Showing posts with label sewing. Show all posts

Friday, January 24, 2025

Kitty Toys...

 I have three cats.  Two of them are kittens who need to be entertained or kept busy.  While looking at a sewing website, I found this toy pattern and thought it would be a perfect little toy.  The kittens can easily carry it around, they can pull on both ends, etc.  This is also a great little scrap busting pattern.  I went the scrap busting route with some leftover corduroy.  I used a 1/3 of the yard of fabric to create four little cattails.   Here is a picture of the cattails before stuffing:


I changed the instructions a little bit.  I did the top fold down with the seams instead of the after stitching the whole piece.  I used a jumbo tube turner to turn each cattail.  


It probably took 30 minutes to stitch and turn the tubes.  The actual challenge with these toys is stuffing.  I used the jumbo tube turner to assist with getting the catnip into the tube.  Here they are stuffed with catnip and tied:


Suprisingly, these were readily accepted by the cats.  Lots of biting, licking, and kicking.  Hopefully, that will be continue.

Happy Stitching!

Tuesday, January 21, 2025

A Packing Cube...

I found this tutorial for making a packing cube.  My niece started a new job a couple of weeks before Christmas and it will include a significant amount of traveling.  I thought this would be a perfect additional to her gear.  This was suppose to be a Christmas gift but life got in the way and now it is a late Christmas gift.  I did not use the fabric stated in the tutorial but chose to use a cute cotton print from my stash.  This makes this a stash buster project.  Now, to be honest, it could also be a scrap buster depending on the size of the scraps you keep hanging around.  Here is the fabric that I chose for this project:


My niece loves cats (as did I) and I thought this would be the perfect fabric for a packing cube. 

The tutorial uses a nylon fabric that does not ravel and I choice a cotton fabric.  I really had to look carefully at the information and make changes as needed.  Here is the finished project:


I put about 4 yards of fabric in the packing cube so that it would not collapse.  


Another view of the fabulous fabric on the back.


A side view.  This gives you an idea of how much more the packing cube could hold.


I did take the time to finish all the seams.  It was time consuming but really a necessary step.

Overall, this was not a bad project.  I am keeping the instructions so I can make additional packing cubes in the future.

Happy Stitching!

Tuesday, November 7, 2023

New Patterns...

 I rarely notice the new pattern release from the big four but noticed a few interesting patterns this fall:

This is Simplicity 9855.  The top pattern does not interest me at all but the pant pattern does.  Here is the line drawing:

The pattern descriptions is "Slim fit ankle length pants with hook and bar closure have belt loops, darted back waist, front pockets and single back welt pocket.".  The pattern sizing starts at a 10 and goes through a 38W.  There is no additional information on the site regarding the pattern at this time.  I would love to see what type of fabric the pattern is designed for.


This is Simplicity 9854.  Here is the line drawing:


This appears to be a good basic coat.  One that you can actually wear in cold weather with clothing underneath.  Yes, that is kinda a diss of the coat styles of the last few years.  The sleeves always seem to be ridiculously narrow.  Here is the description from the website: "Relaxed fit coat features notched lapels, inverted pleat at the center back, button closure and patch pockets with flap."


McCall's 8432.  Ah, I remember wearing this type of pant in the 90s.  Stirrup pants were so nice.  I do not necessarily remember them being pleated but memory is not necessarily accurate.  If I were making this these view A would be without the stirrup and view B would be with the stirrup.  Here you go for those pleated pants.


Butterick 6933.  The jacket and the pants are spot on for what I have been seeing online.  Not so sure about the skirt but if you are looking for jacket and pant pattern this on looks like it would be good. Here is the website descriptions: "Semi-fitted, partially lined jacket has notch collar, shoulder pads, princess seams, welt pockets, and long two-piece sleeves with button trim. Bias, A-line skirt has elastic waist and narrow hem. Full length pants have side front pockets and side seam zipper." 


Vogue 1996.  You like sewing for the men in your life.  This pattern has pants covered.  There is pleated pants, flat front pants, and pockets to make cargo pants.


Vogue 1973.  Finally, a blouse pattern with a bow and two sleeve styles.  I know that a this type of shirt is kinda limiting but you can fit once and make twice.  This was another style that I saw a lot for fall.  Wish the patterns came out sooner.

I guess that is all that caught my attention.  I will say that if you like vintage patterns there are a lot of reproduction in the fall offerings.  

Happy Stitching!

Wednesday, November 1, 2023

Stitching, Stitching, Stitching...Working on the Love Notions Octave Coat

 I am slowing getting my planned projects going for fall/winter.  The next project is the Love Notions Octave Coat.  The pattern and instructions have been printed.  Next, will be taping the pattern together.  That is the down fall of a pdf pattern but you can print it as many times as you need which is a plus.  I noticed this past week that the pattern had been updated.  As far as I can tell the change is adding a new lapel.  Then, I saw that there was a new class for the Octave Coat available.  So it was a yes please, I will take that class.  Another benefit is that by taking the class you get instructions for making a zipped version of the coat.  

This will probably be a slow sew for me.  I never seem to get things done quickly any more.  Even when it should be a quick project.  Just does not happen.  However, the weather has decided to cool off and I really meant for this to be done before that happened.  I am not planning for this to be a heavy coat more like an intermediate coat as the fabric is a suiting weight.  This will be the first coat that I can remember making.  I hope it goes well.

How has your sewing been going?  Have you made a coat before?  How did it turn out?

Happy Stitching!

Wednesday, September 6, 2023

New Sewing Toys...

 I will admit that I enjoy collecting feet for my sewing machines.  In the last year of so, Juki released new feet for the MCS-1500.  I would love to have gotten all of the new items for the machine but they are mostly very expensive.  So, I selected the one I thought would be the used most.  


This is the Coverstitch Clear Presser Foot.  It will be replaced the metal one most likely for all sewing.  I can not express how happy I am about this foot.

The next item that I purchased was for my Bernette B77.  This machine is very limited on the feet that comes with it so I was happy that new feet were released.  I purchased a collection of feet:

This is the Decoration Presser Foot Set.  I was beginning to think that I would never find this set but I finally did.  It includes the following items: 

  • universal presser foot holder
  • ribbon couching foot
  • binder attachment
  • beading and sequin foot
  • pintuck foot
  • embroidery foot with clear sole
  • piping foot
  • zigzag foot with guide
  • roller foot
I admit that some of these feet I am more excited about than others.  The instructions are really lacking for this set but I will figure them out.

Do you like purchasing new accessories for your machines?  

Happy Stitching!


Tuesday, July 4, 2023

Black & White Shift Dress...

 When back in March, I had an inspiration dress that I really loved.  Here is the dress:


The link above is for the post which gives the details on the dress.  Here is the fabric that I found:


Not an exact match but close enough to get the idea.  Yes, I am going to use the Butterick 6500 pattern.  It is already fitted, well mostly. I made changes to the armscye opening returning it closer to the original drafting of the pattern.  Here is a glance at the pattern cover:


I will not be lining the dress this time but I will be using a one-piece facing which gives a very clean look to the dress.  Since the facing is already drafted, I used this video to assist with the attaching and turning of the garment.  This video will work as well.  Two methods that both work well.  Here is a couple of places to find information on installing an invisible zipper - method 1 and method 2,  Invisible zipper is not needed for the dress but I like the invisible zippers.

Here is the finished dress:


Now, I just need some new accessories like a long necklace or a different pair of shoes.

Happy Stitching!


Friday, June 30, 2023

Book Review...Create The Perfect Fit

 I always seem to miss the deadline at the library for returning books.  Of course, this gives me a good excuse to look at sewing books.  I found a good one today - Create The Perfect Fit by Joi Mahon.  I have seen the author's name from time to time but I do not know much about her.  This book is direct and to the point.  It is about fitting  but more importantly explains actually measuring your body and measuring the pattern.  Everyone should take the time to measure your body both horizontally and vertically.  

I believe that most people know to measure their bust and hips when purchasing a pattern range.  Then, get upset when the pattern does not fit out of the package.  I admit this has happened to me.  Only because I went from not having many issues with pattern to "why doesn't anything fit anymore?".  It is all about age, in my opinion. 

The book is broke down into chapters:

Chapter 1 - the basics tools needed, measuring yourself and the pattern, solving issues before cutting

Chapter 2 - vertical torso adjustments

Chapter 3 - horizontal torso adjustments

Chapter 4 - vertical lower body adjustments

Chapter 5 - horizontal lower body adjustments

Chapter 6 - vertical arm adjustments

Chapter 7 - horizontal arm adjusments

Chapter 8 - ease and polished fit

Chapter 9 - garment application workbook

Chapter 10 - Real bodies, real fit 


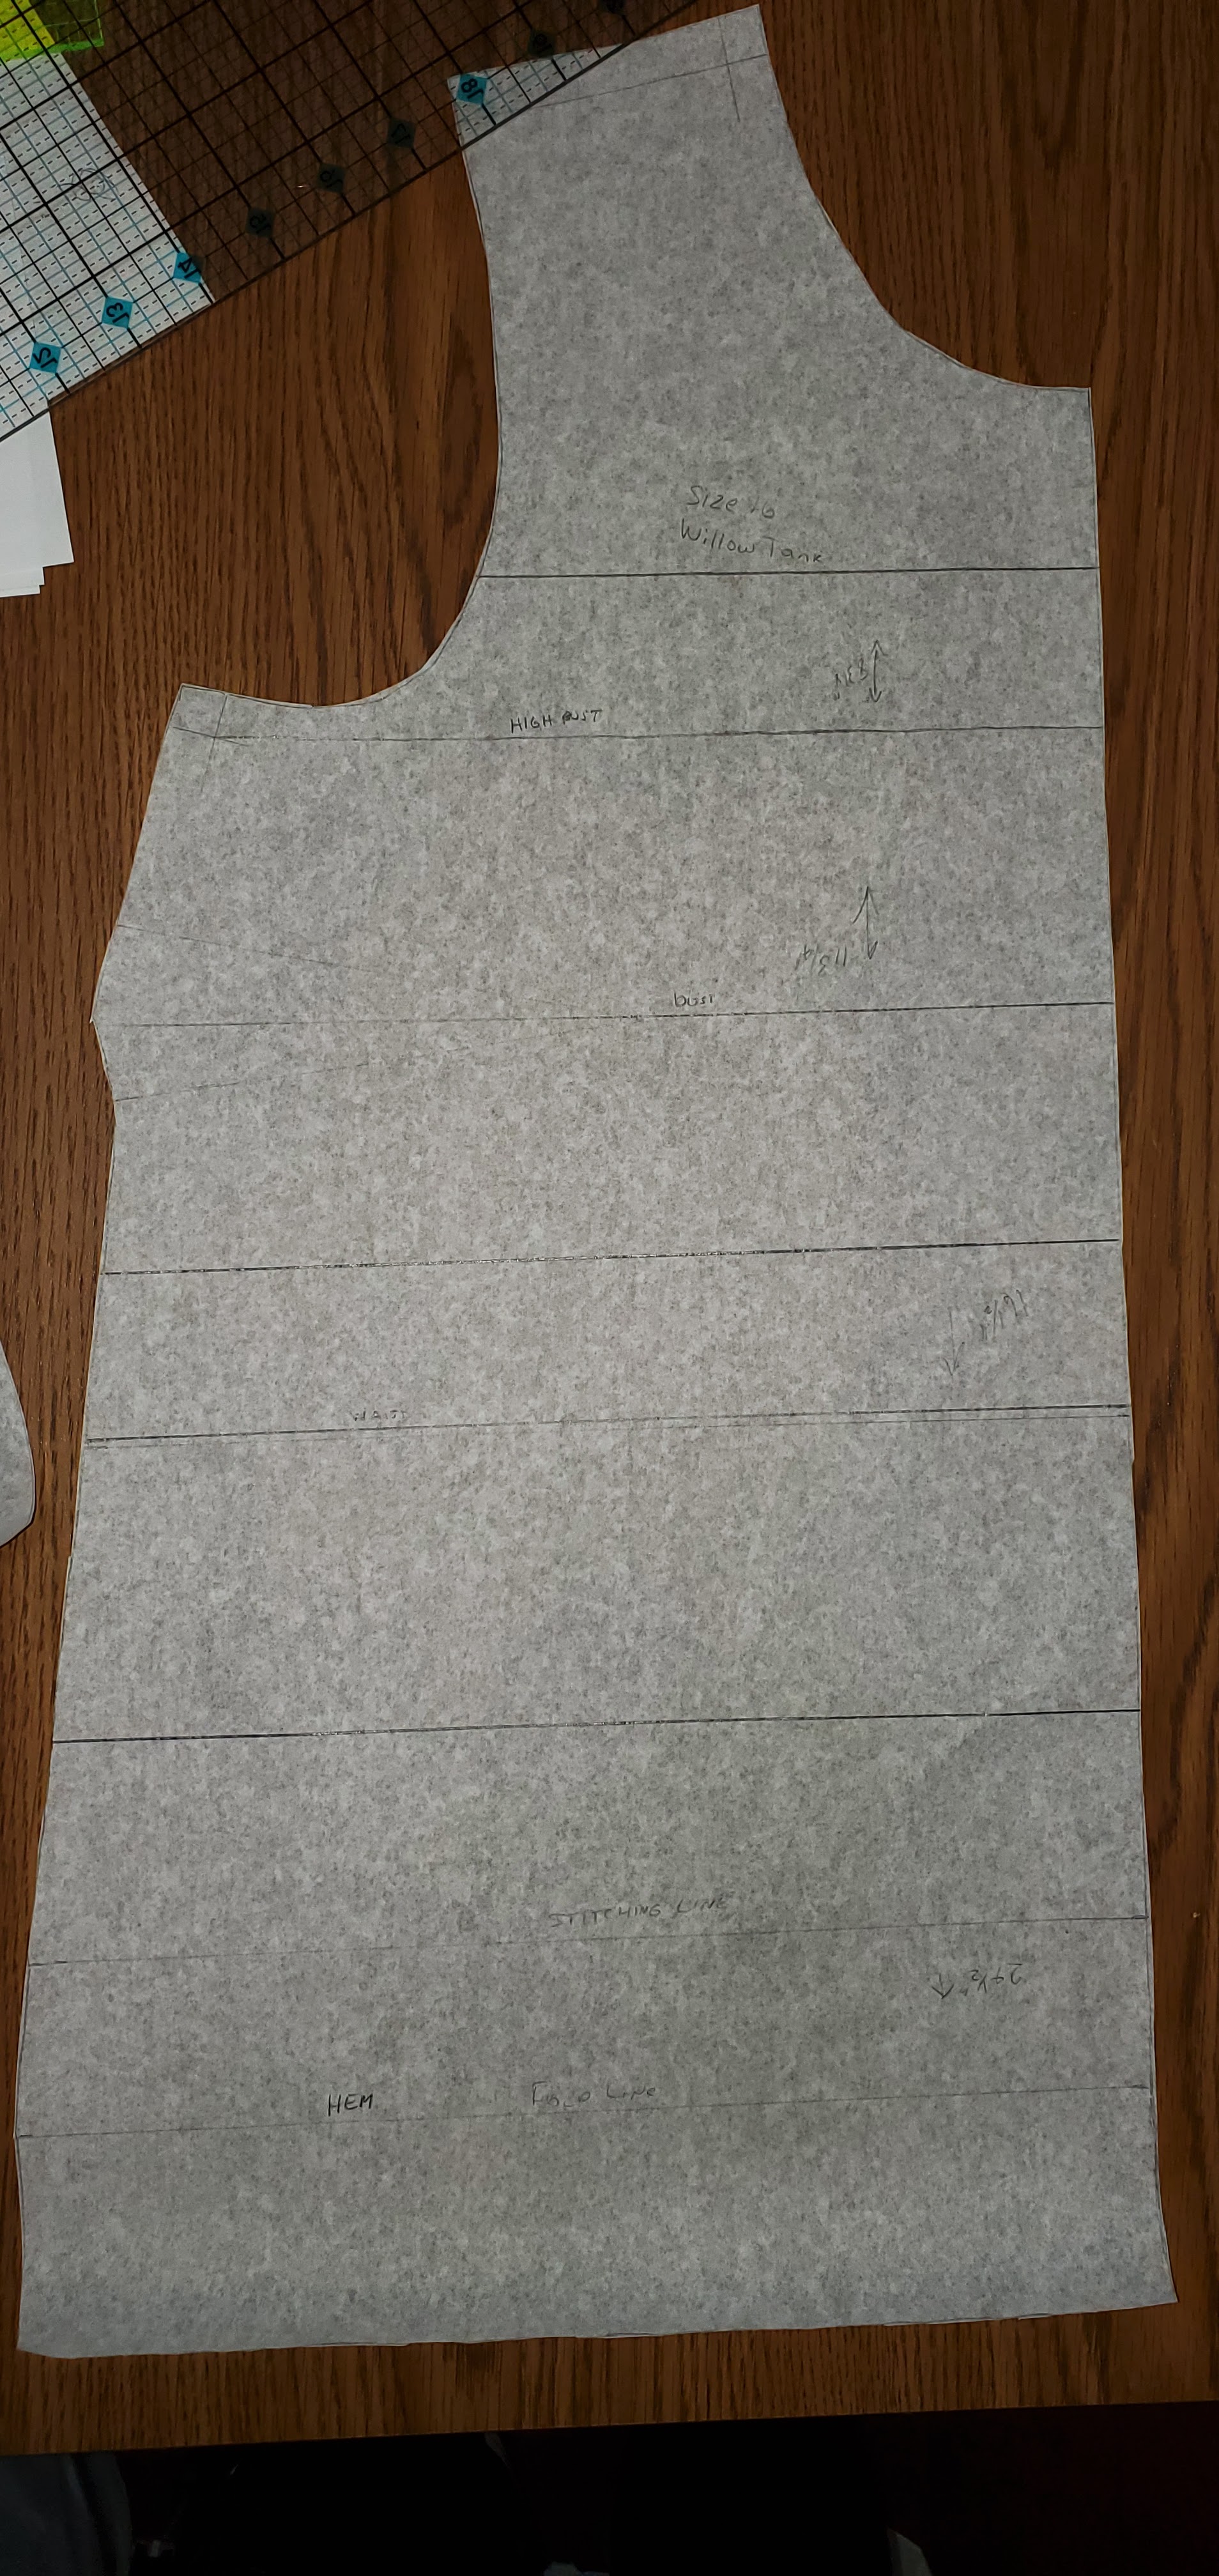
This thinking corresponds with some of the techniques that Peggy Sagers of Silhouette Patterns has taught for years - LCD or length circumference depth.  I use a lot of fitting techniques from Peggy but I think I be able to do better.  I am going to work through the book and see how things look with my basic patterns afterward.  How nice would it be if that muslin only needed minor tweaks to fit?  I do not remember in any of the sewing classes that I have taken any mention of needing to know vertical measurements.  Those numbers are really important.  The Vogue Sewing Book does state to take those measurements.  Yes, I knew to take them be brushed it off as unimportant.  Age has been teaching me that it is important. 

As I work through this book, I will update from time to time to tell you how the patterns look compared to my measurements.  Circumference is not usually an issue because I purchase by hip/waist with the exception of the arm.  Length though is a different animal all together.  I have only recently been checking lengths on a pattern verses lengths on me and it has been a real eye opener.

Have you read/followed this book?  How did it work out for you?    What do you for fitting? Just guess, make a muslin and adjust, etc.

Happy Stitching!

Tuesday, June 13, 2023

I Just Can Not Stop Myself...

 What can I not stop myself from doing?  Buying patterns.  I have slowed the fabric buying down immensely.  Here is the line drawing of my latest purchase:


Yep, this is the Love Notions Cadence Dress and Top pdf pattern.  It was on sale this past Friday and since it is like a woven t-shirt I decided to get it.  There are a lot of options with this pattern - 2 necklines, 5 sleeves, 3 lengths, and a full bust option. 

I do not know when I will get to this but hopefully before the end of summer.

Do you find yourself purchasing patterns?  

Happy Stitching!

Tuesday, February 28, 2023

Color Blocking...

 Have you noticed the amount of color blocking this year?  Here is a cute patchwork coat video.  How easy would that be to accomplish?  The fun part going through the remnants.  I have been doing just that but my linen, linen/cotton remnants are not in fun colors.  More like blues and grays which is what I wear a lot of.  Here is an blog post on color blocking at Deer and Doe.  Here is a pinterest board with tons of color blocking inspiration. Here is an example of a shirt:


This is a Lafayette 148 New York Striped Colorblock Button Down Shirt.  Price tag: $798.00.  Details can be found on the Neiman Marcus website.

The price on the shirt seems like a lot.  If it was just left over pieces of fabric pieced together. It would be essentially free, right?  I suppose you actually have spent money on the fabric and you should use every little bit that you can possibly use.  

I have actually been going through my remnants/scrap fabric.  I intend to make a scrappy quilt but I also have many pieces of linen/cotton or just linen.  I may try to figure something out because why not. A scrappy top could be fun.  Add a bit of embroidery or other embellishment for some fun.

Have you given any thought to the color blocking trend?  Remember to check out quilting sites/blogs for additional information on putting colors together.

Happy Stitching!


Friday, February 17, 2023

New To Me Online Fabric Shop...

 I found a new fabric shop today.  It is called KnitFabric.com.  As the name suggests, they have knit fabric and some woven fabrics.  If you subscribe to their email list, you get 10% off your first order.  There is also a rewards program.  Check out the website to learn about about the rewards program.

I am particularly interested in the Sweatshirt Fleece with matching ribbing.  There is some Polartec fabrics as well.  Those make very nice pullovers.  There is selection of water repellant fabrics and Softshell as well.  They would be perfect for a light weight rain jacket. Oh, a button in liner with the Polartec fabrics with be wonderful as well for the jacket.

My imagination has been running away planning future projects.  I will post my first fabric purchase when it occurs.

I am an affiliate of Knit Fabric.   Any purchases made through my links will result in a small commission to me at no cost to you.  Thank you!

I am off to see what I need from this site.  Planning must be one of my favorite parts of sewing judging from the size of my stash.

Happy Stitching!

Thursday, February 16, 2023

Starting A Christmas Project...

 While cleaning my sewing room, I discovered a forgotten project.  I am positive that I purchased it before I closed my quilt shop so maybe I have had it since 2017.  I think it has marinated long enough.  Here is the pattern:


I also found that I had all the notions to go with it:

Now that I have rediscovered all of this, I am going to make it.  Going through my scraps and small yardage pieces, I found the following fabrics:


The only fabric that I might change out is the one on blue Santa one on top.  That particular fabric is for the backing and I might pick something else.  The front of the Santa has to be finished first any way so there is lots to do before the backing has to be picked out.

I have a lot of projects in the works (fitting the Love Notions Classic Tee, the Love Notions Allegro Pants, finishing the binding on a quilt, making many yards of piping for my slipcovers, and Santa).  It has been a long time since I have had time to work on multiple projects at once.  Hopefully, I can handle it.

Happy Stitching!

Friday, February 3, 2023

Willow Tank Round 2...

 I have continued working on the Willow Tank muslin.  In the last post, I was going to increase the armhole depth by 1/2-inch.  I did this but it still wasn't enough.  Then, I made the change equal to 3/4-inch.  I think that is perfect.  This put the bust dart when it should have been, I think.  I draped the bust dart and pinned in another inch.  Here is the results of those changes:

In this picture, the length from the shoulder to the bust is better.


In the picture you can see the bust dart positioning.  I think the location is good but needs to be a bit shorter.  I can still a little bit of rippling along the back armscye.  I think that means I need a little bit more length and I will do a small increase at center back by 1/4-inch.  


This is so you can see the difference in the hang of the top from left to right.  The left side has the larger dart pinned in.

The back view with the armhole depth enlarged from first go around.  It is the same 3/4-inch. I do not see any additional pulling under the arms.  I do see some strange wrinkles that I am not familiar with.  They look like backward parenthesis about where the bottom of the shoulder blades would be or bottom of the armscye.  

A little more alterations and I enlisted the help of the photographer:


I have hand stitched larger darts.


The front is hanging better with the larger, shorter dart.


The back is hanging much better.  The weird backward parentheses is mostly gone.  A 1/4" high round back alteration was done.  When I restitched the side seams, I only stitched to the waist leaving the remainder open to see how the wrinkles looked.  I think the answer is that the width of the pattern doesn't match me yet.  It could be that the waist is hanging lower than should which would be the width of the hip in the wrong.  Regardless, I need a little more space for the backside.  Here is the finally version of the pattern:


Folks, I am going to call this pattern ready to sew the spring/summer wardrobe in April.  The changes need to be transferred to the pattern.   I might have to redo this if I happen to lose more weight but if I do not then I can whip a couple of tops and a dress with this pattern fairly quickly.

One item checked off my list.

Happy Stitching!


Tuesday, January 31, 2023

Willow Tank - 1st Muslin...

 Following last week's measuring session, I have cut out and stitched a muslin of the Willow Tank.  I am pleasantly surprised.  The fit was not too bad but I would say I mismeasured on the armhole depth because it is really tight. Making a mistake on the first length measurement has repercussions all the down the garment.  Here are the photos:


As expected, there are depth issues. The bust dart needs to be a bit larger.  You can see the diagonals wrinkles going from the bust to the hem.  The bust dart is actually a little too high which is partially due to the armhole depth being too small.  It could also be an bra issue as I have a different bra on now verses when I did the measurements.


Now you can really see the depths issues with the cup sizing and the dart being too high.  I can also see an ever so slight indication that I need a little more space for my back.  A small high round back alteration.  


Mostly the same issues are the left side.


You can see the issue with the armhole depth here.  The arnscye is really tight in the back.  As far as the wrinkling in the back.  I am going to leave it for now.   When I open the side seams for the draping of the dart, it may show I need more circumference.  

Changes that I will do on this muslin:

    1.  Insert 1/2" of fabric for armhole height.

    2.  Drape dart.

    3.  May add a high round back adjustment.

    4.  Double check circumference at hip.  I do not think that I actually did this when I was measuring.  

Hopefully, I can get back to this quickly.  My mom is moving to an apartment very soon and I seem to be the main packer.

Happy Stitching!

Thursday, January 26, 2023

Starting The Project List...The Willow Tank

 Today, I started working on my Project List.  I have started with the Willow Tank pattern by Grainline Studio.  I started here because I have space to work it instead of one of the larger projects.  Here is a view of the Willow Tank:


I purchased this pattern a couple of years ago thinking I would make some new tanks for the following summer.  Did not happen.  

I traced a size 18 and I am now checking the lengths on the pattern.  I know that there will be depth issues because this pattern is drafted for a B cup but that will easily be taken care of once I have a muslin made.  Well, I actually traced the pattern last summer or fall and it seems that I have lost weight which has resulted in needing a size 16 instead of the size 18.  It is a shocker.

Now, repeating the same exercise with the size 16 instead of the size 18.  Here is the pattern pieces with marking at the bust, armhole, waist, hip, and marking for making lengths changes:


Now, the interesting part happening.  I started measuring and was very surprised.  I knew that I was short between high bust and shoulder but was surprised to see how much.  I knew that my torso was long.  Here is the changed pattern:


I reduced the length of the upper torso through the armscye by 1 1/2 inches.  That is a lot.  I added 3/4-inch above the bust and 2-inches above the waist.  All I can say is wow.  

This is an experiment on part.  I have never been one to change the pattern before making a muslin.  I am following along with Katrina in Lifting Pins and Needles on the Let's Sew Our Best Fitting Woven Top Series.  Check it out.  

Next, I will make a muslin and see how it looks.  My muslins are almost always snipped and tucked.  I do expect to increase the dart.  I generally do this with the muslin and then make the changes to the pattern.  I will see if doing the length changes a head of time make short work of the muslin.  

Some links on this page are affiliate links.  Should you use one of the affiliate links to make a purchase, I would receive a small commission at no cost to you. Thank you!

Happy Stitching!

Thursday, January 19, 2023

First Rope Bowl...

 I could not resist playing with the rope more.  It is such an addictive process.  I played until I ran out of thread which means that I get to make a trip to JoAnn Fabrics.   I am going to try a little rope bracelet also so I will look at the buttons while I am there.  Here is my very first attempt at a bowl:


I know it is not much to look at but I am rather proud of it.  It measure 6 to 7 inches at the base and is about 3 inches tall.  No idea what I will do with it.  One thing is for sure I will try a larger diameter on the rope.  The rope that I got was 3/16-inch.  I think 1/4-inch or 3/8-inch rope would be a bit better.  

Okay, I will be starting clothing projects soon.  I really need to make some new tank tops this year and I definitely want to have them done before warm weather is here.  

Happy Stitching!

Tuesday, January 17, 2023

Stitching Again!

 It has been a long 6-7 weeks of not being able to sew because of my knee/knee brace.  However, the velcro on the knee brace needed replacing and it is hard to realize that a knee brace that costs just less than $1000 could not last through the time needed to wear it.  Yes, that meant that I was stitching without my brace on but I was very careful while I worked on the replacing the velcro on the knee brace.  

I can not express how happy it made me to be able to sit down at a machine and stitch.  Even if it was a repair.  Later in the day, I decided that I needed more time in front of the sewing machine.  Before my little accident, I was wanting to play with rope and had purchase 100 feet.  I had borrowed books from the library.  Then, accident, unable to sew, and books returned.  I did read through the books though.  So, here is my very first rope project - a little trivet:


I am so pleased with this little trivet.  Not sure exactly what size is but fit in the arm of my sewing machine so maybe 7-8 inches and I used 30 to 40 feet of rope.  I can see why this is so addictive.  It is easy sewing and can be very creative.  I used a natural cotton rope 3/8" with a natural cotton colored thread.  Image all the fun that can be had using different threads both solid and variegated. little bits of fabric, or even different colored ropes.  However, I can not let this enthusiasm take over from my list of projects but it will certainly have a place among the list of things to do as I can have fun.  Just so you know my list is rather fluid.  It has to be for me to enjoy what I am doing.  

Happy Stitching!

Monday, January 2, 2023

A Look Back...2022 Sewing Winners

 The year of 2022 was incredibly busy which limited my sewing a little bit.  I did manage to finish one long term ufo - a quilt:


There are multiple posts on the blog regarding this quilt.  You can read a little about it here.  

Just a blurb - some of the links may take you to pages that contain affiliate links.  If you purchase anything through these links, I will get a small commission.  Thank you!


Now, I'm going to say that most of things that I stitched this year were winners but not everything.  Here are the winners:


This Merchant & Mills Camber Set Dress was a winner.  It was worn weekly after it was made.  You can read about it here.  I think I need a couple of tops made with this pattern as well.


This Itch to Stitch Celeste Dress is a winner as well.  Once I figured out how to fit for this pattern company, it has been easy.  You can read about it here.


 This is the Itch to Stitch Soller Dress and Top.  These items were made late in summer and were fabulous.  Both made it into fall weather with a sweater when needed.  Loved and worn just about weekly.  You can read about it here.


This is a McCall's Camp Shirt pattern from the early 2000s.  It is the only shirt I made for my husband this year.  It is very much hobby themed and has been worn a lot.  You can read about it here.


This is the Love Notions Allegro Pant.  These pants have been worn a lot.  When the temperature gets in the 90s and above, I tend to wear dresses more but it is a great pant pattern.  You can read more about this pattern here

So, that is my short list of winners for last year.  Hope you enjoyed reading about the my winners.

Happy Stitching!