Showing posts with label Gifts. Show all posts

Tuesday, January 21, 2025

A Packing Cube...

I found this tutorial for making a packing cube.  My niece started a new job a couple of weeks before Christmas and it will include a significant amount of traveling.  I thought this would be a perfect additional to her gear.  This was suppose to be a Christmas gift but life got in the way and now it is a late Christmas gift.  I did not use the fabric stated in the tutorial but chose to use a cute cotton print from my stash.  This makes this a stash buster project.  Now, to be honest, it could also be a scrap buster depending on the size of the scraps you keep hanging around.  Here is the fabric that I chose for this project:


My niece loves cats (as did I) and I thought this would be the perfect fabric for a packing cube. 

The tutorial uses a nylon fabric that does not ravel and I choice a cotton fabric.  I really had to look carefully at the information and make changes as needed.  Here is the finished project:


I put about 4 yards of fabric in the packing cube so that it would not collapse.  


Another view of the fabulous fabric on the back.


A side view.  This gives you an idea of how much more the packing cube could hold.


I did take the time to finish all the seams.  It was time consuming but really a necessary step.

Overall, this was not a bad project.  I am keeping the instructions so I can make additional packing cubes in the future.

Happy Stitching!

Tuesday, December 31, 2019

Butterfly Chair Covers...

My son requested that I make some new butterfly chair covers for Christmas.  I admit that I groaned just a little bit.  I had made one cover a few years ago.  I found the pattern and some fabric but not enough to make a cover.  Here is the post with the picture of that cover.  You will have to scroll down a bit to find the cover.  I was really hoping to find some instructions because I wrote very few notes on the pattern.  Unfortunately, no additional notes.

Oh, the request was also for the same fabric and color combination.  So, I began the search for the black canvas.  I settled on a 9 oz canvas from James Thompson at fabric dot com.  The last cover was a 10 oz canvas that I had in stock at my store.  Oh, why didn't I keep more of the fabric.  Fortunately, I found enough of the gold canvas in the stash to create the stripe.  Yes, stash reduction.

The width of the pattern is just enough that I had to cut each piece of the cover individually.  Yes, this is 4 cover pieces and 4 padding pieces.  This doesn't include all the little pieces that are needed for pockets and support.  So, it was cut, cut, cut, iron, iron, iron, stitch, stitch, stitch.  Here are the covers:


The top picture is the black front with the gold stripe.  The bottom picture is the back where you can see all the pockets.  Each pocket has two velcro strips to place around the poles and strapping to help support the cover on the frame.  I did add an additional support fabric in each fabric in hopes that it will help support the pockets.  The pockets are the weak area of the whole cover.

I hope my son gets a few years of wear out of them.  I do not believe that I will want to make another set of covers.  Hopefully, by the point, he will no longer be a student and have a full-time job.

Happy Stitching!


Thursday, December 26, 2019

Neck Tie Zip Bags...

I always try to make something for Christmas.  This year, my Dad gave me 95% of his ties.  He no longer wears ties.  I decided to make something for the grandkids from the ties.  I found this tutorial for Neck Tie Zip Bags. 

Have you ever taken a neck tie apart?  It is mostly easy but time consuming.  Here are the guts of the ties:


I am not 100% sure what this material is that was used for the tie interfacing.  Only two of the six ties actually had similar material.  It seems to be different than the tie interfacing that I have purchased in the past.  I think I have two precious of the tie interfacing left in my stash.  I did save this tie interfacing.  I am sure some day my son will wonder why I kept this.

Here are the bags:


It was fun picking out the ties for the project.  The bags were fairly easy to construct. 

Happy Stitching!

Friday, June 28, 2019

Seat Belt Pillow...

A month or so ago, my Dad had a pacemaker put in.  He was recently released to start driving and such and found that the seat belt was uncomfortable.  I'm not comfortable with him driving with the seat belt under his arm.  So, I went on a search for a pillow to make wearing the seat belt a little more comfortable for him.  Since I sew, I wanted to make this for him.  I found this tutorial - How to Sew a Seat Belt Pillow on youtube.  It seemed easy enough to follow.  I check the cotton stash to see what was available and found something that I hope will make him smile a bit.  I changed the dimensions just slightly due to the size restriction of my fabric.  Here's the finished product:


For those who may be looking for a similar product, there are versions for sale on Etsy.  Here's one that is fairly inexpensive - Seat Belt Pillow.  This would be a great charity item to make and gift.

Happy Stitching!

Wednesday, December 26, 2018

Christmas Sewing....

I try to make a few things every year for Christmas.  This year it was just for my immediate family.  Here are the results:


This was actually a request from my son.  There are two identical shopping bags.  This is a cute potato chips print that I found in the stash.  I used the grocery bag pattern from Creative Thimble.  This is the fourth set of these bags that I have made.  The hardest part of these bags is the cutting out.


Yeah, I know this doesn't look like much but it is a bag to put potatoes in.  As I'm sure you know, it is best to keep potatoes in the dark.  The last time I was at my son's apartment, he had them sitting out on a shelf in the open.


Another simple bag.  This is a linen bag made for bread.  My husband enjoys baking bread so I thought I would make a variety of bread bags.  Unfortunately, this one is the only one that was finished before Christmas.  I'll try to remember pictures later. 

By the way if you haven't worked with 100% linen, it is an absolute delight to work with.

Hope you seasonal sewing brought you joy!

Happy Stitching!


Saturday, July 28, 2018

Indygo Junction Sale...

I thought I would let you know that Indygo Junction is having a Christmas in July sale through the end of July.  It's a buy 2 patterns and get one pattern free sale.  That's a pretty good sale.  So, go take a look and think about any type of gift you might want to make and give.

Get inspired and sew, sew, sew.

Happy Stitching!

(affiliate links included)

Thursday, April 26, 2018

Kitchen Towels...

Last year, I purchased a bolt of toweling with in intent on making new towels for my kitchen in Pennsylvania then life changed.  I will probably still make some towels for myself but for now I made 6 towels for my son who is moving into his first apartment soon.  I hope he likes his towels.  Here they are:


It really can't get easier to make towels using toweling.  Just ironing the hems and stitching them down. 

During the process of pressing the hems, there was a bit of excitement at my house.  I have an older Rowenta Pressure Iron & Steamer.  I know many people have had issues with this iron but the one I have is around 12 to 15 years old and has always worked well.  Anyway, getting back to the pressing of the hems for the towels, I was taking my time pressing taking many breaks.  I kinda forgot about my iron after finishing the last towel.  All the sudden, there was a loud pop and lots of steam.  Really scared me!  I quickly unplugged the iron and give it a little bit of time to cool.  My husband comes home and I explain to him what happened.  He takes the iron apart, checks the tank, declares it ok to use, resets the tank so that it is no longer at an angle, cleaned the tank, and gives it back to me.  I HAVE NOT TRIED IT.  I'm a little scared of it.  He assures me that it is okay to use.  What would you do?  I did purchase another iron but it isn't the same as the old Rowenta.

Happy Stitching!

Friday, December 29, 2017

Kismet Trinket Boxes....

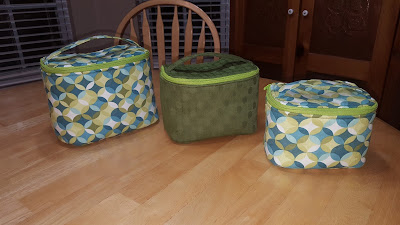
As part of a gift for a relative, I decided to make a set of rectangle Kismet Trinket Boxes by Sew Sweetness:


I had asked if they were interested in any additional fabric storage containers and they responded with that they love some with lids.  This particular pattern fit the description.

I made pattern pieces by drawing and tracing. Then, I carefully cut out all the pieces for each box and pinned them together.  The zipper instructions were a little difficult for me to understand but I finally managed it.  Here's my versions:


I love how this little boxes turned out.  I hope that the recipient likes as much as I do.

Here are the notions that I found to be very useful:


seam ripper and it was new, a Sew EZ Fingerthing, and Wonderclips.  I've included links to Etsy for the same items.

All in all this was a challenging project but fun.

Happy Stitching!

Tuesday, December 26, 2017

Bendy Bag....

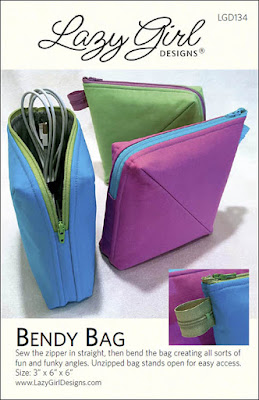
As part of a gift for a relative, I decided to make a pair of the Bendy Bags by Lazy Girl Designs. 


Here is my effort:


I thought that they turned out fairly well even with the issues that I had.  I am unsure of how long it actually took me to complete these little bags because I worked on them over a couple of days. 

The fabric was a joke on my part.  This particular relative had asked for $1M dollars and one of the bills on the fabric is a $1M bill. 

I did draw out the pattern pieces for this project.  I did cut out the pieces individually.  Next time, I will stack all the fabric and cut out in one swoop.

Things that I found confusing in the directions:

1.  The zipper - The instructions for the zipper application were good.  What a found a bit confusing was that the supply list says that the zipper size is 14" or longer but the directions are written for a 14" zipper only.  Once I realized that the zipper diagram was representing a 1" grid, I figured out how long the second cut on the zipper was suppose to be and where the stitching on the zipper was suppose to be.  I also missed the bit about the zipper casing and had to redo that part. 

I think that was the only part of the instructions that I had any issues with.  Fortunately, all issues were correctable.

I may make these again.  Little bags to organize stuff in are always needed. 

Happy Stitching!

Friday, December 30, 2016

Mug Rugs....

As a gift a quick extra gift for my Mom, I decided to attempt some braided fabric mug rugs.  I can assure you that for me, this wasn't quick.  I think the braiding took the most time.  I completed six mug rugs.  Here is an example of what I made:


I chose a green and cream fabric.  Here and there you can see the little hearts.

I used the Braided Rag Rug Coaster tutorial at Six Two Seven Handworks.  It is a pretty good tutorial.  I accomplished what I wanted.  There is also a youtube video for the sewing portion.  I did watch it a couple of times.

I guess I will return to the quilt making for a bit.  I have enjoyed working on something besides a quilt for a couple of weeks.  I do have a few other items that I would like to create but maybe I can work out a schedule where the quilt gets worked on and the other projects get worked on, too.   I want to sew some clothes.

Happy Stitching!


Tuesday, December 27, 2016

Button Boats....

Have you see the new Lazy Girl Designs Button Boats?  I thought they were so cute and ordered them immediately.  It felt like it took forever to get it and the other items needed.  Here's a look at the pattern:


Yes, the one's I made are just a cute!  I just don't have the photography skills to go with.  Here's a look at one the boats I created:


This is the back (L) and front (R) in the flat form.  Here it is in boat form:


I did make two of these and they were so much fun to create!  I did purchase the 10" squares of the stiff stuff and that worked out great for me. I made these for my niece as a gift for her craft room in her new house.

Pattern Review:

This pattern was very easy.  Purchasing the 10" squares of stiff stuff probably helped with the ease.  This is a rotary cutter project.  I'm fairly slow when sewing and it only took me couple of hours to create these.  The hardest thing was figuring out how to do the ties.

I hope my niece like these.  I tried to get a colors that would work in her craft area whether it was sitting out on a table or sitting on a shelf.

Happy Stitching!