Thursday, November 30, 2017

Sewing Pants for Women...Preparing the Pattern for Alteration Step 6, Part 7

Continuing with the Sewing Pants for Women by Else Tryoler.  Today, will we start with Step 6 of the seven giant steps to pants perfection:

Leg Alterations:

How tight should a pants leg be?  A woman with particularly heavy thighs or heavy knees will be more comfortable and look more presentable in wider ones.  A pleasing hem width would be one equal to the calf measurement.  For a semi-tapered look use the calf measurement minus about 1-inch. 

To widen a pants leg:  Add an equal amount to both Front and Back at the hemline, continuing up in the same manner past the knee line.  Taper in to the lower hip line.


To attain the popular tapered look, first check your chart for your instep measurement, or you'll have a lovely pair of tapered pants you can't get into!  Taper an equal amount on all four seams at the hem-line, blending into the seam-line and running slightly above the knee.  For very slim legs, taper all the way to the crotch and hip line.  See dotted in line in Figure 22.  Whenever you change the width of the legs, it must be done in equal amounts on all four seams to keep the crease line in the true center of the knee line. 


Question:  Can you tell that this is written in the early 60s?  How does the statement in the first paragraph apply to today or does it?

Happy Sewing!

Friday, November 24, 2017

New Patterns....

I haven't looked at new patterns in quite a while but I have finally decided that it didn't hurt to a bit.  You know I found something that I would like to get.

This is Vogue 9291.  I really like View C and I like View D.  I'm not 100% sure that you need a pattern to recreate either look.  I usually see capes like View C done in a fleece but this pattern calls for a coating.  I'll have to think about that.  I think I would prefer something a little lighter than coating.

Surprisingly, this was the only pattern at the big 4 that was of interest.  Now, I need to think about whether I really want to recreate this.  I did find online tutorials for View C and generally they are called a Tuck Cape.

What do you think of this style of cape?

Happy Stitching!

Thursday, November 23, 2017

Sewing Pants for Women...Preparing the Pattern for Alteration Step 5, Part 6

Continuing with the Sewing Pants for Women by Else Tryoler.  Today, will we start with Step 5 of the seven giant steps to pants perfection:

Waist and Dart Alternations

By manipulating the darts in a pattern you are molding your figure on paper, much as a sculptor does in clay.  Is there a great difference between your waist and hips?  Then it follow that you will need deeper darts, or more of them.

A curve on you requires a dart in the pattern.  We cannot change your curves but we can change the darts to fit them.  Study your figure in a mirror to assess what the measurement chart has told you, and roll up your sleeves.

To adjust waist:  Take your waist measurement and add 1-inch for ease.  This is a very important one inch, for when it is properly eased onto your waistband it will eliminate all the unsightly wrinkles sometimes found below that area.  When sewing, direct the ease to the places where the curves are more prominent, such as over the abdomen or above especially full hips.  Otherwise, distribute the ease evenly, except between the seat darts where none at all is required.

To make the waist smaller:  Study your figure.  Do you have additional curves at the sides below the waist, often called a "shelf" or "pillow"?  If you do, place an extra dart in the waistline of your pants.  It can be located either in front or back, depending on the area of greatest need.  This dart, usually about 1/2-inch deep and 2-inches long, is called a baby dart because of it's small size  It is placed halfway between seat dart and side seam or front dart and side seam.  See Figure 15.  A slightly deeper and longer dart is used to fit a protruding hip bone at front running down to meet the most prominent point of the hip.


Depth and length of darts:  The length and depth of darts can be changed to fit your individual figure.  Always remember this about the length of darts:  they must never run over the curve.  Darts are used to provide fullness for a curve below.  If they do not stop short of the fullest point, their purpose is defeated.

Look at Figure 16 and see how the back dart stops above the fullest part, indicated by the hip-line.  It an stop as much as 2 to 3 inches above the this point, depending on the need of your figure.  Notice that it is a much deeper dart than the front dart, indicating that the back curve is more prominent.

The story for the front dart is quite different.  The lesser curve of the abdomen requires that the dart be bother shorter and shallower.  But quite frequently the front dart and the back darts are pictured as being of equal length and depth!   You will recognize this familiar problem.  The long line of that front dart looks very striking in a sketch, but has the opposite effect on the body.  If the dart is stitched down straight over the tummy (which rides rather high on most of us), the result is a distressing pull and a fullness at the end of the dart.  You may have had the same experience with a skirt, which, fitting too tightly across the tummy, puffed out below.  The front dart is too long and this is what to do about it.

In either a pattern or a finished garment, reduce both the length and the depth of the offending dart as shown by the broken line in Figure 17.  You may make one dart if you need extra width to enlarge waist or split it up into two smaller darts, as suits your fancy.  The chart below will guide you in assessing the proper dimensions.


*where there is an abundance of curves, two darts may be placed in the front or in the back.

Remember that your tape measure does not tell all.  Use a mirror and a judicious eye to judge your type of figure and the darts required.  You are working on a standard pattern or garment, so determine whether your figure is standard or on the plus or minus side in some places.


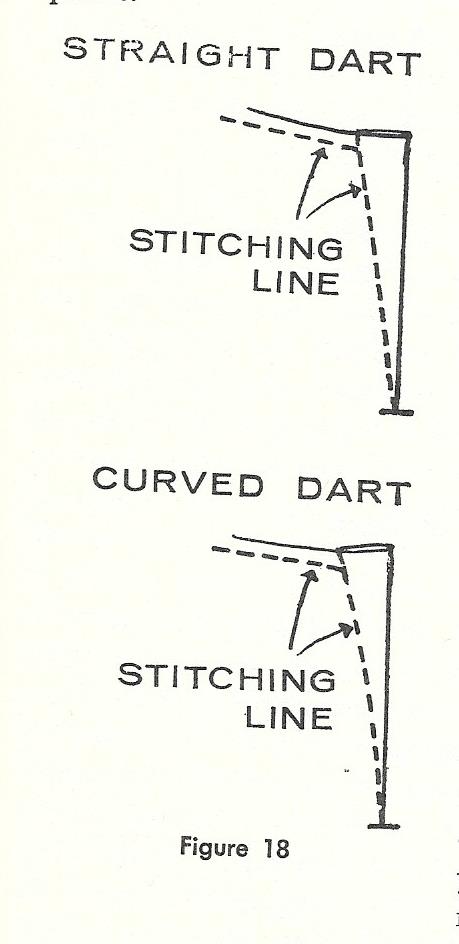
Stitching darts:  Figure 18.  With darts, the proof is in the stitching.  There is no hard and fast rule that says a dart must be straight.  The majority of figures will fair quite well with straight darts, but if yours is an abundantly curved shape use curved darts. Remember this when setting needle to cloth.

Another point, mark the end of your darts with a horizontal line so that you know when to stop stitching and end up with darts of a uniform length.  It doesn't matter whether you stitch from the waist down or from the horizontal line up.  Once you have placed your darts with the right depth and length, you may have a free hand in the rest of the operation and sew in either direction you choose.

Remember, in adjusting a waist, first adjust the darts for your abdomen and seat.  Do not make the common mistake of operating on the side seam only.


For a prominent seat:  figure 19.  Since you have selected your pattern by hip-size (pants patterns should always be bought by hip measurement) an alteration for an overabundant seat is actually a reduction in the size of the waist in the back.  Place a second dart 1-inch deep and 1-inch away from the existing one.  Reduce the original dart to 1-inch -- see the broken line on figure 19.

Figure 20. If further reduction is needed, take 1/4-inch off the center front seam, tapering down about 3-inches.  The method is illustrated by a broken line.  Do the same to the side seams both front and back.  No more than 1/4-inch to 3/8-inch should be removed in this manner.

To make the waist larger:  First adjust the darts.  Make them shallower or eliminate one dart all together.  For a particularly flat seat, decrease the seat dart to 3/4-inch or 1-inch -- then add the side seams, front and back equally.

Perform the same operation for an unusually flat abdomen. In this case, you will need only one dart about 1/2-inch deep.  If a still greater addition to the waist is needed, add it at the side seams, front and back equally.  Always work through the darts first, then resort to the side if more alteration is needed.


Diagonal darts, Figure 21.  Diagonal darts may appeal to you as a style feature, or as a solution for prominent hip bones.  In either case, change your darts to a slant-wise position.  Either a flat abdomen or protruding hips -- the two conditions often go together -- can be fitted by swinging the darts to meet the nearest prominent projection.  Darts are placed in your pattern to help you fit the complexities of your figure.  You are not bound to use them as is; you are free to move them wherever they will do you the most good.

Question:  Have you ever heard of making alterations at the center front either adding or subtractions?  I have always thought that this was a big no-no in the sewing world.  I did note that there was no suggestion of adding/subtracting from the center back seam.  Thoughts?

Happy Sewing!

Wednesday, November 22, 2017

Inspiration....

I found this lovely tank by Nic+Zoe:

.

I love the styling!  Do you think the front is a double-layer with the top layer having a seam.  I have a pattern for a t-shirt with a similar neck opening, I think.  I haven't actually seen it since the move.  I think I may give this a try for spring.  This is actually part of the winter  retreat collection for Nic+Zoe and can be found on their website.  Price tag:  $98.00

Then, I found this:


Same styling but with sleeves.  Oh, I hope I can figure this out.  I love this, too.  This is part of the Inside Out at Nic+Zoe. Price tag:  $118.00.


Happy Sewing!

Tuesday, November 21, 2017

Asymmetrical Skirt...

The sewing room is almost ready and I'm lining up the sewing projects.  I feel like I can spend days sewing.  I don't think I've had this long of a break in years.  Here's my inspiration picture:


This is the Nic & Zoe Mod Twirl Bias Cut Skirt.  This is pull-on style made from a cotton/rayon fabric.  Only $148, you can find it at Neiman Marcus.

I don't have a pattern for the pull-on styling but I'm really loving the hemline.  So, I'm going to go with this pattern from Silhouette Patterns:


The basic silhouette will be very similar to the inspiration photo.  I found a gray wool in the stash that will be perfect.

I think I need to check out tops and see what I have to go with all of these skirts that I'm planning.  We all know if there isn't a top that it will become a sad little orphan in the closet.

Happy Sewing!

Monday, November 20, 2017

Getting a Little Bit Crafty....

The sewing area is still in the organization stage and I have been wanting to create so badly that I have turned toward crafty.  A new house needs new decorations for the holidays, don't you think?  I created a wreath:


This is the very first time that I have done something like this and I'm mostly happy with the results.  I may play around a bit more with the ribbon placement, the greenery placement, and added a few ornaments.  I think it is could just be finished.

I found the tutorial for the wreath on youtube:  Ruffled Burlap Wreath.  The lady doing the tutorial gives information on where to get supplies.  All of the items for this wreath were purchased at Walmart with the exception of the ties that I'm using to hold the greenery picks in place.  Those were found among my husband's stuff in the garage. The ornaments found at the Dollar Store.

We were sad to find out that there isn't a Michael's nearby.  The closest one is an hour away.  Fortunately, family live in the town where Michael's is located so we will still be able to grab stuff there occasionally.  I kid you not when I say that Walmart's holiday picks selection was slim at best.  There was maybe 6 or 7 styles and that was it.  So, if for some reason we visit family before this goes up on the front door, I might change out the greenery picks.

You can see my new back door in the picture.  I'm so proud of how it looks.  This room will get a coat of paint soon. I will be so happy to have nice looking trim in this room along with lightening up the whole room.

Happy Sewing (or Crafting)!

Thursday, November 16, 2017

Sewing Pants for Women...Preparing the Pattern for Alteration Step 4, Part 5

Continuing with the Sewing Pants for Women by Else Tryoler.  Today, will we start with Step 4 of the seven giant steps to pants perfection:

Hang of the pants at the waist and crotch width alterations

There is an old and weary joke about a person's legs being just long enough to reach the floor.  It is also axiomatic that the shortest distance between two points is a straight line.  Now, suppose we start at the waist smack in the center of the back and envision two lines traveling to the floor.  If the person involved has a very flat seat, the route from waist to floor will be a straight line.  But if she also throws her hips forward making her tummy rather prominent, you can see the line from the waist to the floor in front has to travel over the provenience en route;  therefore it is not a straight line and is longer than the line to the rear.


A similar situation develops if the subject has a bustle back and a flat stomach.  In other words, it is possible for a pair of pants to be a different length from waist to floor in the front and the back.  This is also true of a person who carries no extra weight, but simply tilts her hips forward or backward so that her waist line is at a slant. See Figures 9, 10, 11.  These three figures each have the same hip measurements.  Figure 9 shows a standard (or perhaps ideal!) shape.  The anatomy is evenly balanced and requires little or no alteration.  Figure 10 shows a shape which is wider through the seat.  It is rounder in circumference through the hips, and is more like a true circle.  This type requires a longer line in the back to reach from the waist to the floor as shown in Figure 12.  Add 1/4 to 1/2- inch at the center back waist seam, tapering to nothing at the side seams.


Figure 11 is very flat in the seat.  This type requires a far shorter line from the waist to floor in the back.  In this case, drop the waistline 1/4 to 1/2-inch a the center back seam, tapering, as before, to nothing at the side seams.  You will find this technique illustrated by the dotted line at the top of Figure 13.


Look again at Figure 10.  Compare the distance between the Xs on this type -- this is called crotch width  -- with the distance between the Xs on the other figures.  Wider, isn't it?  In order to fit this type, the crotch curve must be widened by adding to the inner leg seam at both front and back.  See Figure 12.

Look now at Figure 11.  Judge the distance between the Xs on this type.  Her crotch width is narrower, isn't it?  Therefore less crotch width is needed in the pattern, so the inner leg seam is decreased at the crotch by about 1/2-inch in the back only.  This is shown by the broken line at the side of Figure 13.  It is sometimes necessary to alter this again after the first fitting.  If it then proves to be still too wide, in out a small amount at the front seam also.

Front alteration (the waistline seam):  If your abdomen is flat, no alteration will be needed.  However, if you tend to round out in front once the coning influence of a tight garment is removed, this is more apt to be a problem.  If this is so, increase the center front by adding 1/4 to 1/2-inch to the waistline, tapering to nothing at the side seams.  See Figure 14.


Did you notice anything with the terms in this section? I believe we would know crotch width by today is called crotch length.  What do you think?

Happy Sewing!

Tuesday, November 14, 2017

Organization....Fabric

Here's a view of some of the fabric organization in the closet:


In this picture you can see the collection of denim, fat quarters, holiday fabrics, interfacing, and mostly contained quilting scraps.  There is a shelf above that can not be seen.


In this picture, you can see the carefully folded fabric.  Fabric in this area is larger than 1/2 yard.  You can also see the sleeve board, a few hangers, towels awaiting applique, and more interfacing.


This is some of the carefully folded fashion fabric.  There are a few pieces in this batch that will be for muslins only.  This is a couple of shelves above this picture and a shelf below.  This is also a sewing machine under the last shelf.


This is another view.  Additional carefully folded fashion fabric with magazines, patterns, and a tiny bit of yarn (this is the only knitting stuff that has made it to the room).  There is a couple of shelves above with more fabric and a shelf below.  You can see the corner of my cutting table which will be in the closet and moved out to line up with the sewing table when needed.  Also, hidden by the cutting table is a couple of my sewing machines.

I think the biggest surprise with doing this organization is the amount of denim that I have collected along with the amount of quilting weight cotton fabrics.  Some of the denim is destined for a quilt and some of it is destined for jeans.  I suppose some of the denim can be used as a muslin for jeans.

If nothing else, this whole experience has certainly slowed down the desire to purchase more fabric.  Now that I can see the majority of it, I'm hoping that it will be considered first before purchasing more.  I do not have a large amount of knits so that will most likely be the exception.

Fabric folding techniques can be found in the blog post "Organization....Folding Fabric".

Happy Stitching!

Monday, November 13, 2017

Organization.... Rulers...

My room is slowly coming together.  I hope that it works as well as I hoping.  I used the vertical surfaces on cabinets and my shelves for the rulers:


On the bookshelf, I have a long skinny ruler and my tube turners.  There is a little bit of space left to add additional skinny rulers should I find them or acquire more (I hope not).


This side of my little cabinet has triangle rulers.  Additional space below for some additional rulers.  I'm currently out of hooks and have two more small rulers to hang .  You can see my largest mat behind this little cabinet.  Not ideal storage for it but it was the only spot I could find.


This side of the cabinet has the hexagon rulers with a variety of other rulers below.


One on side of my pattern cabinet, I have all my large cutting rulers.  There are 2 stripology rulers and a 12 1/2" square.


On the other side of the pattern cabinet are the remaining rulers.  I think most of the rulers have been found.  At least, I hope that have been.  There is always the chance that some mini rulers may be discovered yet.

I used the Command Medium Wire Hooks to hold up the rulers.  So far they seem to be holding up well.  This particular hook will hold up to 3 lbs.  Here's a better picture:

FYI:  I'm not affiliated with this brand.  Just a happy customer.

Happy Sewing!


Thursday, November 9, 2017

Sewing Pants for Women...Preparing the Pattern for Alteration Step 3. Part 4

Continuing with the Sewing Pants for Women by Else Tryoler.  Today, will we start with Step 3 of the seven giant steps to pants perfection:

Hip alterations

There are as many different humps and bumps to a pair of pants as there are women to walk around in them.  There is certainly no area more susceptible to poor fit than the hips if you attempt to squeeze all those varied contours into one pattern shape.  Might as well try to add apples and oranges or bananas and pears for that matter.

On your measurement chart you have all the information you need to personalize a pattern so that it will fit you and your particular terrain.

Pin the front and back pattern pieces together by matching the side seams at the hip-line.  (Remember those two pins at the fullest part of your hips, about seven or eight inches down?)  Take a look at Figure 7 to see what you should be doing.


Now comes a little math:  look up your hip measurement and add two inches for ease.  This represents the total hip circumference you will need in your pattern, but remember that the two pieces of your pattern represent only 1/2 your figure.  So, next divide your total hip circumference by two and you have the number of inches your pattern must measure to fit you.

Back to the pinned together pattern.  Measure from the center front (the X to the left on Figure 7) to the center back (the X to the right on Figure 7).  If the measurement is more than the number of inches you determined in the preceding paragraph, you will take half the difference out of the pattern Front and half the difference out of the pattern back.

This alteration is made on a vertical line, designated by the alteration line on the diagram, so that it will not disturb the side seam curve.  (Do not make the common mistake of adding only at the hips, because that will make the side seam ripple and cause great difficulty when it comes time to insert the zipper.)  An example:  if the pattern is 1-inch too large, fold out 1/2-inch in the front and 1/2-inch in the back.  Be sure to fold it out all the way from the waist to the hem as shown in Figure 7.  Similarly, if the pattern is too small by 1-inch, insert 1/2-inch in the front and 1/2-inch in the back.  You are now grading or sizing the pattern up or down a fraction of a size.

Remember your hip measurement is not all hip.  It also includes the seat and abdomen.  If your hips curve more than standard, add a little more at the side seams of the front and back to take care of the excess.  This is particularly  necessary when the hips are prominent.

If you have very straight hips, the curve at the side seams must be decreased in front and back. Be sure to decrease in equal amounts, however.  See dotted lines, Figure 8.


Always operate where your figure requires it.  Sometimes you grade or size only in the front, sometimes only in the back.  For example, you may need to add only a small amount to your hip measurement -- let's say 1/2-inch.  If you protrude more in the front over the abdomen than the standard figure, then insert only in the front.  Or perhaps your seat is standard plus --- or a prominent side.  Then insert only through the back portion.

Do the same grading if you want to make the pattern smaller.  For a figure with a flat abdomen, fold out a small amount in the front only, or do the same in back for a flat seat.

After you have made any of the alterations, ad have decreased or increased the width of your pattern pieces, remember to draw a new crease-line vertically through the exact center of the knee-line and parallel to the former crease-line.  The reason for this is that when inserting or decreasing the pattern piece, the crease-line moves over half the amount of the any change made.

Tuesday, November 7, 2017

Found Beauty...

Moving all of my sewing stuff across country has been a true eye-opener.  Too much stuff but it has been fun going through it.  I have also found many projects.  Many unfinished and stuffed into bags and/or boxes.  Along with the unfinished projects, there have many projects that were purchased (pattern, fabrics, and notions) and just left in the bag for another day.  I'm planning on finishing some of these projects.  The first project is this little beauty:


Yes, this is very hard to photograph but I tried.  I'm pretty sure this is something that I did in the late 80s when I was learning how to hand quilt.  I have no idea if it was ever intended to be anything but what it is but I'm going to turn this into a small pillow.  Hopefully, among the pillow form stash will be a form that will fit the finished size.  Also found with it was more of the same muslin and this will be perfect for the backing.  Now, I just need to see if I have a zipper in an appropriate color (cream or white).

Have you found old projects like this?  Have you gone through with the completion?  Were you happy with the end results?

I'm hoping that this will be a good addition for the bench in my entryway.

Happy Stitching!

Monday, November 6, 2017

Casual Skirts....

As life continues to change and I fall into new routines, I decided that I needed a new casual skirt.  You can't really get much more casual than a denim skirt but do I really want denim?  Maybe I will consider the skirt styling and try for a colored denim.  So, with that in mind, I headed over to Neiman Marcus to see what they were showing in this particular style.  I found this:


A rather typical denim pencil skirt with jean styling. Although my skirt will not be too small as the picture is showing on the model.  I suspect that if this skirt was worn by the model for an entire day, it would be butt sprung.  Of course, the denim might relax but I'm not familiar with the fabric blend on this skirt.  It is cotton and polyurethane.  I don't general think of polyurethane as a chemical to create fabric but there is it.  This is the AG Emery High-Waisted Pencil Skirt.  Regular price tag:  $168.00.

Now for a pattern.  I just received the Silhouette Patterns #2017 - My Basic Jean Skirt:


This is a classic jean skirt pattern.  Styling is pretty close to the inspiration picture.  It most likely is not a high-waisted and not as close fitting because it doesn't show in the line drawing that it has a slit.

Other pattern considerations:


McCall's Perfect Fit Skirt, the shortest version on the right.  It has slanted pockets which might rule it out.


This Vogue Calvin Klein skirt.  It's a little shorter than I prefer but that is easy to fix.  It has the high waist like the inspiration picture.  There is a slit in the back which is where I would prefer to have the slit, if I'm going to have one.

So many things to consider.  The Silhouettes pattern would probably be the easiest because of the sizing.  The McCall's and Vogue patterns will need to have adjustments made.  All three are very classic skirts. 

As far as the fabric, the recent move has proved to me that I have plenty of fabric.  For some reason, I tend to collect denim which I had no idea that I had done.  I also have a small collection of twills.  I'm leaning toward a dark chocolate brown twill to make this skirt. 

I guess if I'm going to get this moved from a plan to reality I need to work a little harder on the sewing room and get the organization finished so I can get the sewing machines going.  I'm definitely ready to see how a couple of the machines survived the move.  It will give me the chance to see how my setup works.

What are your thoughts on the chosen patterns?

Happy Stitching!


Thursday, November 2, 2017

Sewing Pants for Women...Preparing the Pattern for Alteration Step 2, Part 3

Continuing with the Sewing Pants for Women by Else Tryoler.  Today, will we start with Step 2 of the seven giant steps to pants perfection:

Length alterations:  crotch, knee, and full side

First we will deal with the crotch length.  Take the Crotch Length from the measurement chart.  Then, add the necessary ease:

For small sizes (hips below 35 inches) add 1/2 inch.
For medium sizes (hips 35 to 38 inches) add 3/4 inch.
For large sizes (hip over 38 inches ) add 1 inch.

For stretch fabrics, reduce the ease by half these amounts.  For tight fitting pants, reduce the ease slightly, especially if the fabric has some give to it.


Let's correct the pattern.  Look at Figure 5.  Measure the length from A to B on your pattern.  Compare this figure with your own crotch measurement plus the necessary amount of ease.  If the pattern is too long, draw a parallel line below the hip-line and fold out the excess.  Do the same to the back.  If the pattern is too short compared to you, cut it along the hip line.  Lengthen it by inserting the needed paper all the way across, see Figure 5.

The knee length:  Some women are long from the ankle to knee , some are long from the knee to hip.  It doesn't really matter unless you're wanting a type of pant that depends on the knee for length.  So regard that knee-line you made in step one with suspicion, until you have determined whether it coincides with yours or not.

Locate knee length:  Refer to you knee length on the chart and apply it to the pattern.  Measure the pattern from A to C.  See Figure 5.  If the measurements are the same, you're home safe.  If not, draw a new, correct knee-line parallel to the existing knee-line (either above or below).  Make the line in red so you'll know that it's yours.  This step is important when styling different lengths of pants.

The full side length:  To adjust, compare your measurement from the chart with the length of pattern.  If there is a discrepancy, shorten or lengthen the pattern below the knee-line.  Make certain that you keep your lines parallel.  Add or remove the same amount both front and back.

Seams do not meet after alteration:  Adjust your lines as shown in Figure 6 by the broken line.  It is a matter of giving a little and taking a little to arrive at a compromise between the original lines.


Happy Sewing!