Showing posts with label Sewing Pants for Women. Show all posts

Thursday, January 11, 2018

Sewing Pants for Women...Pressing Your Pants, Part 13

Continuing with the Sewing Pants for Women by Else Tryoler.  Today, will we talk about pressing your pants:

Pressing Your Pants

To some, pressing pants is as frustrating as a wrestling match with an octopus.  To others, it is a simple business involving nothing more mysterious than straight lines.  Neither is the case.

You will discover it is easy to set the creases in the Fronts before you have sewn a single seam!  With the pants in this completely raw state, there are no distractions from either the crotch or back.  Simply fold a front precisely on its crease line (which, of course you dutifully marked with tailor's tacks in  the cutting stage), making certain that the fold points squarely to the dart.  As you press, remember that the crease stops just below the waist dart.  Later, you will see that a previously set front crease is a handy guide when setting the back crease.

Setting a Crease

Is not a matter of making a few desultory passes with a steam iron -- not if you would like a lasting and professional crease.
  The tools of the trade are few and simple.  Your ironing board should have firm padding and not too much of it.  Thick, soft padding may sound luxurious, but it will offer no resistance to your iron;  a hard surface is essential to a knife-sharp crease.  A steam iron is the most practical way of providing moisture, but on some fabrics it will raise a shine, so add a pressing cloth to your list.  A striker is also needed.  It is a wooden instrument shaped somewhat like an iron and is used to strike or pound the steam into the fabric.  If you don't own one, can't find one, or merely decline to make the purchase, you can use the bottom of your sleeve board with adequate results.

With these tools at hand, lay out the fronts on the board with the fold on the crease line and pointing to the waist dart.  Apply steam.  Now, with the striker, pound the steam into the fabric until all the moisture ha bee absorbed.  

Hold that iron!  Before you step back to admire your handiwork and congratulate yourself on creases so straight that they made an arrow look like a wiggle-worm, think a minute.  Are your legs as straight as that?  Not if you walk around on them.  You have a gentle swell to the calf muscle which is functionally necessary and cosmetically nice.  Therefore, when you slip a leg into those arrow-straight pants, the symmetry will be disturbed by that rounded calf.  The fronts will be pulled toward the rear and their hems laid smack up against your shins as if you were standing in a gale.  As the pants pull backwards to accommodate the shape of the calf, there is a fringe benefit in the form of baggy knees.  All the precision of your careful crease will be gone! And what can be done about it?

The cure for shin-plastered pants and baggy knees is part of the pressing technique.  After you have set the creases in the above manner, keep the pants on the ironing board.  Starting about 3-inches above the knee-line, stretch the side and inner leg seams of the fronts, stopping about 3-inches from the hem.  See Figure 42.  As you stretch the two seams together, swing them forward until you have created a concave curve in the front crease. The method is demonstrated in Figure 43.  Continue stretching until you have added from 1/4-inch to no more than 1/2-inch in length, the amount depending on the give inherent in your fabric.  When you have stretched the proper fraction of an inch, trim a corresponding amount off the front hems, the same amount all the way across.  In other words, if you stretched 1/2-inch, remove 1/2-inch evenly from the front hems.  See Figure 42, broken line.

When you stitch the fronts and backs together along this stretched seam, the shape will hold.  The slight concave curve of the crease will forestall the tendency to baggy knees, for it moves out away from your shins, distributing the hem width evenly, front and back.

Fabrics with give (especially stretch fabrics) need not be stretched in advance by pressing, but can be stretched directly at the machine.  This is done when seams are joined and front seam is stretched to meet the longer back seam.

What about baggy knees in finished pants?  The same procedure will work in this case, too.  Rip the side seams to 3-inches above the knee-line.  Stretch the inner and outer side seams of front only. When you have gained 1/2-inch, you will see that you have achieved the typical concave curve in the the crease line.  Remove a like amount evenly all the way across the front hems.  Sew up the seams again and bid adieu to bags at the knees!

These things accomplished, your initial pressing chores are at an end.  Press your seams as you go, paying special attention to the crotch curve.  Remember this in this case, you press the front and back seams open from the waist down to the notches, but below that  through the crotch curve you do not press the seams open at all.  You will find further information when you return to the Sewing Instructions.

When the pants are finished, set the back creases with the striker, just as you did in front.  Use the previously set front creases as a guide in laying out the pants.  Back creases stop at crotch length.  There!  They look almost too impeccable to put on!

Don't Hang Those Pants!

Yes, of course, you were taught as a very small child to always say "please" and "thank you" and to always hang up your clothes.  Quite commendable.  But when you have just finished pressing a pair of pants, lay them on a flat surface for a period of time to all the fabric to dry out thoroughly.  All your preciously won concave curves may hang right out if you hang them up too soon!  This procedure should be followed both with your unfinished front pieces and with the freshly laundered finished pants.


Conclusion

Now we have come to the end of a perfect way.  The ghosts of ancient pants problems have been laid to rest.  No longer can the specters of men's alterations haunt the tailoring  of women's pants.  

In this series, you have found a concept of fit designed from its inception for women.  Its impact will sweep the last vestige of cobwebs from your pants construction, and put you in the vanguard of an army of faultless fitted women in pants.  

Now that pants have been made for women, it is triumphantly clear that woman were made for pants!


Thursday, January 4, 2018

Sewing Pants for Women...Adding Style to a Basic Pattern, Part 12

Continuing with the Sewing Pants for Women by Else Tryoler.  Today, will we talk about adding style:

Adding Style to a Basic Pattern

A basic pattern is you on paper.  It is made or altered to your measure, faithful to your every contour, and lacking any nagging need for alteration.  When it has been perfected, you are free to design at will.  For a good basic pattern is just this;  a splendid fitting tool from which to create any variety of pants you fancy.  If your basic pattern is designed to fit well, it will carry whatever style you ask of it.  If, on the other hand, you add style to a faulty fit, you are only adding insult to injury. First, be sure of your fit.  Then choose whatever style you prefer.

Style is a spice added to fit according to taste.  It may be the length of your pants, the width of your pants, even the pockets of your pants.  To some minds it is a perky little bow perched on one prominence or another.  There is one thing style is not:  it is not a magic wand to transform poor fit into high fashion.

Tapered pants

If you have a yen for slinky pats with next-to-nothing legs, refer back to Step 6.  The diagram and instructions you will find there deal with leg width.  Be sure to taper all four seams, as the directions read, and by all means don't get so carried away with tapering that you forget to leave instep-room to get your foot through!  This necessity can become a style detail in itself, by finishing the outside seam in a jaunty little slit at the hem.

Bell Bottoms

If you take a second startled look and find that current fashion is busy flirting with a pronounced flare at the hem-line, this, can be achieved from your basic pattern.  Simply go back to Step 6 and add 3 inches to all four seams at the hem-line, tapering to nothing at the knee-line.  It is even smarter-looking, if you have slim knees, to make a pinch of 1/4-inch to 1/2-inch at the knee-line, as shown in Figure 37.


Long or short?

The choice is yours from infinite variety.  Work with a semi-tapered sloper, that is, a basic pattern which has been conservatively tapered in the manner described.  Figure 38.  Draw a crotch line on the Front, as in Step 1.  Do the same on the Back.  Check to make sure that your side seams are the same length.


For shorts, Jamaicas, and Bermudas, select the desired length from Figure 39 and measure an equal distance from the crotch line.  Add about 1/2-inch to inner seams, front and back, and a lesser amount at the outer seams.  Drop the hemline approximately 1/2-inch at the at the inner leg seam.  Both of these maneuvers are illustrated in Figure 38.  You will find that dropping the hemline in such a manner takes care of the small kink at the inner leg seam so often seen in shorts.  (This is sometimes seen in other lengths of pants, too, and be corrected by smoothing out the inner and outer leg seams as you baste under the hem.)


For pedal pushers, calf skinners, Capris, and any as-yet unborn whim of fashion, use the knee-line as your guide, measuring up or down the appropriate distance, and proceed in the same manner.  It may be easier to use the hem-line as a guide for longer pants.


Whatever name you give them -- hipslingers, hiphuggers, hipriders -- the weight of public opinion appears to be solidly behind them!  The trend started on the French Riveria, crossed the Atlantic, and was influenced by the All-American blue jean.  If you have both the inclination and the figure for them, they can easily be styled from your basic pattern.

As in Figure 40, measure down from the waistline 2-2 1/2-inches and draw a line following the original waist.  This will be your finished seam line for pants with a facing inside or outside.  Add seam allowance when cutting away the top.  If you prefer a waistband on your hipslingers, drop the seam line still lower, depending on the width of the proposed band.  If your wonder what to do with the little leftover darts, particularly in the front, don't stitch them, but ease on to facing or belting.

Tapered Pant Without Side Seams

Abandon hips, all ye who enter here!  Pants without side seams are sleek, smooth, and smack of expensive price tags, but they are feasible only for the slim-hipped few, and recommended for smaller sizes.  Any womanly swell about the hips, prominence in the thigh, or comfortable little billows below the hip-line demand the presence of side seams to facilitate fit.  It is one of the bitter truths of life that pants without side seams look dashingly alluring on models, but without a model's figure the picture is different.  Be honest with yourself, and with your appearance.  If you fill the bill, slim hips, no protrusions anywhere below the hip-line, go for it!  These pants can flatter your diminuendo figure lovingly.  If you don't fit the bill, or fill it too amply, beware!

These pants are also made from a basic pattern. See Figure 41.  Pin front and back together, 7-inches down from the waist, matching the side seams at hip-line.  Try to overlap the side seams about 1/8-inch to 1-4-inch.  (This is what is meant by a closer fit!)  Match the side seams at the hem-line, also.


Now that you have matched the hem-line seams, take a look at the side seams below the hip-line.  If they do not overlap more than a 1/2-inch, you are a candidate for this style of pants.  If the overlap is greater, this is the point to abandon your plans and settle for pants with side seams!

You will find that some patterns cut for a pronounced tapered leg present an additional problem when used without side seams.  When pinned together at hip-line and hem-line, the knee-line does not come together, adding extra width in this area.  To correct this situation, overlap the side seams at the hem-line 1/4-inch to 1/2-inch.  Be certain, in doing so, that you have left enough hem-line width to accommodate your instep measurement, unless your are fashioning a slit at the side or center front.

Adjust the hem-line, as shown by the broken line in Figure 41.  Notice that the side seams at the waist now form a dart, which should end about 1-inch to 2-inches above the hip-line.  The closing for this style of pants will be either in the front or back, according to your preference.

The grain and crease line will remain the same in the front.  However, you will find the grain line in the back will swing off.  Don't worry about it.  The original crease lines are still valid, and that is your only concern.


Happy Stitching!

Thursday, December 28, 2017

Sewing Pants for Women...The Three-Headed Dragon of Pants Construction, Part 11

Continuing with the Sewing Pants for Women by Else Tryoler.  Today, will we talk about sewing instructions for perfect fit:

With your trusty needle for a lance, you must slay this awesome dragon!  Use this chapter for a shield!  Know thy pants sag and bag and won't sit down and half the battle is won.  The other half can simply to avoided.

Pants were originally designed for men, by men.  In attempting to fit them to malady's more diminutive waist and rococo hips, the pattern-makers applied what know they had --- all of which had worked for men -- and what usually happened?  This!  Pants that bagged in front!  The center front seam took off like a ski jump --- bias all the way!  Figure 32 illustrates such a seam in action.  Its only possible use is to fit the figure beside it!  Pants hang from the waist, just like a tailored skirt.  Try taking a straight skirt pattern and changing the front seam to a bias.  What happens?  The skirt would pouch out in front like a cow-catcher, wouldn't it?  That is exactly what pants do when their center front seam is cut on the bias.  The evidence appears as baggy wrinkles across the crotch.  The fault lies in the design of the pattern itself; there is no cure for it.  If you already own such a pair of pants, look for another brand of pants.

Pants that sag in back

The same principle holds true here.  If the center back is cut on a distinct bias --- and you are not --- you are in for a bad case of the sags!  (See Figure 33)  It is not a question of too much length in the back seam.  It cannot be cured by "taking a little tuck across the seat".  Such a remedy would be about as effective as giving aspirin to a drowning man.  So it is with a bias-cut seat seam.  Alter, adjust, take tucks, let in, and let out all you want, but nothing is going to change the basic situation.  A bias-cut seat seam sags because it is  bias-cut, and there is nothing you can do about it.  It you are chagrined owner of pants of this description, throw a coat on over them, and dash out for another pair.


Pants that won't sit down


Perhaps you know the ones we are talking about.  When you sit down, they pull down in the back.  The effect ranges all the way from discomfort when sitting to a general public announcement of what you wear beneath those back-sliding pants.

What do do about it?  Well, you can always balance yourself on the end of your spine, like a board propped in the corner, for there is no handy relief for your distress.  The fault again is in the construction of the pattern:  the old devil, bias back seam, is with us again.

Think of it this way.  Picture the seat curve of your pattern as a contour chair.  Could you sit in it comfortably, with suitably erect posture, in no danger of sliding off?


In Figure 34, the broken line represents the back center seam of the pair of pants with sitting room; the sold line shows a bias seam guaranteed to keep you in misery for the life of the pants.  The distance between the two is your margin for composed sitting.  The solid-line bias seam, forced to conform to the dotted-line straight seam when you sit down, pulls your pants down in back exactly the distance between the two.  Look for pants construction with a seat seam shaped like a dotted line, or put the shape in as shown in Figure 34.  You will most likely have to add to the side seam.

Recognizing a well-constructed pattern

Now that you know all about the wrong sort of construction, just what do you look for to assure no-bag, no-sag, sitting-down pants?

A good pattern has a fairly straight up-and-down center seam in both front and back.  Remember that pants hang from the waist just like a slim, tailored skirt.  The center seams must be straight or the skirt will flare: the center seams of pants must be straight or they will bag.  There will be a tiny bit of bias to a well-constructed pattern, just enough to accommodate the human figure, but never enough to condemn you to eternal bagginess sagginess ad miserable sitting.  You should be able to sit on the seat curve without sliding off!


Compare Figure 35 and Figure 36.  In Figure 35 you see a well-constructed pattern.  See how the hips curve to accommodate a woman's shape.  Notice that the center seams are virtually straight up and down.  In the poor construction in Figure 36 the side seams at the hip-line are quite straight --- and the center seams are cut on the bias.  Here is what happened; the curve was taken off the hips and put in the center crotch seams.  There is probably the same amount of room in the two patterns, but it is in the wrong place!  The Good Lord put your hips where they are --- and that is where the curve must be.


Thursday, December 21, 2017

Sewing Pants for Women...Sewing Instructions For Perfect Fit, Part 10

Continuing with the Sewing Pants for Women by Else Tryoler.  Today, will we talk about sewing instructions for perfect fit:

The assumption is made that you have not begun this DIY pant without a pattern.  Of course, commercial pant patterns have their own set of instructions.  Don't toss them out!  You will need them for all the little details that lend style to the pant.  Pockets, belts, slits, and loops are all details that should have detailed how-to's on your instruction sheet.  The first thing to do is read over both these instructions and the pattern instructions.  Note where and when to refer back to the pattern instructions.  Otherwise follow the instructions below:

The Groundwork

Test your pattern in denim:  Make your first pair of pants in an inexpensive cotton material such as denim.  This pair is a trial run, subject to minor re-adjustment and trial-by-wearing.  Do not choose muslin for this purpose.  Using muslin makes fitting trousers more difficult, and, besides, why not have pants worth wearing in public.

Cut your fabric with accuracy:  This is many a slip twixt snip and fit, and what isn't there cannot be added.  By the way, if you would like to achieve that very tapered look in pants, choose a fabric with give.  It is a quality that can be determined by hand-to-hand test ore found with certainty in a stretch fabric.  Don't look for true taper in stiff and hard-finish cloth.  It can't be done.

Choose your zipper location:  This is a matter of personal taste  We assume that you choose your pattern with zipper site in mind.  If not, barring interference with the style of the garment, the decision is now yours to make.  As a general rule, a zipper placed either in front or back is preferable for full and rounded hips.

Do not stay stitch:  If your instructions call for stay stitching, ignore that part.  You will find that these fitting instructions require occasional stretching and easing of the fabric.  Stay stitching will interfere with that because of the inflexibility.

Preliminary pressing:  This is an important step that comes before you sew a stitch, so turn to the pressing section on  future section.

The Actual Sewing

1.  Center back:  Figure 28.  Stitch darts.  Seam back center together (leaving opening for zipper, if desired) stopped at the lower curve about 1-inch short of the leg seams.  Stretch the seam about 1/2 to 3/4 of an inch, depending on the give of the fabric through the lower curve in back only, when stitching and pressing.  This stretching will not only mold fit right into your pants, it will also prevent split seams at this point of great tension.


2.  Center front:  Figure 29.  Stitch darts. Seam front center down to about 1-inch from leg seam. Leave zipper opening, if necessary.


3.  Leg Seams:  Stitch inner leg seams.  Stitch outer leg seams, leaving an opening for the zipper, if not already provided for.  Press seams open.  See future for pressing.

4.  Curved seams:  Figure 30.  Finish curved (crotch) seams.  Reinforce by stitching again from start to finish of the curve.  Clip the inner curve to 1/4-inch of remaining seam, both front and back.  These clips, should be about 2-inches below the hip-line.  Press front and back seams open from waist to clipping.  Curved seam between the clips is not pressed open, but is trimmed down to 3/8-inch.


5.  The zipper:  In preparing the pants for the first fitting, you may simply baste under one side of the closing and mark the other side with colored thread for an accurate pinned closing or place the zipper.

6.  The waist:  Ease waist on to waistband.  There should be about 1-inch of ease in the waist seam to be eased on to either waistband or facing to prevent any drawing or pulling below the waist.  If you are using a fabric that does not shrink readily, stitch seams or darts slightly deeper at waist.  Do no ease through center back between the seat darts.  Direct the ease evenly to all other areas, or concentrate it more where curves are more pronounced.  Close with buttonhole or hook and eyes.

7. Hems:  Turn up hems.

8.  Pressing:  Press crease in front to just below darts.  Do same in back, stopping at crotch length.  Follow crease markings in both.


Questions:  What do you think of the stretching and easing mentioned?  Do you do either when your making a woven or stretch woven pant?  Does this apply to knits?

Happy Stitching!

Thursday, December 14, 2017

Sewing Pants for Women...The Dress Rehearsal - First Fitting, Part 9

Continuing with the Sewing Pants for Women by Else Tryoler.  Today, will we talk about the first fitting:

If you have faithfully learned the lines of the Seven Giant Steps to Pants Perfection, your anguish will be at a minimum.  However, even with best of all possible plays has a few awkward bits.  In our case little individual body quirks you didn't know you had may become apparent.  Take heart, you must remember to take back any little oddity back to your pattern and make the changes there as well as in the finished product.

Now for the fitting:  Be sure you have sewn a belt onto the waist, or that you at least have a band basted to it.  Pants hang from the waist.  Don't try to hold them up with your hands and achieve fit at the same time!  The closing should be basted under on one side and the other marked with colored basting stitches for an accurate pinned closing.  If you are quite hippy put zipper in front or back, otherwise at any place you wish.

1.  Check the waist band for comfort, letting it out or in as needed.  This will affect the darts, making them deeper or shallower at the right place, either front or back.

2.  Check hip comfort, letting in or out slightly at side seams.

3.  Check crotch length.  Does it hang too low?  Then pin an even tuck all around the hip-line.  Is the crotch too short? Go back to Sewing Pants for Women...Preparing the Pattern for Alteration Step 2, Part 3 for the alteration. If it is only a matter of 1/4-inch or 1/2-inch, drop the waistline that amount.

4.  Check the crotch width.  Are you comfortable?  Is there a pull across the front or back at the crotch level?  Then let out the seams on the inner legs at the crotch point.  (See Sewing Pants for Women...Preparing the Pattern for Alteration Step 4, Part 5)  Perhaps there is too much leeway in this area.  Take the seams in, especially if you covet that cupped-in look of the younger generation.  In this case, taper a sharper inward curve down to the knee line.

5.  Check the back rise.  If any droopiness has crept in, or the seat does not hang as straight as you would have it, pin out a tuck across the seat. (See Sewing Pants for Women...Preparing the Pattern for Alteration Step 1. Part 2) .  If your pants pull in the center when bending or sitting:

      a.  Look at the waist center, front and back.  There may be too much dip or drop.  If this is so, set the waistband higher, tapering to nothing at the sides.

      b.  If more rise is needed, alter pattern by opening at center back about 1/2-inch and re-mark pants with altered pattern.

6.  Check for leg comfort.  This is a matter of taste as well as fit.  Take in or let out seams by the same technique you learned in { Step 6 }.  Be sure to keep the crease-line in the center!


A smile is a very pleasant thing indeed, except when it refers to wrinkles in the front of your pants!  Among the familiars of the garment trade, "pants that smile in front" is the euphemistic term used to describe garments with wrinkles that flair upwards from the crotch, as in the illustration.  And it is nothing to grin about!

The cause is varied:  there may be insufficient crotch width.  In this case the malady can be cured by referring back to crotch width alterations in Sewing Pants for Women...Preparing the Pattern for Alteration Step 4, Part 5.  There you will find instructions for widening this area.  Often, wrinkles are caused by too snug a fit through the hip at the side seams.  Misjudged hips or heavy thighs may need more breathing space.  Release the side seams and see if that doesn't do away with the unwanted smile.


To cup or not to cup -- that is the question!

The cupped-in look is a modern trend among the young-at-heart.  See the illustration.  Perhaps you admire it, perhaps you don't.  There are followers in both schools of thought.

This contour fit is achieved by reducing the crotch points in back only, and by deepening the seat curve.  The crotch curve must be a straighter, downward plunging line with a sharp turn inwards.  See Figure 31.

Perhaps you are not devoted to the cupped look, but find that there is simply too much fullness across or just below the seat.  Making the crotch curve a straighter, down-ward-plunging line or giving it a sharp turn inwards (or both) will serve to remedy the situation.

If any of these last-minute changes have cropped up in your fitting, and you have conscientiously made the changes to your pattern, you can go forth knowing that you are now the proud possessor of a true-blue pants pattern this is yours, all yours!  The final sweet reward will come when you sit back and dream of rows upon rows of perfect pants that are yours for the making!

Question:  What are you thoughts on these alterations?

Happy Sewing!

Thursday, December 7, 2017

Sewing Pants for Women...Preparing the Pattern for Alteration Step 7, Part 8

Continuing with the Sewing Pants for Women by Else Tryoler.  Today, will we start with Step 7 of the seven giant steps to pants perfection:

The Back Rise

What is the back rise, anyhow? When you look at the blueprint of a pair of pants, the back rise is your sitting room.  It is the extra bit of length built into the center back seam to give you the necessary leeway for sitting, bending, an walking.  No one can appreciate it more than the poor unfortunate who has heard that ominous rrrrip in public.

Therefore, if you are intent upon constructing a pair of pants primarily for action -- to wear for golf or bowling, or mountain climbing -- you will want to be sure that they have the necessary back rise to make such activities possible.  By the same token, if you desire pure chic and fashion, the amount of back rise will determine whether they do hang arrow-straight from the seat.  In either case, too much of a good thing is going to give you that dreary droop in the seat that has a way of making a pair of pants look tired.

Remember that you cannot always have comfort for activity and an extremely straight hang from the seat to hem.  More active sports usually call for Bermudas or pedal pushers, and a slight sag in the rear is not as noticeable in this length as it would be in the long, tapered pants.

Take your fabric into consideration, too.  A soft fabric with more give through the seat will require less rise.  Woolens and unlined knit fabric (or knits) need very little, and a stretch fabric needs no back rise at all.

It is difficult to determine just how much rise a pattern maker has built into his pattern.  When you cut a pair of pants from a pattern be sure to leave extra seam allowance.  That is, add 1-inch instead of the usual 5/8-inch to the center, waistline, and side seams in the back.  Add 1-inch allowance to front waistline only.  See Figure 23.  Broken lines indicate seam allowance.


The dismal results of too much back rise is a seat that droops and hangs down like the tail of a whipped puppy.  The fault cannot be corrected by taking up at the wait, nor is it associated with the length of the crotch.  If you find, at the first fitting of pants cut from a pattern, that this is the case (as in Figure 24), pin out the excess rise in a tuck across the seat at the hip line.  Starting at center and pinning tuck along hip-line, taper to nothing a the side seam.  You will transfer the same amount to tuck to the pattern by cutting the pattern along the hip-line, from the center back seam to side seam.  Then overlap the lower half over the upper half a the center back seam and taper to nothing at the side seam.  Reshape the crotch curve slightly, as shown by the broken line in Figure 25.  Also, use these directions for alterations on read-made pants. 

Having now adjusted the pattern to the exact amount of rise needed by you, rip the side seams of your garment down far enough to permit re-placing the pattern upon it, and re-mark to the new dimensions.  You see now why we warned to leave a little extra seam allowance when cutting from a pattern for the first time.

In altering a pair of ready-made pants for which you do not have a pattern, drop the waist the same amount that you pinned out across the seat a center.  See Figure 26.  The broken line is the former stitching line.  The side and the center seam mover over and assume a new position.  See solid line.

How do you know how much back rise to eliminate?  For long, glamorous pants that look their best when hanging in a die-straight line below the seat, a shorter back rise is required.  Take out 1/2-inch to 1-inch by cutting the pattern from the center back seam along the hip-line from center back to side seam.  Overlap the correct amount at the center, taper to nothing at side seam.  Adjust the crotch curve as in Figure 25.

Pants intended for more strenuous sports need more rise for movement.  Cut across the hip-line from center back to side seam, and pin pattern to an insert about 1/2-inch wide at the center seam, tapering to nothing at the side seam.  Adjust the crotch seam as in Figure 27. 


Modern pants need a deeper curve than patterns and ready-made pants allow.  The curve must be deepened on a pattern or pinned in on ready-made pants.  For a cupped-in look, the curve must be fitted deeply, and a small amount tapered off the crotch point in back.  See "Crotch Width Alteration", Figures 12 and 13 in Sewing Pants for Women...Preparing the Pattern for Alteration Step 4, Part 5.  These alternations apply to the back ONLY.  They will not work on the front.

Question:  What is your thought on this method of altering the back rise?  Have you tried it?  Did it work for you?

I stumbled upon this alteration accidentally when I was taking a pant drafting class.  It was the only way I could get the wrinkles under the butt to disappear.  The teacher told me that it was an incorrect alteration.  However, the next iteration of the class did indeed show that alteration. 

Next will be sewing instructions for the perfect fit.

Happy Stitching!


Thursday, November 30, 2017

Sewing Pants for Women...Preparing the Pattern for Alteration Step 6, Part 7

Continuing with the Sewing Pants for Women by Else Tryoler.  Today, will we start with Step 6 of the seven giant steps to pants perfection:

Leg Alterations:

How tight should a pants leg be?  A woman with particularly heavy thighs or heavy knees will be more comfortable and look more presentable in wider ones.  A pleasing hem width would be one equal to the calf measurement.  For a semi-tapered look use the calf measurement minus about 1-inch. 

To widen a pants leg:  Add an equal amount to both Front and Back at the hemline, continuing up in the same manner past the knee line.  Taper in to the lower hip line.


To attain the popular tapered look, first check your chart for your instep measurement, or you'll have a lovely pair of tapered pants you can't get into!  Taper an equal amount on all four seams at the hem-line, blending into the seam-line and running slightly above the knee.  For very slim legs, taper all the way to the crotch and hip line.  See dotted in line in Figure 22.  Whenever you change the width of the legs, it must be done in equal amounts on all four seams to keep the crease line in the true center of the knee line. 


Question:  Can you tell that this is written in the early 60s?  How does the statement in the first paragraph apply to today or does it?

Happy Sewing!

Thursday, November 23, 2017

Sewing Pants for Women...Preparing the Pattern for Alteration Step 5, Part 6

Continuing with the Sewing Pants for Women by Else Tryoler.  Today, will we start with Step 5 of the seven giant steps to pants perfection:

Waist and Dart Alternations

By manipulating the darts in a pattern you are molding your figure on paper, much as a sculptor does in clay.  Is there a great difference between your waist and hips?  Then it follow that you will need deeper darts, or more of them.

A curve on you requires a dart in the pattern.  We cannot change your curves but we can change the darts to fit them.  Study your figure in a mirror to assess what the measurement chart has told you, and roll up your sleeves.

To adjust waist:  Take your waist measurement and add 1-inch for ease.  This is a very important one inch, for when it is properly eased onto your waistband it will eliminate all the unsightly wrinkles sometimes found below that area.  When sewing, direct the ease to the places where the curves are more prominent, such as over the abdomen or above especially full hips.  Otherwise, distribute the ease evenly, except between the seat darts where none at all is required.

To make the waist smaller:  Study your figure.  Do you have additional curves at the sides below the waist, often called a "shelf" or "pillow"?  If you do, place an extra dart in the waistline of your pants.  It can be located either in front or back, depending on the area of greatest need.  This dart, usually about 1/2-inch deep and 2-inches long, is called a baby dart because of it's small size  It is placed halfway between seat dart and side seam or front dart and side seam.  See Figure 15.  A slightly deeper and longer dart is used to fit a protruding hip bone at front running down to meet the most prominent point of the hip.


Depth and length of darts:  The length and depth of darts can be changed to fit your individual figure.  Always remember this about the length of darts:  they must never run over the curve.  Darts are used to provide fullness for a curve below.  If they do not stop short of the fullest point, their purpose is defeated.

Look at Figure 16 and see how the back dart stops above the fullest part, indicated by the hip-line.  It an stop as much as 2 to 3 inches above the this point, depending on the need of your figure.  Notice that it is a much deeper dart than the front dart, indicating that the back curve is more prominent.

The story for the front dart is quite different.  The lesser curve of the abdomen requires that the dart be bother shorter and shallower.  But quite frequently the front dart and the back darts are pictured as being of equal length and depth!   You will recognize this familiar problem.  The long line of that front dart looks very striking in a sketch, but has the opposite effect on the body.  If the dart is stitched down straight over the tummy (which rides rather high on most of us), the result is a distressing pull and a fullness at the end of the dart.  You may have had the same experience with a skirt, which, fitting too tightly across the tummy, puffed out below.  The front dart is too long and this is what to do about it.

In either a pattern or a finished garment, reduce both the length and the depth of the offending dart as shown by the broken line in Figure 17.  You may make one dart if you need extra width to enlarge waist or split it up into two smaller darts, as suits your fancy.  The chart below will guide you in assessing the proper dimensions.


*where there is an abundance of curves, two darts may be placed in the front or in the back.

Remember that your tape measure does not tell all.  Use a mirror and a judicious eye to judge your type of figure and the darts required.  You are working on a standard pattern or garment, so determine whether your figure is standard or on the plus or minus side in some places.


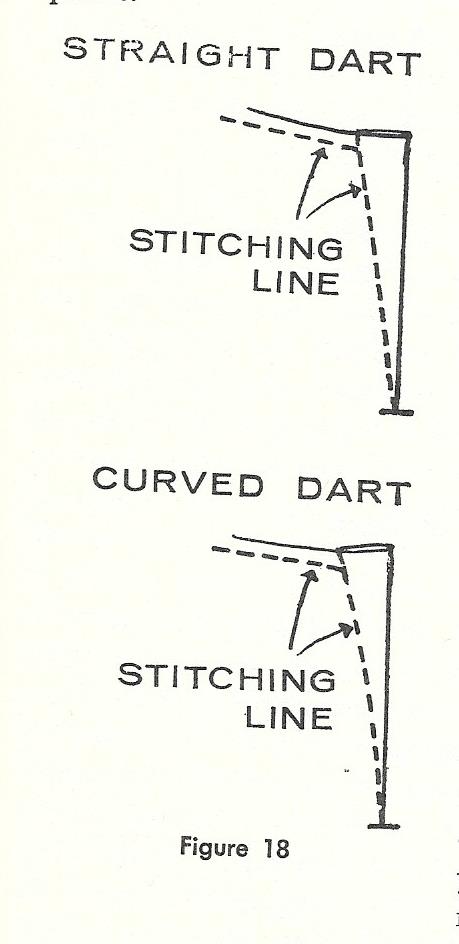
Stitching darts:  Figure 18.  With darts, the proof is in the stitching.  There is no hard and fast rule that says a dart must be straight.  The majority of figures will fair quite well with straight darts, but if yours is an abundantly curved shape use curved darts. Remember this when setting needle to cloth.

Another point, mark the end of your darts with a horizontal line so that you know when to stop stitching and end up with darts of a uniform length.  It doesn't matter whether you stitch from the waist down or from the horizontal line up.  Once you have placed your darts with the right depth and length, you may have a free hand in the rest of the operation and sew in either direction you choose.

Remember, in adjusting a waist, first adjust the darts for your abdomen and seat.  Do not make the common mistake of operating on the side seam only.


For a prominent seat:  figure 19.  Since you have selected your pattern by hip-size (pants patterns should always be bought by hip measurement) an alteration for an overabundant seat is actually a reduction in the size of the waist in the back.  Place a second dart 1-inch deep and 1-inch away from the existing one.  Reduce the original dart to 1-inch -- see the broken line on figure 19.

Figure 20. If further reduction is needed, take 1/4-inch off the center front seam, tapering down about 3-inches.  The method is illustrated by a broken line.  Do the same to the side seams both front and back.  No more than 1/4-inch to 3/8-inch should be removed in this manner.

To make the waist larger:  First adjust the darts.  Make them shallower or eliminate one dart all together.  For a particularly flat seat, decrease the seat dart to 3/4-inch or 1-inch -- then add the side seams, front and back equally.

Perform the same operation for an unusually flat abdomen. In this case, you will need only one dart about 1/2-inch deep.  If a still greater addition to the waist is needed, add it at the side seams, front and back equally.  Always work through the darts first, then resort to the side if more alteration is needed.


Diagonal darts, Figure 21.  Diagonal darts may appeal to you as a style feature, or as a solution for prominent hip bones.  In either case, change your darts to a slant-wise position.  Either a flat abdomen or protruding hips -- the two conditions often go together -- can be fitted by swinging the darts to meet the nearest prominent projection.  Darts are placed in your pattern to help you fit the complexities of your figure.  You are not bound to use them as is; you are free to move them wherever they will do you the most good.

Question:  Have you ever heard of making alterations at the center front either adding or subtractions?  I have always thought that this was a big no-no in the sewing world.  I did note that there was no suggestion of adding/subtracting from the center back seam.  Thoughts?

Happy Sewing!

Thursday, November 16, 2017

Sewing Pants for Women...Preparing the Pattern for Alteration Step 4, Part 5

Continuing with the Sewing Pants for Women by Else Tryoler.  Today, will we start with Step 4 of the seven giant steps to pants perfection:

Hang of the pants at the waist and crotch width alterations

There is an old and weary joke about a person's legs being just long enough to reach the floor.  It is also axiomatic that the shortest distance between two points is a straight line.  Now, suppose we start at the waist smack in the center of the back and envision two lines traveling to the floor.  If the person involved has a very flat seat, the route from waist to floor will be a straight line.  But if she also throws her hips forward making her tummy rather prominent, you can see the line from the waist to the floor in front has to travel over the provenience en route;  therefore it is not a straight line and is longer than the line to the rear.


A similar situation develops if the subject has a bustle back and a flat stomach.  In other words, it is possible for a pair of pants to be a different length from waist to floor in the front and the back.  This is also true of a person who carries no extra weight, but simply tilts her hips forward or backward so that her waist line is at a slant. See Figures 9, 10, 11.  These three figures each have the same hip measurements.  Figure 9 shows a standard (or perhaps ideal!) shape.  The anatomy is evenly balanced and requires little or no alteration.  Figure 10 shows a shape which is wider through the seat.  It is rounder in circumference through the hips, and is more like a true circle.  This type requires a longer line in the back to reach from the waist to the floor as shown in Figure 12.  Add 1/4 to 1/2- inch at the center back waist seam, tapering to nothing at the side seams.


Figure 11 is very flat in the seat.  This type requires a far shorter line from the waist to floor in the back.  In this case, drop the waistline 1/4 to 1/2-inch a the center back seam, tapering, as before, to nothing at the side seams.  You will find this technique illustrated by the dotted line at the top of Figure 13.


Look again at Figure 10.  Compare the distance between the Xs on this type -- this is called crotch width  -- with the distance between the Xs on the other figures.  Wider, isn't it?  In order to fit this type, the crotch curve must be widened by adding to the inner leg seam at both front and back.  See Figure 12.

Look now at Figure 11.  Judge the distance between the Xs on this type.  Her crotch width is narrower, isn't it?  Therefore less crotch width is needed in the pattern, so the inner leg seam is decreased at the crotch by about 1/2-inch in the back only.  This is shown by the broken line at the side of Figure 13.  It is sometimes necessary to alter this again after the first fitting.  If it then proves to be still too wide, in out a small amount at the front seam also.

Front alteration (the waistline seam):  If your abdomen is flat, no alteration will be needed.  However, if you tend to round out in front once the coning influence of a tight garment is removed, this is more apt to be a problem.  If this is so, increase the center front by adding 1/4 to 1/2-inch to the waistline, tapering to nothing at the side seams.  See Figure 14.


Did you notice anything with the terms in this section? I believe we would know crotch width by today is called crotch length.  What do you think?

Happy Sewing!

Thursday, November 9, 2017

Sewing Pants for Women...Preparing the Pattern for Alteration Step 3. Part 4

Continuing with the Sewing Pants for Women by Else Tryoler.  Today, will we start with Step 3 of the seven giant steps to pants perfection:

Hip alterations

There are as many different humps and bumps to a pair of pants as there are women to walk around in them.  There is certainly no area more susceptible to poor fit than the hips if you attempt to squeeze all those varied contours into one pattern shape.  Might as well try to add apples and oranges or bananas and pears for that matter.

On your measurement chart you have all the information you need to personalize a pattern so that it will fit you and your particular terrain.

Pin the front and back pattern pieces together by matching the side seams at the hip-line.  (Remember those two pins at the fullest part of your hips, about seven or eight inches down?)  Take a look at Figure 7 to see what you should be doing.


Now comes a little math:  look up your hip measurement and add two inches for ease.  This represents the total hip circumference you will need in your pattern, but remember that the two pieces of your pattern represent only 1/2 your figure.  So, next divide your total hip circumference by two and you have the number of inches your pattern must measure to fit you.

Back to the pinned together pattern.  Measure from the center front (the X to the left on Figure 7) to the center back (the X to the right on Figure 7).  If the measurement is more than the number of inches you determined in the preceding paragraph, you will take half the difference out of the pattern Front and half the difference out of the pattern back.

This alteration is made on a vertical line, designated by the alteration line on the diagram, so that it will not disturb the side seam curve.  (Do not make the common mistake of adding only at the hips, because that will make the side seam ripple and cause great difficulty when it comes time to insert the zipper.)  An example:  if the pattern is 1-inch too large, fold out 1/2-inch in the front and 1/2-inch in the back.  Be sure to fold it out all the way from the waist to the hem as shown in Figure 7.  Similarly, if the pattern is too small by 1-inch, insert 1/2-inch in the front and 1/2-inch in the back.  You are now grading or sizing the pattern up or down a fraction of a size.

Remember your hip measurement is not all hip.  It also includes the seat and abdomen.  If your hips curve more than standard, add a little more at the side seams of the front and back to take care of the excess.  This is particularly  necessary when the hips are prominent.

If you have very straight hips, the curve at the side seams must be decreased in front and back. Be sure to decrease in equal amounts, however.  See dotted lines, Figure 8.


Always operate where your figure requires it.  Sometimes you grade or size only in the front, sometimes only in the back.  For example, you may need to add only a small amount to your hip measurement -- let's say 1/2-inch.  If you protrude more in the front over the abdomen than the standard figure, then insert only in the front.  Or perhaps your seat is standard plus --- or a prominent side.  Then insert only through the back portion.

Do the same grading if you want to make the pattern smaller.  For a figure with a flat abdomen, fold out a small amount in the front only, or do the same in back for a flat seat.

After you have made any of the alterations, ad have decreased or increased the width of your pattern pieces, remember to draw a new crease-line vertically through the exact center of the knee-line and parallel to the former crease-line.  The reason for this is that when inserting or decreasing the pattern piece, the crease-line moves over half the amount of the any change made.

Thursday, November 2, 2017

Sewing Pants for Women...Preparing the Pattern for Alteration Step 2, Part 3

Continuing with the Sewing Pants for Women by Else Tryoler.  Today, will we start with Step 2 of the seven giant steps to pants perfection:

Length alterations:  crotch, knee, and full side

First we will deal with the crotch length.  Take the Crotch Length from the measurement chart.  Then, add the necessary ease:

For small sizes (hips below 35 inches) add 1/2 inch.
For medium sizes (hips 35 to 38 inches) add 3/4 inch.
For large sizes (hip over 38 inches ) add 1 inch.

For stretch fabrics, reduce the ease by half these amounts.  For tight fitting pants, reduce the ease slightly, especially if the fabric has some give to it.


Let's correct the pattern.  Look at Figure 5.  Measure the length from A to B on your pattern.  Compare this figure with your own crotch measurement plus the necessary amount of ease.  If the pattern is too long, draw a parallel line below the hip-line and fold out the excess.  Do the same to the back.  If the pattern is too short compared to you, cut it along the hip line.  Lengthen it by inserting the needed paper all the way across, see Figure 5.

The knee length:  Some women are long from the ankle to knee , some are long from the knee to hip.  It doesn't really matter unless you're wanting a type of pant that depends on the knee for length.  So regard that knee-line you made in step one with suspicion, until you have determined whether it coincides with yours or not.

Locate knee length:  Refer to you knee length on the chart and apply it to the pattern.  Measure the pattern from A to C.  See Figure 5.  If the measurements are the same, you're home safe.  If not, draw a new, correct knee-line parallel to the existing knee-line (either above or below).  Make the line in red so you'll know that it's yours.  This step is important when styling different lengths of pants.

The full side length:  To adjust, compare your measurement from the chart with the length of pattern.  If there is a discrepancy, shorten or lengthen the pattern below the knee-line.  Make certain that you keep your lines parallel.  Add or remove the same amount both front and back.

Seams do not meet after alteration:  Adjust your lines as shown in Figure 6 by the broken line.  It is a matter of giving a little and taking a little to arrive at a compromise between the original lines.


Happy Sewing!

Thursday, October 26, 2017

Sewing Pants for Women...Preparing the Pattern for Alteration Step 1. Part 2

Continuing with the Sewing Pants for Women by Else Tryoler.  Today, will we start with Step 1 of the seven giant steps to pants perfection:

Preparing the Pattern for Alteration

Your pattern is the blueprint for constructing a fine pair of pants. You will need a ruler, triangle, and pencil.   Prepare your pattern by drawing in the following item (see Figure 4):


(Always measure from the seam lines and not the cutting lines.)

1.  Draw in the seam lines.

2.  Take the vertical waist-to-hip measurement from the measurement chart in Part 1.  On the pattern, measure down that distance on both front and back pieces, establishing points through which you will draw a horizontal line.  This line will be call your hip line and alteration line.

3.  Locate the Crotch Length on your pattern Front by place a triangle on the straight of grain line and matching it to the point of the crotch (see Figure 4).  Draw a line across the top of the triangle to "B" as indicated on the diagram.

4.  Draw in the hem-line.

5.  Locate the knee-line, usually half way between the hem-line and crotch, and carefully draw a horizontal line at this point on Front and Back pattern pieces.

6. Draw a crease-line, both front and back

When you are finished, you should have a workmanlike pattern, drawn in the manner illustrated.


Happy Sewing!


Thursday, October 19, 2017

Sewing Pants for Women....The Measurement Chart....Part 1

This series will be from the Sewing Pants for Women by Else Tyroler.  This publication is from the early 60s.  Let's start with The Measurement Chart.

The Measurement Chart

This is the basis for a perfect pair of pants.  It is where fit is begins.  Follow the instructions and note all your findings.  As you proceed through the fitting steps, you will be referring back to the measurement chart.


Now call in a good friend,  get a good measurement tape, and fasten a length of elastic around you waist snugly.  Relaxy while your friend takes your measurements and watch for accuracy.

Now that you've taken all your measurements.  We will get ready for the seven steps to pant perfection in the next post.

Happy Sewing!