Saturday, November 20, 2010

It's been a month..

Wow! I can't believe it's been a month since I've made any comments. I decided against the dress I was thinking about and just haven't moved on to another project. Work has been keeping me very busy. However, I have purchased a couple of new books. Here they are:


Two of the Sewing Bible books. I was disappointed with both of these books. I would recommend to anyone that these be books that you wait till they show up at the library. The slipcovers book was not what I was expecting at all and was a real disappoint. Given the picture on the front, I thought it was a book about slipcovers for furniture. Not so. There is one project in the book that is related to furniture. Other projects are tablecloths, pillow covers, etc. I think you get the idea. The clothing book might be good for a beginner but I doubt that anyone else would be very excited about it.

I decided tonight that I would look at new patterns. I know I haven't been sewing but I can dream. Here's what I found at Butterick:


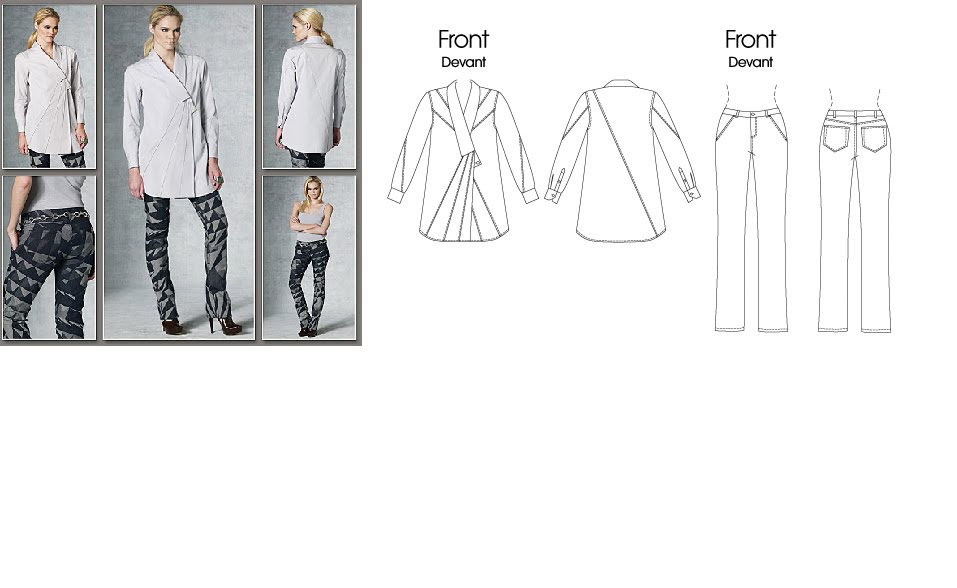
Isn't this a lovely dress by Maggie London? I'm very tempted to purchase this pattern for the stash. I checked the other 3 big pattern companies and didn't find anything else as interesting.

Happy Sewing!

Thursday, October 14, 2010

Another one bits the dust....

Yes, another UFO has bit the dust. The grain bag is finished. I didn't add the elastic to the top. It was super simple sewing and surprisingly everything came together easily. DH is very happy and proclaimed that he now needed to make a batch of beer to try out the new bag. I hope it works for him. I now have a pattern that works. The sewing time on this was very short. It took about 1 1/2 hours to complete and this included fiddling with the serger which had to be threaded from the beginning (I usually pull threads) and I had to move needles. Now, I'm wondering why this became a UFO.

However, I'm now planning new projects which will most likely become the next UFOs. I hope not but you know how that goes.

I have gone stash diving and found a couple of fabrics. The first one is some kind of challis (I think) and is in lovely fall colors. Here's the pattern I was planning on: The version I'm thinking about is the one shown in yellow. This is McCall's 5925. Is this still somewhat fashionable? I was going to lengthen it to knee length and wear tights with boots. I'm thinking that it might be nice and warm for my office. I did look for reviews and found one. I need to take the pattern out and measure it. Since the styling is suppose to be very loose fitting, I will need to determine how loose I'm willing to go.

The second stash find that I found was a navy dinosaur print. My son has agreed that it would make perfect pjs. Hopefully, I can get those made. He has outgrown everything and I'm sure would appreciate something besides short pjs now that the weather is getting cool again.

Don't think that I have made all the UFOs disappear because I haven't. I can think of at least three more but I want something new for myself.

Happy Sewing!

Friday, October 8, 2010

Georgous fabric!

Yesterday, the distributor's rep stopped by to see me and show me fabric. I really do like seeing the fabric in person not that I have ever been disappointed with the fabrics that I have purchased via the internet for the store. However, sometimes you just have to touch the fabric to understand. I got to see the fabrics by Anna Maria Horner yesterday - the voiles, the velvets, the home dec fabric. Oh my, is this nice fabric and in my opinion worth every penny of the price of these lovely pieces. I will be saving room in my budget for her next collections. I want some of the voiles for myself. Oh, I can't locate the code to create a link for you. Just go to Free Spirit Fabric Gallery and look at Innocent Crush and Little Folks collection.

Happy Sewing!

Sunday, October 3, 2010

1 UFO down and....

Yes, I have mostly finished the curtain for the deck and here it is:

This curtain took about 2 months for me to complete. It is certainly not my best work but it is functional. I did forget to add weights to the bottom and this will be fixed over the winter. This is the largest curtain that I have ever made. It is just over 12 feet across. Really, this is very easy sewing. I used felted seams for joins and regular hems on the sides and bottom. The top however is angled to match the slope of the ceiling. This project included two new to me items. First, the fabric is outdoor fabric is a little different to handle. Second, I used outdoor thread for the stitching. My machine balked a little bit at using this thread and it took a little bit of playing with the tensions to get a good stitch. Outdoor thread is very heavy. However, it is a necessary part of sewing for the outdoors.

I really like the change to the atmosphere on the deck by adding the curtain. The curtain is necessary as the afternoon sun shines directly on the table in the summer. I want to add cushions to the chairs. I have stashed more outdoor fabrics. I have been unable to locate the foam for outdoor cushions. I know I will locate it eventually.

I have added another new book to the library. I'm intrigued by "Learning to Sew" books. Here's the latest addition:

Yes, the book has the typical information that is found in every sewing book that is printed today - the tools and the machine. However, something I haven't seen before is a getting to know your machine. As in stitching every stitch and playing with the stitch length and width. A cool little project for anyone sewing. Isn't this something you do with every new machine? The book is full of little projects that anyone would like to do not just the beginner. Did I tell you that you get patterns too? Do I agree with all the techniques that is used on the book? No, I think some of my own techniques are better. I love this book though and maybe this will be a book that I do some projects from. Really though, I picked up because I was looking for a book for a potential client at work who is wanting to learn to sew. I think this book would be very good for her.

Now, I will move on to the next UFO. The grain bag for my husband. It's somewhere in the sewing area all cut out waiting for me to thread the serger and sewing machine. I hope I can remember everything that I intended to do because I doubt that I wrote it all down. DH will be very happy to get it. Brewing season is just around the corner and the brew master will be very happy with a new grain bag that actually fits his pot.

Happy Sewing!

Tuesday, September 7, 2010

Ever had problems with tunneling using a twin needle?

I have sewn many, many t-shirts using twin needles. Yes, I have come up with my own solutions to the tunneling problem. The September 2010 issue of Threads has an article called "Flat Feet". Talk about a light bulb going off. It seems that using a foot with the flat foot instead of a foot with an indention will help with the tunnelling problems. I need to play with this idea. It could be that I was was using this type of foot without thinking about it. Just a basic zigzag foot.

Happy Sewing!

Tuesday, August 10, 2010

New book for the home library

I love getting new sewing related books and today, I received "Sew Serendipity" by Kay Whitt. She is the creative force behind the Serendipity Studio patterns.


So far, I have only read the introduction and steps to a custom fit. I love her attitude. I have flipped through the rest of the book because I just couldn't wait to see what projects were in it. Oh, there is your very typical sewing book stuff - sewing machine talk, tools talk, and technique talk. Then, you get to the first project - a six gore skirt with lots of options. Drum roll on the fabric suggestions: quilting cottons (yes, folks), linen, or silk. The projects are arranged by skill level starting with the skirt and moving on to tunics, dresses, and jackets. By the way, patterns are included.

Oh, I did work on the project for my husband long enough to figure out the circumference (required amount of fabric) using the formula given yesterday, and double-check it using a tape measure. The formula and the tape measure were almost exactly the same.

Happy Sewing!

Monday, August 9, 2010

Moving to the next project...

Well, it's been two months since I started the curtain for the deck. No, it hasn't been finished. Really it only lacks me putting the rings in. However, my DH has asked for something. He even drew up a "pattern" for me.

Yep, it's a big circle. What is the project? The brew master wants a very fine mesh bag for one of his brew pots (a grain bag). Easy enough, I think. Just need to calculate the circumference. What's the formula again? Guess, I need to look it up. Ah, the formula would diameter x pi (3.1416). I must remember the seam allowances. (Of course, I could just pick a point of the outer circle and measure around but what is the fun of that.)

Here's the fabric. It's a polyester. The brew master says that the temps in his pot won't get high enough to melt and he's positive that it is exactly what he wants. I will had a bit of elastic at the top to hold it to the outside. Again, chemist part of said brew master says it won't melt.

Hopefully, this will be super quick. He's been waiting all summer.

Happy Sewing!

Wednesday, July 14, 2010

New Vogues for Fall

Oh, I love seeing the new patterns when they come out. Here are my picks of the new ones:

This look by Issey Miyake is my favorite. I really like the look of the tunic and think that it would be a good look for me to wear. Not sure about about the pants. This look is very 80s. Can you wear the same style twice in your lifetime?


On this easy little dress, it was the collar that drew my attention. This may be added to my collection of patterns. I don't need to wear dresses very often and it's really hard for me find them that fits. With the princess seaming, this has a little more fitting opportunities.

This DKNY dress is created for fabrics with stretch (not just knits). This reminds me very much of a 1940s dress that I use to own (and wear). The pleating coming off from the side is very flattering. Again, with the princess seaming in the top there is opportunity for fitting.

There are several interesting patterns in the fall collection at Vogue. I did note the 80s influence with long tunics and very narrow pants, along with long skirts and long jackets.

Happy Sewing!

Saturday, June 19, 2010

I love getting new books!

Today, I received a copy of "Sewn Spaces" by Joel Dewberry. I have glanced through the book and checked out all the projects. I was surprised to see patterns in the book. It wasn't mentioned in the description.

Just like so many books over the last few years it starts out with the techniques section but what makes it a little bit different is, is it not just sewing. Oh, there is a very basic info on stitches from the sewing machine but also hand embroidery stitches, glass etching, how to cover a button, etc. You get the idea. Of course, all the techniques discussed are used in the projects.

This will be a "shop" copy for the office/store. I plan on making a few of the projects to decorate with - farmer's tote, bird sachet (used as a pincushion), memo board, hanger cozy, fabric roses, etc. I'm hoping that my son can help out with the projects a little bit. I'll try to remember to post pictures as I work on these projects. However, I have a lot of projects and not a lot of time to work on them. Guess, I'll see how it goes. I do have a sewing machine at the office now.

Happy Sewing!

Thursday, June 17, 2010

School is out....

Where has the week gone? I tell you it has just disappeared. I don't like that the days disappear so quickly. I wish that time would slow down just bit. Remember when you were a kid, how the days seemed so long?

Monday, I called about the business who's catalog showed the ruler that I've been looking for. It wasn't in stock. Yes, I was really bummed. This means that the broker ruler will remain in my sewing room to be used on the days that I want bias trim a particular width. I ended up ordering a June Tailor ruler. I hope that I like it.

Tuesday, I was gifted with a sewing machine in a cabinet. I accepted it because it was free. A quick look at it told me that it wasn't as young as they tried to tell me it was. They said that it was 8 to 10 years old but this is a fairly heavy metal machine. I had never heard of the brand - National - before and of course, there wasn't a manual available. This is a super stretch 100 series. I have taken the machine to the office/store.

Wednesday, I played with the machine gifted on Tuesday. It is in good working condition and runs like a champ. I was surprised as the neighbor who I received the machine from had never mentioned that she sewed. I also have located someone who has a copy of the manual and is going to email it to me. Yeah! better than no manual at all. There are two thread spindles on this machine and I would like to know how the 2nd one is used. Also, I need to find out what kind of needles it takes. The machine threads from side-to-side instead of front-to-back.

Thursday, first day of summer for the kids. YEAH! My son is going to be working with me at the office/store. He did pretty good today. He worked to 2 hours without any complaints. I was actually amazed that I was able to keep him busy that long but I'm giving him things that need to be double-checked in inventory before I place another order. I have also been working on creating pattern books and he's helping making copies of the front/back covers.

If anyone knows anything about the Super Stretch 100 series from National, I would love to hear from you.

Happy Stitching!

Saturday, June 12, 2010

On the hunt for a new ruler

I'm still looking for a new ruler. I never would have thought that it would be so difficult. However, I did find a ruler set that I that is similar to a set that I purchase more than 2o years that I thought others might find interesting also. I found it at Nancy's Notions and it's the Lutterloh Pattern Making Ruler Set. Absolutely perfect for redrawing curves on patterns or when making your own patterns.

By the way, I have finally located the same ruler that I broke. However, I have to purchase 3 rulers to get it. I will be calling on Monday to see if they are still in stock and if I can purchase from this company. There isn't any pricing showing in the pages I saw. My fingers are crossed that the item is still available and that it isn't too expensive. Really, I haven't found a ruler like it anywhere. Oh, they have the marking and the 45 degree angle but what about being able to cut the bias stripes to widths between 1 1/2" to 3" wide.

Happy Stitching!

Friday, June 11, 2010

I broke my ruler...

I'm so bummed. I broke my 6"x24" ruler yesterday. Just one corner but that is enough to make it hard to use. I guess that is what I get carrying it back and forth from work. Anyone have any suggestions for a good replacement? My old ruler was made by Dritz. I've been looking around and can not find a ruler with the same markings. Ok, now, I'm feeling really old. I've had this ruler for 20+ years and you would think that there would be some improvement since then. Help me out. I'm looking for a 6" x 24" ruler that is clear with 1/8" markings and has 45 degree bias. Anyone?

Tuesday, June 8, 2010

Preparing for the next project.

The next project on my list is a curtain for my deck. I have an outdoor fabric that is dark green with a white strip and I purchased an outdoor thread. Everything has been measured and I've calculated length and width of each panel. I've purchased a felting foot for my machine. What is slowing me down? I've never worked with the outdoor fabrics before. What if I mess it up? I do have a book - "Sewing for Outdoor Spaces" by Carol Zentgraf. I suppose I should sit down and read about anything that may be special about this fabric before I cut it. However, there is no information about making an outdoor curtain. I'm planning on using curtain grommets with roller shower clips. Hopefully, it will work out. I'm unsure of the spacing for the grommets. Any ideas on how often they should be spaced? Any suggestions would be appreciated.

Happy Sewing!

Sunday, June 6, 2010

Another project finished...

I must be on a roll. This is the 3rd project complete in the past month.

I decided to take an chair from the house to my office/shop but it needed to be changed a little bit. This chair had been sitting on my deck for the last couple years. So the finish on it wasn't in good condition. Here's a pic after it was sanded:


DH stepped in and painted the chair for me. Although the chair looks very white, it's not. It is an ivory color.

I made a pattern by measuring across the seat, dividing by 2 and adding 3/4". Then drew a big circle. This took 1/2 yard of 44" quilting cotton.

Here's the leftovers after cutting out the cushion cover. At this point, I'm hoping that square is big enough to create the ties and bias binding for the piping.

All squared up.

Selecting the spot to cut the 45 degree angle for the bias strips.


Moved the piece from the right to the left so that the straight edges can be sewn together. Notice that both outside edges are now at a 45 degree angle.

Stitched the 1/4" seam.

Pressed seam to the side.

Not shown is how I figured the width of the bias binding which is going to be 1 3/4" wide. How I calculate is by taking the piping and a tape measure. Wrap the tape measure around the piping making sure that you seam allowance (1/2") is visible under the piping. Turn the tape measure over and see where the end of the tape measure end is sitting. That is the width of the bias binding.

Here I took a colored pencil and drew my lines.

Here is where I pinned the seam together. This is where you have to be accurate. Make sure the lines meet on the seam line (1/4").

Here's the seam sewn and you can see that my lines match from one side of the seam to the other.

The cut out bias strips.

Piping sewn to top. Here's I'm getting ready to attach the two ends to make the continuous loop of piping.

Piping is finished, zipper installed, and everything is sewn together. Not to bad for a quick cushion cover. Can you see what I forgot? It's in the picture below.

Cushion cover has the pillow form in it. Yes, it's a pillow form and not a cushion. I went to JoAnn's to get a round cushion but they only had a pillow form which makes it a little puffier than what I wanted. Cushion needs to be played with a little bit to get it to fill out the cover a little better.

Following are examples of how it looks:


This is far from perfect but I'm happy with it. It is the very first time that I have made a round pillow cover. The very first time that I have put a zipper in the round. The zipper didn't turn out so great but it is definitely a learning experience. I love the fabric and actually think that it would have made a great skirt or even a shirt.

The pillow form was suppose to be the same size as the chair - 16". It's not really true. Maybe if you measured from seam to seam on the pillow but it definitely doesn't sit as 16". When making a cover for a pillow or a cushion, make it the same size as what is being covered as in don't add seam allowances unless you need a little for the height of the cushion/pillow form. That way it will fill out the cover.

Oh, I forgot to tell you that I had just enough bias strips for the piping and the ties. The ties are a tad short but will tie.

Happy Stitching!

Thursday, May 20, 2010

I did it!

Yes, I did it. I finished all of the projects that needed to be completed on Tuesday. Here's what I did:

First, I had to figure out the envelope for the situpons. So, I used a scrap piece of fabric and pins to create a small envelope. Here's my sample:

After playing, I figured out that the foldover part of the envelope needed to be on the inside. (In the background is my new Salem cutting mat and I love it. It is so big.)

Here's my testing of the turning.

Here's the finished sample. Perfect for what I need to do.

Now on to the real situpon. The cushions for the situpons are suppose to be 15" x 17" x 1". So, I measured around the measured around the length of the cushion and came up with 35". Next, I measured width along one side and one top and come up with 16". Here's the formula that I used to cut out the situpons:

Length - 35" + 1" (ease) + 6" (envelope) = 42"

Width - 16" +2" (seam allowances + ease) = 18"

Here's pics of the process and finished product:

Here's folding the envelope top with the right sides together. Because I was using a flannel backed vinyl tablecloth for this project, I used the finished edge for the edge of the envelope. Note the pin. I used 2 pins and pinned within the seam allowance which was 1/2". Next, I brought the opposite end up to meet the top of the fold (sorry, missed taking a picture). Then, I stitched 1/2" seams at a 5mm stitch length.

Here's the first turn after stitching the side seams.

Here's the second fold after the cushion was slide into the opening. This is where I was a little afraid that it might perforate but it didn't.

The finished product. Perfect for the boys and three days of classes in the mountains. Hope they are having fun. By the way, this is the same process for making a envelope style pillow case. Although, you might want the envelope part to be on the inside.
Now it was on to make a bag for the sleeping bag.

The sleeping bag that is missing is carrying bag. Pretty much a mess. There are not any ties on this bag so it really does need the bag to contain it.

Fortunately, the matching sleeping bag has it's drawstring bag so I do have a pattern. The process that I used was to measure across the bottom circle. Then, I draw a similar circle adding 1/2" seams. I also measured around the bag and cut out a rectangle with the length + seam allowances and the width + seam allowance + top seam for drawstring.

Here's the finished bag and amazingly the sleeping bag fit. Everything for this project came out of the stash. I also found the drawstring and cord stops in the stash.

Both of these projects were super fast sewing. I was not looking for perfection in either of the projects. I just needed to get them done. I was very pleased with the outcome of both projects. I think that both projects took less than 2 hours to complete from making samples, cutting out, and sewing.

I think my next project will be the curtain for the deck. This is to block the afternoon sun so that we can enjoy the deck just a little bit more in the early evenings. My outdoor thread arrived today. So, I just need to remeasure the area where the curtain is to hang and figure out the various lengths of fabric. Hopefully, this project will turn out well. I purchased a felling foot for this project. Hope it works out well.

Happy Stitching!

Monday, May 17, 2010

Time Flies...

Whew! I didn't realize that it had been so long since I had posted. What have I been to? Lots - spent spring break in Arkansas visiting family, recovery period after vacation running, daily running for work, and the most exciting part - my business has moved from my home. Well, actually, it's still in the process of moving but I'm almost done. I'm hoping once the business is out of the house, that I will find more time to sew.

It seems the last post that I was working on the shamrock place mats and table runner. I did not get these finished. However, I have a wonderful start for next year. I new plan for this to be completed by the end of the year. That way they will definitely be finished for next March.

I do have a couple of things pressing that need to be finished in the next couple of days. My husband and son need situpons for a school campout in the mountains. So, I purchased a inexpensive tablecloth at Walmart (no fabric department any more) and will be using existing pads. Here's the pre-shot:


The plan is to make a big envelope. I have never sewn on the flannel backed vinyl before so hopefully this will work for the few days that they will be needing the situpons. I also need to come up with a cover for a sleeping bag as my son lost one of the bags. Wish me luck, as I rarely get things finished on time.

Happy Sewing!

Monday, March 1, 2010

Rotary Cutting

Whew! I have been using my rotary cutter on the placemat project. It really does take a lot of work to cut a straight line. However, I'm bummed. I thought that I had purchased enough fabric to make 6 placemats and a table runner, but there isn't enough fabric. I was able to cut out 4 placemats and the front of the table runner. I'm still cutting out the fabric for the shamrocks, but I have lots of the dark green fabric. In fact, more than I need. So, I will be using the dark green for the back of the table runner. So officially, the fabric has been cut out. Next, I will tackle the cotton batting and interfacing. I think that sewing of this project should be fairly quick and easy. I hope so.

Since I've been using the rotary cutter and cutting mat a lot the last few days, I realized that I my Salem cutting mat is not in very good condition. It is the only cutting mat that I have ever owned and it has been used a lot. The size is approximately 24" x 18". I have found a company that carries the Salem mats but I'm not sure what size to purchase. Any size suggestions?

I've been looking at the Sew Easy Ruler Cutter as a replacement for both the ruler and rotary cutter. There is much less chance of hitting a finger with a blade with this cutter. Has anyone used one of these? I would love to hear about your experiences.

Happy Sewing!

Sunday, February 28, 2010

Moving along slowly...

Yes, I have been working the fabric for the placemats/table runner. The fabric has been washed and pressed. In reading through the directions, it stated to use misty fuse. I have never used this particular product. So, off the nearest quilting store. They didn't have misty fuse either but they did suggest steam a seam 2. So, I purchased a 1/2 yard and looked around a little bit. Low and behold, I found my favorite sewing notion - Wonder Tape by Collins. I felt a little bit greedy in that I picked up 4 packages for my notions stash. I can't believe that this has been discontinued. If you have been looking for this notion, may be you will find it at your local quilting store also.

Tonight, I plan on cutting out the placemats, table runner, and ironing the interfacing onto the fabric for the shamrocks. DH is out of town so I will not have a lot to do tonight. So, I'm going to be productive and work on this project. I have decided that I will use my featherweight to sew everything together. My various machines need to be used from time to time and this will be a very good project to use that machine for.

Ok, I'm off to get the rotary cutter going. It should make quick work of cutting out the base fabric for the placemats and table runner.

Tuesday, February 23, 2010

Free time..

Today, I had about an hour of free time. This doesn't happen very often. I usually running hard and fast all day. So, I had a decision to make. Work in the store for an hour or do something sewing related. I chose the sewing related. Saturday, I had visited a new quilting store in my area and purchased a few yards of fabric. Ok, I admit it was a struggle to find anything in this brand new store. They had merchandise but it seemed "old". Not physically but the patterns. Hope that makes sense. So, I pulled out the fabric from that purchase and a Chez Ami (?) purchase, and serged the edges getting them ready for washing. Hopefully, I can do that tonight.

Destined to be swim trunks (brown /teal print) and a skirt (black & white check).


Destined to be placemats and table runner. Wonder if I can actually get it done before St Patrick's day? What do you think of the fabric?

Sunday, February 14, 2010

Interesting Details

I enjoy looking at high-end clothing. Just to see the details. This skirt by Versace caught my attention today. No, I don't wear mini skirts. I'll let the 20 somethings do that. What caught my attention was the black stitching on the front of this skirt. Here's the link: http://www.neimanmarcus.com/store/catalog/prod.jhtml?itemId=prod103500032&eItemId=prod100940004&cmCat=search&searchType=MAIN&parentId=&icid=&rte=%252Fsearch.jhtml%253FN%253D0%2526Ntt%253Dversace%252Bpink%252Bskirt%2526_requestid%253D18928

Really you need to zoom in and check out the stitching on the skirt. For $695.00, I think it would be very easy to duplicate the look of this skirt using decorative stitching on your sewing machine with a heavier decorative thread, then add some silver studs. I don't know it this would translate to an older woman's wardrobe but I really do like the detail on this skirt.

Hope you enjoy the inspiration.

Happy Sewing!