Thursday, October 29, 2020

Organization...Sewing Room Part 2

My post on Sewing Room Organization is here.  That post shows that basic room.  I have now drawn my furniture to scale.  Here is the furniture:


It was very exciting to get the furniture drawn.  After I cut out the pieces, I realized that I had missed drawing the miniature cutting table.  So, I measured the various sections of the table and created my piece.  Here is my current room set up:


The cutting table closed up is sitting between the Sewing Desk and the Singer.  Doesn't this layout look like it should work?  I really thought this would be a great setup but I can not seem to keep it neat.  Really I have too much stuff.  Here's how I thought this room would work:


This is how I thought the room would work when I needed to cut things out and the previous picture is how I thought things would when I didn't need the cutting table.  Perhaps, I should clean up the room and leave the cutting table open all the time.  This would allow easy access to all the storage areas under my cutting table.  When the cutting table is folded up and pushed into it's home, I only have easy access to one side of the storage.

I think I am going to rethink this whole re-organization.  I actually still like my room the way it is arrange.  I think that the real issue is my ability to keep the room neat.  If I leave the cutting table open in the middle of the room, I will have space to add an ironing board.  

So, does anyone have any advice on keeping the room neat?  I suppose the real answer is putting things away when I am done with them and then cleaning the room between projects.  I am really bad about not taking the time to clean between projects along with just dumping stuff in the room.  

Okay, I am off to start the cleaning process. If I can get the room cleaned up, I should be able to return the items to the room that have migrated to other parts of the house.  I would love to hear that you think of my layout.

Happy Stitching!


Tuesday, October 27, 2020

Organization...Sewing Room

 I have been in this house for three years now.  I did a few organizational posts when I was attempting to get organized.  Here they are - Rulers, Cutting Boards & Peg Board, Fabric Folding, and views of Fabric Storage (some).  Then about a year later, I wrote a post about reorganizing the room.  The reorganization isn't working either. The things that worked was the first round of organizing the rulers, cutting boards, peg board.  The things that haven't worked partly is how the room is set up.  This means moving furniture around once again.

With this round, I have drawn the room to scale.  Here it is:


It is not a large room at 11 1/2' x 10'.  One wall is mostly doorways either to enter room or for the closet. Another wall is more than 1/2 a window.  I do have a small cabinet that will sit between the closet and entry door.  You can see bits of it in the ruler post above.  There is a three tier cart that sits between the closet door and the window.  The peg board is behind the door which is the perfect place for it.  On the same wall as the peg board, I have an Ikea cabinet that somehow manages to hold a large portion of my patterns with a shelf above it that holds jars of buttons, and other small sewing related items. Then, there is a large Ikea book shelf that is full of sewing books, knitting books, quilting books, and magazines.  There isn't nothing wrong with the placement of the items on this wall.  

Currently, the corning desk is occupying is corner next to the window with a Singer treadle right in front of the window.  Between the sewing desk and the bookshelf is another Singer sewing machine (meant to be the machine for my quilting) and my folding cutting table.  The room is full.  The cutting table can be rolled out into the center and opened up.  At least, that was the original plan.  I can not keep my room clean.  I have spilled out across the house.  I need to come up with a way for this to work in such a way to keep things neat and clean.

Currently, I am contemplating putting my sewing table in front of the closet.  The next step is to draw my furniture to scale and start playing with the furniture placement.  It is possible that the cutting table will not open up with the sewing table placement in front of the closet.  Maybe the real issue is my table.  I have hauled it around for a very long time.  It is possible that it is time to replace it.

I will share the scaled furniture and the various placements as I figure this out.  There is one more thing that isn't working with this room.  It is my fabric scrap storage.  It is literally just crammed into a small three drawer cabinet.  Nothing neat about it.  How do you store scraps?  The majority of my scraps are cotton ones that could be used for quilting type projects.

I will share as much as I'm comfortable sharing.  It is very possible that I will not show the room set up with machines.  I know that I talk about my various machines from time to time but I don't necessarily want to show all of them at once.

If you have organization or furniture arrange ideas, please share.  I will listen to all ideas because I need help.

Happy Stitching!


Monday, October 26, 2020

Inspiration...Reversible Jacket

 As the season progresses into fall, we need jackets.  Here's a boxy jacket that would be easy to recreate:


This is the Filippa Reversible Wool Cashmere Jacket by Lafayette 148 New York. Price tag: $898.00.  Details: open front, zip front, long sleeves, patch pockets, boxy silhouette, hem sits a hip.  The topstitching on this jacket is well worth checking out.

If you want this double-sided you will need to do the figure out to do.  A double-sided fabric would be perfect.  Here's a pattern that would be perfect:


This is the Janie's Jacket pattern by Silhouette Patterns.  It will work perfectly for the inspiration photo.  The inspiration photo has beautiful topstitching.  Check out the post on Pinstitch or Pickstitch or Prickstitch here.

Hope you're inspired to create something beautiful.

Happy Sewing!


Thursday, October 22, 2020

Inspiration...Boxy Cardigan

 As the days get shorter and the weather cools down, there is nothing better than having a cardigan to carry with you.  Here is a great cardigan:

This is the Eileen Fisher Wool-Blend Hooded Boxy Cardigan.  Price tag: $378.00.  Details:  Attached hood, open front, long sleeves, patch pockets, boxy silhouette, sits at hip.  

Folks, I think we could recreate this cardigan very easily with sherpa fleece or cuddle sherpa.  Here's the pattern that I think will make a perfect version of this cardi:


This is a freebie cardigan pattern by So Sew Easy.  This pattern will need to be shortened to make it perfect but you can't really get easier than that can we?  

Happy Stitching!

Wednesday, October 21, 2020

Pinstitch or Pickstitch or Prickstitch...

 Monday,  I shared a inspiration photo of a coat with a "pinstitch" detail.   Now, I thought this was going to be very straight ward to locate information on how to do this.  Guess what?  It was not.   I found tutorial for pin stitching in cross stitch, and heirloom pin stitch.  There were many of these types of tutorials available.  However, where is the information for using a pin stitch on a garment for top stitching or applying a zipper?  I was puzzled.  Perhaps I was using the incorrect term.

As it turns out, indeed it is the incorrect term. Pinstitch as used on the coat is called Pickstitch in the sewing world.  Here's a video from Threads - How to Sew a Pickstitch.  Here's another version - The Pickstitch.  This version also mentions that it can be called a prickstitch.

I found mention of this stitch in The Vogue/Butterick Step-by-Step Guide to Sewing Techniques circa 1989, and Sewing Couture - The Couture Cardigan Jacket by Claire Shaeffer circa 2013.  No doubt if I dug through more of the books in my library I would find more references.

Hope this information is useful.

Happy Stitching.

Monday, October 19, 2020

Inspiration...Coat

 When you live in a cooler climate, you definite need a nice coat.  Here is one for thought:


This is the Lafayette 148 New York Marabela Elite Italian Wool-Cashmere Coat.  Price tag: $1798.00. Details:  Notched lapel, one button, long sleeves, welt chest pocket, flat hip pockets, relaxed silhouette, pin-stitched detail, about knee length, approximately 39" back length.  

This is a very expensive coat and it is all about the fabric and pin-stitching.  Here is a pattern that is very close to the silhouette:


The is the Chaval Coat pattern by Liesl & Co.  With this pattern, you would need to add a chest welt pocket and maybe remove two of the buttons.  If it were me, I would leave all of the buttons for added warmth.

The wool/cashmere coating is fairly easy to find and there are lots of colors/patterns to choose from.  Even at $35.00 a yard, you could purchase enough for a muslin and still be a head.  

Hope you are inspired to create something beautiful.

Happy Stitching!

Friday, October 16, 2020

Seamwork Rhett Muslin Round 3

The next round of changes to the Rhett jacket are here.  I basted all of the previous changes in so I could see what was going on.  Starting with the back:


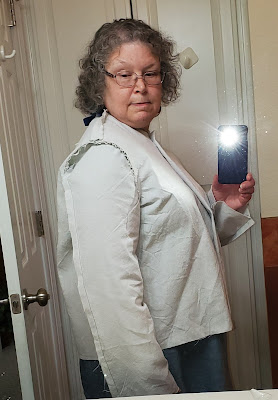
The back looks reasonably well.  It might be a little wide on me but I am going with it.  There is 1/2-inch rounded back adjustment about 1 1/2" from the neckline.  Here's some side shots:


This side shot looks much better than the side shots without the dart.  I think the pinned in dart looks like it is a bit too long.  I think it will be backed off by 1/2-inch.  

With the exception of the "pocket hack", I think this jacket is ready.  I will be working on the pattern changes.  This is actually the hard part.  Some changes affect others so, I will need to get that worked out and hope that the changes from the muslin to the pattern translate well.  Here's links to the other posts on the Rhett jacket:

Round 1 - straight from the pattern

Round 2 - some of the changes.

Happy Stitching!


Thursday, October 15, 2020

Seamwork Rhett Muslin Round 2....

 After looking closely at the pictures from Round 1, I decided to make minor changes to this round.  Here's a glimpse:


The changes to the muslin here are:

1.  added collar

2.  added sleeve hems and jacket hem

3.  Remove 1" from each shoulder seam.

I think that the shoulder seams are in a better place now.  I really should have been the tuck down a bit further but we'll save that for the next round. I'm not sure about the length shown here.  Let's see what the side view looks like:


Now from the side with my hair out of the way, you can see two things:

1. The collar is standing away from my neck which indicates that I need a rounded back adjustment.

2. The front is much shorter and appears to stand away from my body which indicates that a bust dart is required.  This will added length where is it needed.

I think I am okay with the sleeve length.  It is a little bit long but not some much that I want to do something about it.  Really, this is not a bad list of changes.  It will be important to do them in order though as the round back adjustment will make the jacket fit a little bit differently in the front.  

I am going to say that I have never shortened a shoulder seam before.  Nothing like learning something new.  I will actually be following information provided in the classroom section of Seamwork for this modification but I found similar information at Curvy Sewing Collective here.

I am a member at Seamwork.  The classroom is part of the subscription.  If you were to use one of the Seamwork links here to purchase a monthly or yearly subscription, you would get a $3 discount and I will get a small benefit.

Happy Stitching!


Wednesday, October 14, 2020

Technique For Hand Sewing Snaps...

One of the things that need to be considered for the Rhett jacket is finishing technique.  The jacket takes 3/4" buttons.  I am considering using snaps instead of buttons.   I was thinking that the Alabama Chanin way of hand sewing snaps would look interesting on the jacket.  I started looking for information on the technique for sewing the snaps on.  I really thought that it would be super easy to find and a tutorial could be found on the Alabama Chanin blog.  I was wrong.  Here is the information that has been found:

1.  Alabama Chanin Covered Snaps

2.  Alabama Chanin instructions on how to sew a snap on

The information from both of these posts may very well work for my jacket.  Let's see what happens when I get to the point where I can actually make a decision on this.   

Hope you found this information interesting.

Happy Stitching!

Tuesday, October 13, 2020

Seamwork Rhett Muslin Round 1...

 I started my next project for my Design My Wardrobe plan.  Here's the line drawing:


This is the Seamwork Rhett jacket.  Originally, I was going to make the view with the square pockets on the left.  Then I discovered this hack:


This hack has hidden front pockets.  This hack is found in the magazine.  So, here's round 1:


The front of the jacket isn't too bad.  You can see that the indications that a bust dart is needed.  Looks like the shoulder is too long.


Here's two views of the side.  The view with my arm down definitely shows that a dart is needed.  I am not sure what to do about the puffiness on the back near the bottom of the sleeve.  I didn't actually wear the muslin long enough to know whether or not I need to add a round back adjustment.  Let's see what the back looks like:


The back just looks too big.  Maybe that is the puffiness that I noted form the side view.  There may be a need for a round back adjustment.  I think I need to find something to get my hair off my neck so I can see what is going on.  

I'm off to make changes to this particular muslin and see how it turns out.  I will definitely reduce the length of the shoulder since that seems to be affecting so much; add the collar so I can see how the collar is actually hanging; baste in the hems.  I think that is enough for Round 2.

Just so you know.  I only make one muslin unless the size is extremely off.   A muslin that is too small just won't work.  A muslin that is too large will be easier to deal with but will require too many changes.  I am not looking for perfect because I am not sure it exists.

About Seamwork - Seamwork is a subscription service.  It can be purchased monthly or yearly.  Individual patterns can be purchased as well.  If you purchased a Seamwork subscription through my link, you would get $3 off your subscription and I would get a small benefit as well at no cost to you.

Happy Stitching!
(affiliate links are included)


Monday, October 12, 2020

Inspiration...Popover Top

 I rarely find a top that I want to purchase.  This one is it.


This is the Covered Button Popover Top by Ann Taylor.  Price tag: $79.50.  Details: Split Neck, long sleeves with cuffs, button front, relaxed fit, gathered shoulder, gathered back yoke, 25 1/4" long.

I was unable to locate a similar pattern.  However if you are the creative type, you could probably take an existing pattern and recreate the look.  


Friday, October 9, 2020

Inspiration...Midi Skirt

 I really like that the midi skirt is returning.  This is such a good style of skirt.  Here's a lovely skirt with interesting details:


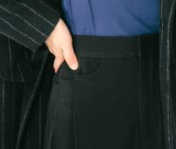
This is the Aurelie Midi Skirt by Skye.  Price tag: $165.00.  Details:  aline, vertical pleats, back elastic waist, high waist, length for a size small is 34.4".  Here's a close up of the pocket detail:


Notice the pleating is actual part of the pocket detail.  Love this detail.

Folks, I was unable to locate a pattern with the trouser styling and a back waist.  The closest that I could find is this pattern:


This is My Basic Jean Skirt pattern from Silhouette Patterns.  This will only give you the trouser details for the front of the skirt. Note that this isn't high-waisted.  Adding the pleats are probably the easiest thing to do here.   Here are the steps I would use:

1.  Trace pattern.
2.   Decide on added length and sweep of the skirt.
3.   Decide where the three pleats should be and how wide.
4.   Draw the line from the pocket to the hem where the pleats are indicated.
5.   Draw three sets of parallel lines the Length of the skirt and width apart that was determined in #3.
6.   Cut the one of line drawn in #4 and add one of the set of the parallel lines.  Repeat for each pleat.  

Hope that makes sense.  Now, I don't know if this will create the interesting pocket line or not.  It would definitely take some playing.  

Friends if you know of a pattern that is closer to the inspiration picture, let me know and I will add it to the post.

Update: I have located another skirt pattern that may indeed work.  Here is the line drawing:

This is the Blandine Skirt pattern by Republique du Chiffon.  What do you think?


Happy Stitching!


Wednesday, October 7, 2020

Seamwork Bertie... It's Done...

 Whew!  I really didn't think this dress was going to get finished but it did and here is a hanger view:


I think I am going to really like this dress.  Yes, the fabric wasn't the color that I thought I was getting but I think it turned out very nice.  I had more issues with this dress that I ever thought was possible.

I started this dress at the end of July.  You can find the posts on the muslins  - Muslin 1 and Muslin 2.  There are a fairly long list of changes to the pattern:

1.  Raised the neckline by 2 inches and corrected the neckline.

2  Added a dart which lengthened the bodice by 1 1/2".

3.  Added an inch to the length.

4.  Added a rounded back adjustment.

5.  Respaced the buttonholes/buttons because of the added length to the bodice.

One of these changes will cause me grieve later and I will explain.  

At the end of the last Bertie post, I was ready to go.  I made all the changes to the pattern (I thought) and cut it out.  I got the bodice stitched, the neckline done, the sleeves in, and then I hit the first snag.  I did not have the braided elastic called for in the pattern.  I attempted to use a knit elastic.  NOPE.  The knit elastic would not work.  So, I started looking for braided elastic in the correct width.  Folks, narrow width elastic is not easy to find.  I finally found some at Nancy Zieman Productions.  This site also had some other items I had been looking for so it turned out good.

Then, I fell into a sewing slump and didn't sew for a couple of weeks.  Yeah, not the right time for that to happen.  I finally made myself get with it.  The right kind of elastic was perfect and got the dress hemmed.  The button bands was the last thing to do.  Here is where I missed a change on the pattern - the button band.  I had added the 2-inch at the top and the 1-inch, but I missed the 1 1/2-inch change of the bodice.  My button band did not fit the dress.  Luckily, I had enough fabric to recut the band.  Yeah, the dress is all done except for the buttonholes and buttons.  The respacing meant that I was going to use every button that I had purchased.  Shell buttons can be fragile and you know I broke one taking off the package.  Another delay!  So the next opportunity that I got to go to JoAnn Fabrics, I was hopefully that there would be more shell buttons but I had purchased all the shell buttons in that size the last time I was there.  Much to my surprise, the buttons were there.

A few days later, I return to working on the dress.  Because of earlier mistakes, I was able to create a button band to practice making buttonholes.  Sewing button holes on the rayon twill turned out to be an adventure all by itself.  I ended up using a folded piece of the rayon twill under the right side of the pressure foot.  This was the only way that I could get the buttonholes even remotely straight and I had to make 15 buttonholes.  These are the ugliest buttonholes I have ever made but they are functional and I will be the only person who really knows.  Do not say anything if you see me in the dress.  

If I have enough fabric left, I intended to make a matching tie belt.  I do think the dress needs it.  I am also unsure of what type of shoe to wear this.  When I have time with the photographer, maybe I will try a couple of different shoe types and post it.

In conclusion, this is not a beginner pattern at all.  It is marked as a beginner intermediate.  If you were just stitching, maybe that is the correct rating but if you have to do any fitting it is not.  For me, the neckline sat right on top of the edge of my bra.  That is too low and wide for me.  The fact that the dress has to be made entirely before any fitting can happen makes if difficult also.  I don't know if I will make this again.  I feel like I should make a version in chambray for summer but who knows what size I will be next summer.  Besides, there are lots of other patterns to stitch.

Happy Stitching!

Tuesday, October 6, 2020

Buying Spree...

 I just can't help myself.  Change of season needs new fabric.  Let's hope I don't purchase too much more.  Here's my latest acquisitions:


This is a Telio sweater knit.  I intend to make a boxy top using this pattern:


This is the Cowl Top pattern by Loes Hinse Design.  It's an oldie but goodie.  I haven't decided yet whether I'm actually going to put the cowl on or not.  It will depend on the fabric.


This is an inexpensive knit to use an a muslin for this pattern:


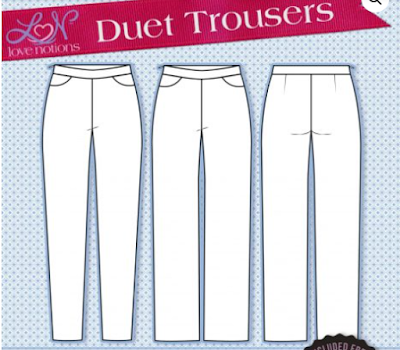
This is the Love Notions Duet Trousers pattern.  I'm hoping that I can get this pant to fit rather quickly.  It is meant for both stretch woven and knits.  All of the remaining fabrics are intended for this pattern. 


This is a navy ponte de roma.  It is a polyester, rayon, lycra blend.  I'm hoping it's the correct weight for pants.  It said that it was a medium weight fabric.


This is a grey ponte de roma.  It is a polyester, rayon, lycra blend.  It is a heavier fabric than the navy ponte above.  


This is a charcoal grey suiting.  It is a rayon, nylon, polyester, lycra blend.  It's the only woven that I purchased today but it is intended for the same pattern.  Hopefully, I can locate an inexpensive source of stretch woven that will work for the muslin on this one.

I do have other pant patterns but it is so hard getting them fitted that I want to make it worth my time to do the fitting.  I seem to always plan way more than I can actually sew.  Let's see where this goes.

Happy Stitching!


Monday, October 5, 2020

Inspiration...Funnel Neck Box Top

 Fall is here.  It is really time to think about cool weather clothes.  This top would be perfect:


This is the Eileen Fisher Diagonal Striped Funnel Neck Box Top.  Price tag: $278.00.  Details:  High neckline, long sleeves, boxy silhouette, pullover style, 22" long from shoulder to hem.

This type of top could be a real day-to-day, live-in top.  My first thought of pattern was this one:

This is Seamwork Ace funnel neck top pattern.  For me, this pattern is a little bit fitted.  However, you could go up a size for a less fitted look.  Seamwork is a subscription service.  You can purchase yearly, monthly, or individual patterns. Following the Seamwork link will give you $3.00 off and I will get a small benefit also.

Here's a couple of additional options:


This is The Toaster Sweaters pattern by Seven House Seven.  The sweater on the right is much like the inspiration pattern. 


This is Simplicity 8529.  It is also a design by Seven House Seven and very similar to the Toaster Sweater.

Now, you have a few options for making a similar top.  Hope you're inspired to create something beautiful.  By the way, if you have a similar top already in your pattern stash use it.  Save those dollars for the fabric.

Happy Stitching!

Thursday, October 1, 2020

Inspiration...Silk Blouse

 I never get tired of blouses.  Here's a lovely version:


This is Lafayette 148 Scottie Tidal Print Blouse.  Price tag: $498.00.  Details: Details:  Approximately 26" long down center back, spread collar, concealed button front, long sleeves, button cuffs, back yoke, chest patch pocket, relaxed silhouette, shirttail hem.  Check Neiman Marcus for closer details.

Please notice that this top is very similar to the many past inspirations.  Differences between this and the last inspiration shirt is the fabric, length is slightly shorten, and the hem is different.  However, the shirts look completely different.  

Here's a link to a previous post - here.  This will have the pattern information and links to a tutorial for the concealed button front.  It is so worth getting this style of shirt fitted and then making it over and over.  Small style changes can really change the look of the shirt.  

Here's an additional pattern to think about:


This is the line drawings for the Montana Shirt digital sewing pattern from Itch To Stitch.  This pattern has cup sizes from A to DD.

Hope you're inspired to create something beautiful.

Happy Stitching!

(Affiliate links are included.)