Showing posts with label Bernette B77. Show all posts

Tuesday, November 26, 2024

Corduroy Skirt...

 My last two projects have been shirts.  I am actually tired of making shirts so I decided to move on the Itch to Stitch Taroko Skirt pattern.  Here is the line drawings of the skirt:


I made a muslin of the skirt last year and actually wore it a lot.  So, it is time to make another one.  I looked for an appropriate fabric hiding in the stash and found this great corduroy:


The corduroy is a navy blue.  It should fit well into the current wardrobe.  This is one of my little helpers.  The corduroy must feel nice to the kittens because I have found both of them either laying or rolling around on the fabric.  Here is the finished skirt:


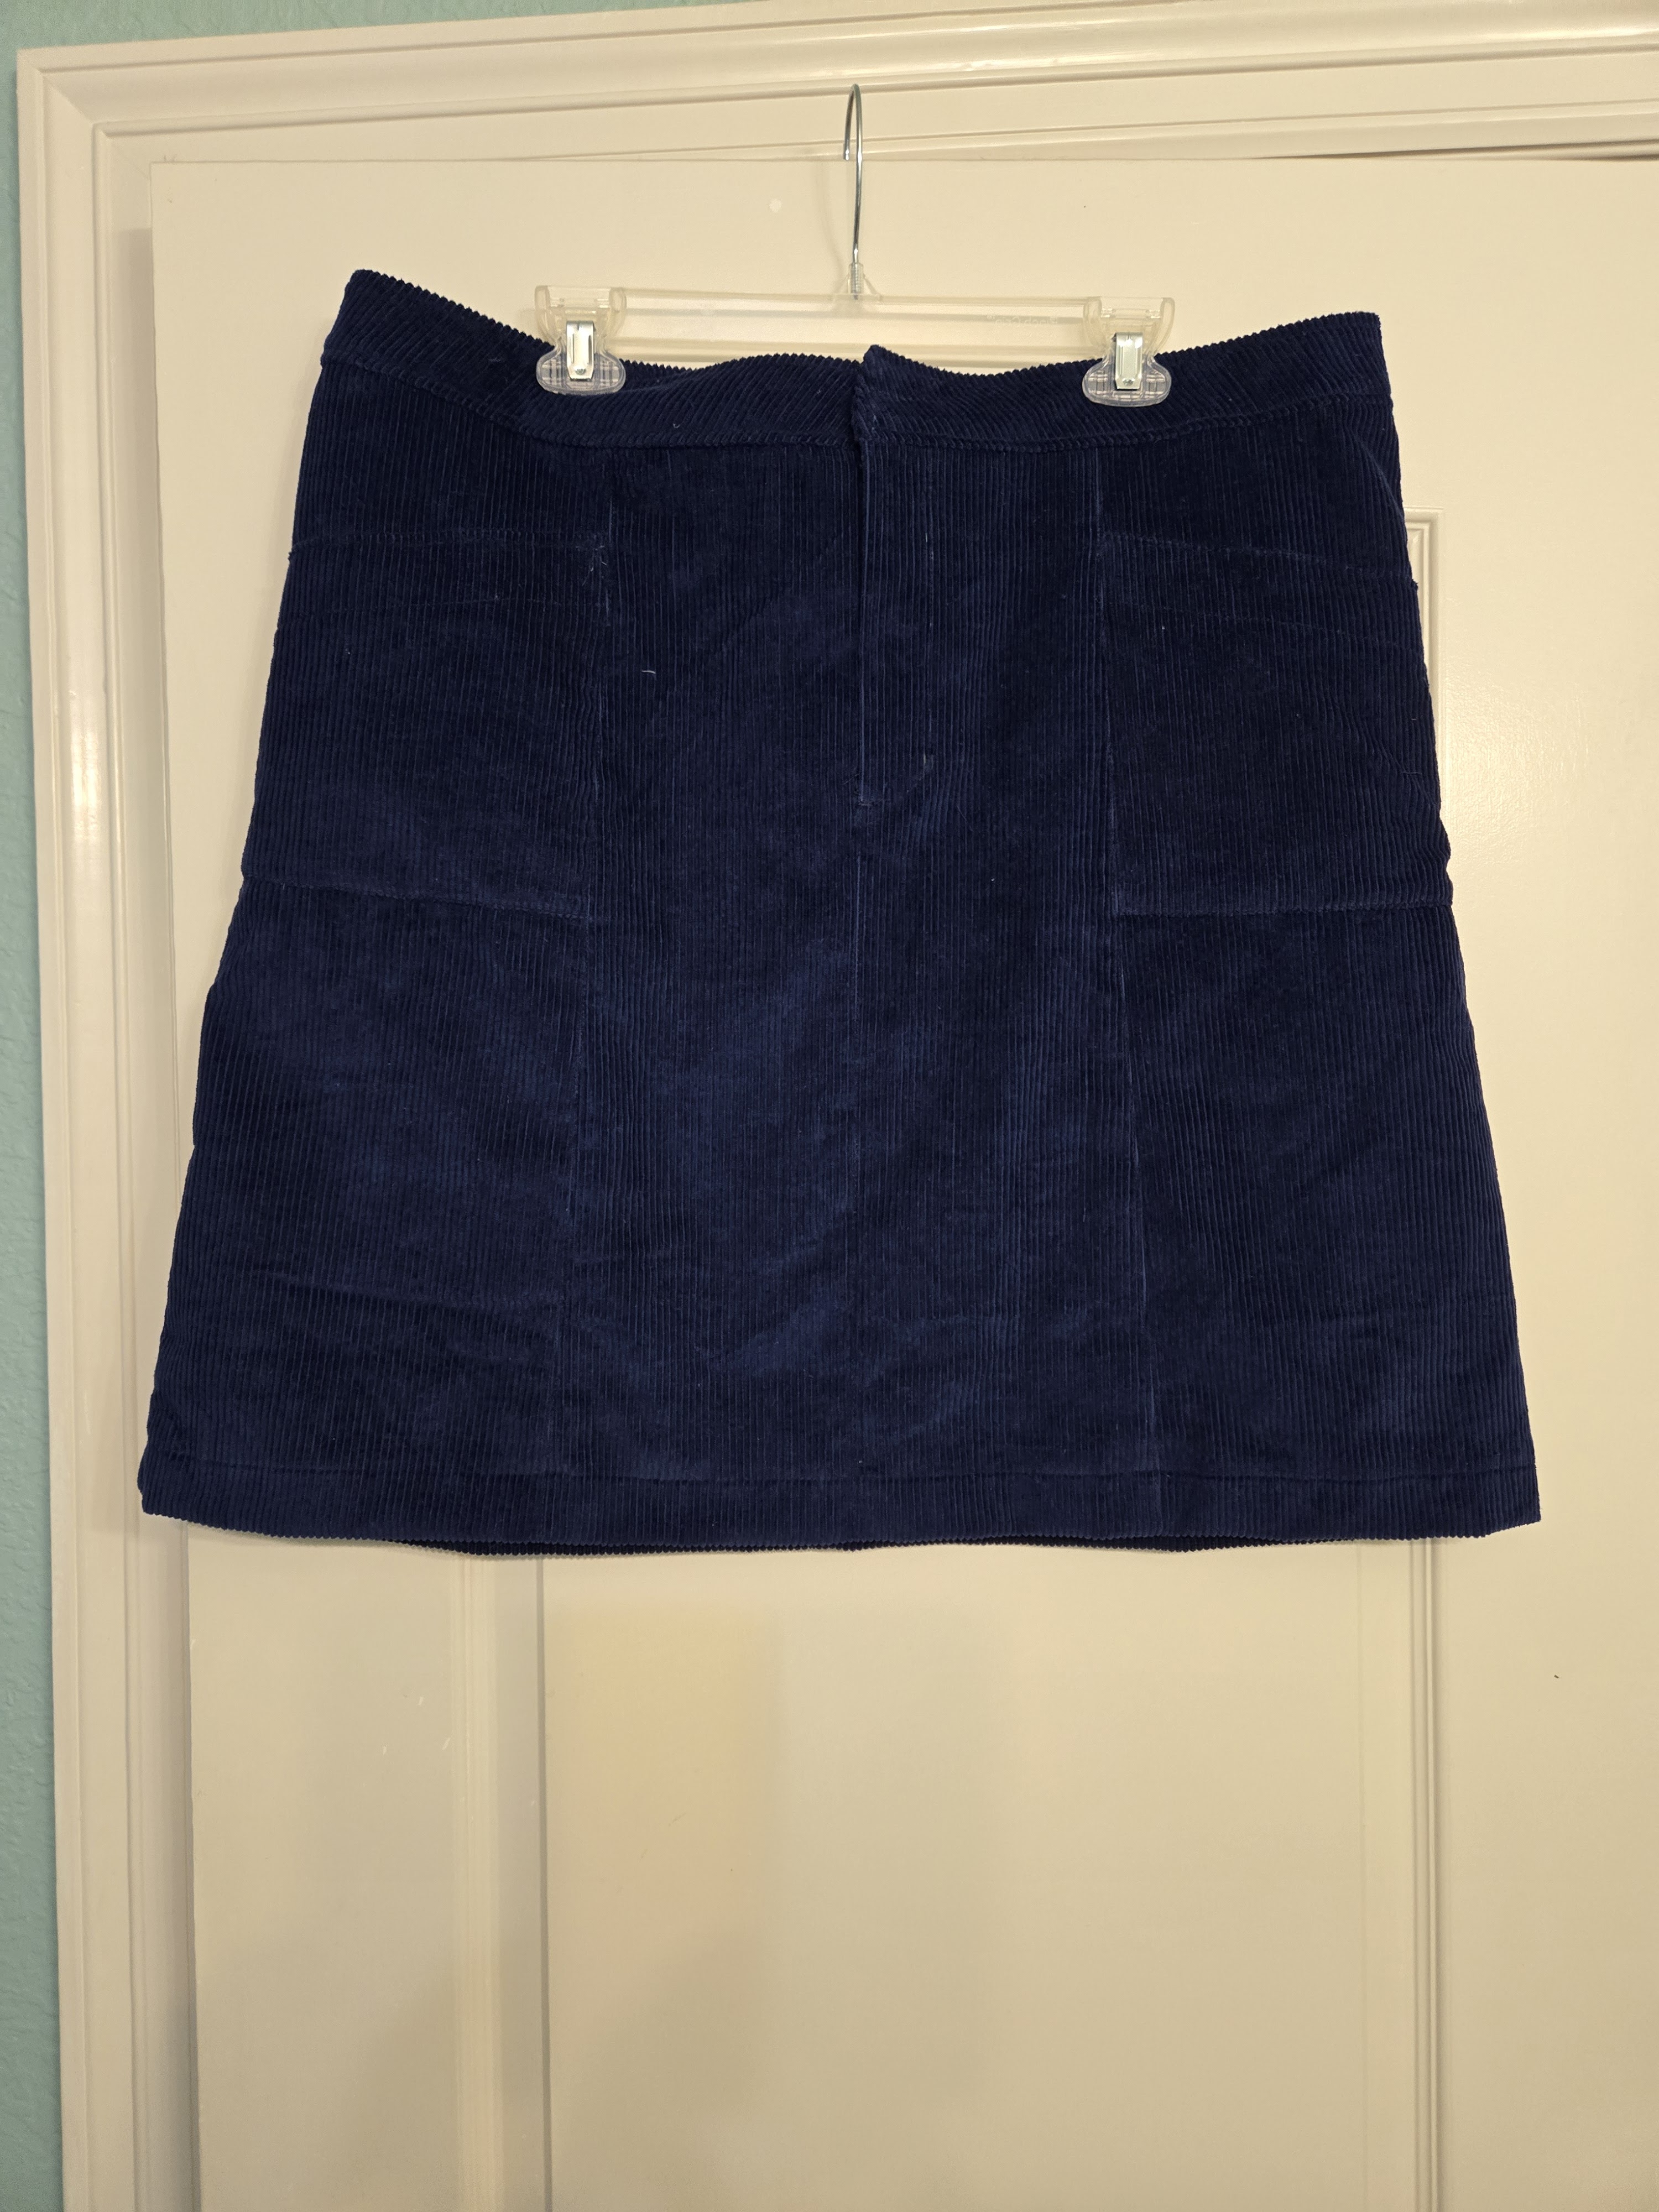
I know solid, dark fabrics are hard to see and hard to photograph.  My impromptu skirt turned out nice and I am looking forward to wearing it.  

I decided to reduce the bulk in the zipper area by using a shirting fabric that somewhat matched:


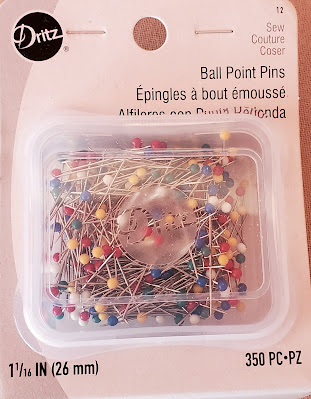
I also pulled out the manual for my Bernette B77 and looked to see if there were any built in stitches that might be helpful.  Here are the stitches that I found:


This basting stitch is 5.0 mm long.  Nothing special to it.  Just pick it out.  This stitch will be used again.


This is the Bartack Stitch.  Yep, instead of you figuring out the stitch width and density, there is a dedicated stitch.  It works well.  However, it used the buttonhole function which means that the buttonhole foot is used.  Visibility is limited with the buttonhole foot.  Practice before using so you understand how it stitches.

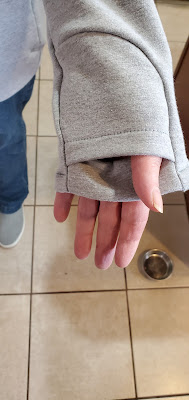
I do not know if you can tell from the picture above but there is no button at the waistband.  I had to sew on a hook and eye as the B77 just would not stitch on the waistband.  It stitched every test buttonhole beautifully but on the actual waistband it stayed in one place.  I might sew a button on the outside of the waistband just so it looks like it is suppose to.

Please note, I am an Itch to Stitch affiliate and if you use any of my links above to purchase, I will get a small commission. Thank you!

Happy Stitching!


Tuesday, March 1, 2022

February Update...

 Woohoo!  I actually finished something in the month of February.  


This is the Itch to Stitch  Lamma Hoodie & Sweatshirt pdf pattern.  I mentioned purchasing this pattern back in November 2021.  I sized up a bit on this one.  I think that I decided to make a size 20 with the full bust front because I wanted it to be little bit of an over sized.  Looks like I got my wish on that one.  It will be perfect for hiking or cool evenings.  Here is a picture of the thumb hole sleeves:


The fabric is a grey stretch french terry that has been hanging out in the stash for a long time.  I used a black activewear fabric to line the pockets and hood which has also been hanging out in the stash for a while.  That is a win-win in my book.

I had no issues with the pattern and I think it is very well drafted.  You should probably be aware that there are places where the seams are really thick.  Like around the the thumb hole with 6 layers.

I do have a couple of changes that have been noted on the pattern:

1.  Move bust shaping up about 1 1/2-inches.

2.  Change the lengths from a 20 to an 18.

No doubt additional changes will show themselves as this gets worn.  I am very happy with this comfortable top. I think this maybe the end of the french terry hiding out in the stash or at least colors that I would wear.  I am ready to make more.

I did use my Bernette 77 and Juki MO-1000 for construction.  Both machine operating well and did not hesitate going over the thick areas.  Two feet were particularly handy on the Bernette:


This is the zig zag foot for dual feet. It is the default foot for the machine. However, it also has a built in leveler - the little button on the side.  It is fabulous for the thick seams.


This is the open embroidery foot for dual feed.  This foot actually helped with the staystitching on the inside of the pockets.  It worked well for this application by using the inside edge along the seam.

Happy Stitching!

(Affiliate links are included.  Should you purchase via one of my links, I would receive a small commission.  Thank you!)


Wednesday, December 22, 2021

Foz Top, Round Two...

 Here is the second Foz Top.  My first Foz Top which was suppose to be a wearable muslin did not wash well.  I found out that the pins I was using was not a good match to the fabric and resulted in holes all around the neckline.  So sad but the buttons were reused.  Here is the finished top:


This top fits differently than the previous version - here.   The neckline is not too low in this version.  It also seems a little snugger.

Here is the Dritz ball point needles that I purchased:


I think that I purchased these at Amazon.  There is not anywhere locally that I can purchase something that is this specialized.  Now, let's talk a little bit about my Bernette B77.  Here are the setting from the machine for the seams and the hem:

1.  Select light weight knits (#5) on the Creative Consultant.  Then, selected straight stitch (#1) on project type.  Click the green check mark.

2.  Change the stitch length to 4.0.

This results in the stretch stitch #11 being selected.  There are also a list of recommendations that you can use or not use.  This is the foot that was used:


This is the zigzag foot for the dual foot.  Notice the little button on the side of the foot.  It is an interesting little detail that I have not seen on a machine accessory before.  It is used to level the foot when you have areas that are unlevel.  As far as I can tell, this is close to using a hump jumper.  I did have the dual feed engaged through out this project.  Here is a look at the hem:

For the buttons, I returned to the Creative Consultant and repeated Step 1 above.  At Step 2, I selected buttonhole (#4).  Again, you will get a list of recommendations.  This resulted in the machine selecting buttonhole #53, a stretch buttonhole, for the project.  Here is a drawing of this buttonhole:

I had never used this type of buttonhole before but decided to go it.  Here are the results:


Also, I set up a stitching mark so that I would be able to get a reasonably straight seam.  The markings for inches is at the back of the plate and very hard to see when sewing.  Here is my set up:


Overall, I am very happy with this project.  I think there will be another long sleeved version of this top.  There is not anything more enjoyable than a quit project with great results.  Who knows, maybe I will address the fitting a little bit or maybe not.  

Happy Sewing!


Monday, December 20, 2021

Classic Buttondown Shirt...

 It seems that I did not post the results of the Classic Shirt muslin before moving on to the first version.  I think the changes were fairly small.  I increased the bust dart and shaped it.  That alteration added length to the front.  Reduced the length of the shirt body and sleeves by 1 1/2 inches.  I had a beautiful shirting that has been hanging out in the stash for a while.  So, I pulled it out to use.  Here are the results:


I used my Bernette B77 to make this shirt.  This is not the first project that I have made using this machine but it the most complicated one to date.  The feet on this machine do not have good markings on them.  It is easy enough to do topstitching on an outside edge but it is not so easy to get a good topstitch on the inside.  I ended up using this foot:


This is the B77 embroidery foot.  The blue line points at what I used to do edge stitching.  It made a stitch about 1/16-inch from the edge.  Perfect.  The red points points at another spot and it is 1/4-inch from the edge.  Here is a close up of the stitching:


Here is a picture of the inside topstitching:


The B77 makes a beautiful buttonhole.  This is an example of buttonhole #51which is a standard buttonhole:


I used the Liesl & Co Classic Shirt pattern.  This pattern is very well drafted.  The instructions are well written.  I can see many of these shirts in the future.

Happy Stitching!

(Affiliate link included.  I receive a small commission should you purchase.)

Friday, November 5, 2021

Machine Update...

 Way back in June, I purchased a Bernette B77.  You can read about it here.  In July, I gave a little update on how things were going with the new machine.  You can find that here.  Now it is November.  My machine is not at my parents house.  It is still sitting at my house and gets used almost every day.  I have not worked through any of the manuals or work books or finished my stitch bible.  What can I say except "I just want to sew."  

I have been sewing simple things.  A new machine takes getting use to.  This machine is taking a while to get use to. There are things that I really like about the machine and there are things that I really do not like about the machine.  

Things that I like:

1.  The needle threader.  It is fabulous and works every time.  

2.  The buttonhole maker.  I have made dozens of buttonholes and have had only one failure.  It was a user issue.  I think it was the bobbin ran out of thread.

3.  Love the knee lift. It is something that you could find on older mechanical machines or very high end machines.  Nice that it is on this machine.

Things that I do not like:

1.  The bobbin winder.  It is super fiddly.  I finally figured out that you had to thread the bobbin and hold on to the thread tail the entire time that the bobbin was winding or you would get a loose bobbin.  I can get a good bobbin now just about every time I wind a bobbin now.

2.  The ankle for the presser feet.  Again, putting a different presser feet on is fiddly.  Perhaps this is a user issue and I really need to read the manual a little closer.  

3.  The buttonhole maker.  Do not get me wrong.  This machine makes beautiful buttonholes but there is no way to make a manual buttonhole.  You have to have a button.  Sometimes, you need to be able to make a buttonhole that is not used by a button.  Obviously, the answer is to have different size buttons.  Sometimes, that sends you shopping.

4.  Lack of markings on the presser feet.  This really only got noticed when I decided to do some topstitching.  I did finally figure out that I could use two feet to workout what I wanted to do but it was a real struggle and slowed me down.


Now I admit that have not done anything elaborate yet with the machine.  I have made buttonholes but I have not sewn any zippers.  Isn't the straight stitch and zigzag what is used 90 or 95 percent of the time?  This will be remedied.  I have a vest project for my husband that has multiple zippers.  I will update as the adventure continues.

Happy Stitching!

Friday, July 9, 2021

Finally A Completed Project...

 It seems like forever since I actually finished a project.  That bag is February really put me off sewing for a while.  There is nothing like a simple project to get things rolling again and this project could not be simpler.  It is a pillow case for a body pillow.  Here is the fabric which I never admitted to getting:


I know this is crazy fabric but I just loved the colors.  The walls in my bedroom are in the shades of the softer bluish green.  The quilt on my bed is navy.  I figured this would be a good look.  I do not do anything fancy for the pillow case.  Basically, I figure out how much fabric that I need and add a little extra for shrinkage and being off grain.  I purchased 2 1/4 yards of 42" wide cotton and I have less than 1/2" left.  This is one of the few times that my cutting is done with a rotary cutter.  I straighten the fabric with the first cut and then start measuring until I get to the desired length and then another rotary cut.  Don't forget to add seams and hems to the length.  In my case, the pillow is 54" long.  Basic construction was completed on the serger.  Then, I turned to a decorative stitch on the Bernette B77.  Here is a simple of the stitch:


I thought this stitch looked a bit like waves so I used it to hem the pillow case. Not that you can really tell.


Yeah, this funky stitch took about 20 minutes to complete.  It turned out okay for what I needed but it's a shame you can not see it.  Here is the completed case on the pillow:


My husband likes it and that is all that matters.  

My first completed project with the Bernette B77.  Maybe this will give me courage to really get to using it more.  I have buttonholes on projects that need to be finished.

Hope you are inspired to do some simple sewing for yourself.

Happy Stitching!