Showing posts with label Bernette. Show all posts

Wednesday, December 22, 2021

Foz Top, Round Two...

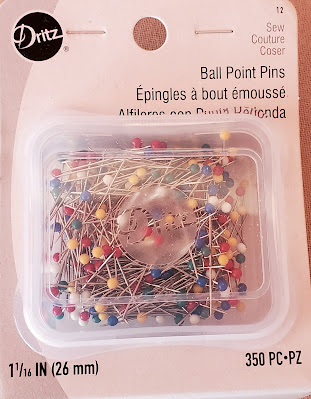
 Here is the second Foz Top.  My first Foz Top which was suppose to be a wearable muslin did not wash well.  I found out that the pins I was using was not a good match to the fabric and resulted in holes all around the neckline.  So sad but the buttons were reused.  Here is the finished top:


This top fits differently than the previous version - here.   The neckline is not too low in this version.  It also seems a little snugger.

Here is the Dritz ball point needles that I purchased:


I think that I purchased these at Amazon.  There is not anywhere locally that I can purchase something that is this specialized.  Now, let's talk a little bit about my Bernette B77.  Here are the setting from the machine for the seams and the hem:

1.  Select light weight knits (#5) on the Creative Consultant.  Then, selected straight stitch (#1) on project type.  Click the green check mark.

2.  Change the stitch length to 4.0.

This results in the stretch stitch #11 being selected.  There are also a list of recommendations that you can use or not use.  This is the foot that was used:


This is the zigzag foot for the dual foot.  Notice the little button on the side of the foot.  It is an interesting little detail that I have not seen on a machine accessory before.  It is used to level the foot when you have areas that are unlevel.  As far as I can tell, this is close to using a hump jumper.  I did have the dual feed engaged through out this project.  Here is a look at the hem:

For the buttons, I returned to the Creative Consultant and repeated Step 1 above.  At Step 2, I selected buttonhole (#4).  Again, you will get a list of recommendations.  This resulted in the machine selecting buttonhole #53, a stretch buttonhole, for the project.  Here is a drawing of this buttonhole:

I had never used this type of buttonhole before but decided to go it.  Here are the results:


Also, I set up a stitching mark so that I would be able to get a reasonably straight seam.  The markings for inches is at the back of the plate and very hard to see when sewing.  Here is my set up:


Overall, I am very happy with this project.  I think there will be another long sleeved version of this top.  There is not anything more enjoyable than a quit project with great results.  Who knows, maybe I will address the fitting a little bit or maybe not.  

Happy Sewing!


Monday, December 20, 2021

Classic Buttondown Shirt...

 It seems that I did not post the results of the Classic Shirt muslin before moving on to the first version.  I think the changes were fairly small.  I increased the bust dart and shaped it.  That alteration added length to the front.  Reduced the length of the shirt body and sleeves by 1 1/2 inches.  I had a beautiful shirting that has been hanging out in the stash for a while.  So, I pulled it out to use.  Here are the results:


I used my Bernette B77 to make this shirt.  This is not the first project that I have made using this machine but it the most complicated one to date.  The feet on this machine do not have good markings on them.  It is easy enough to do topstitching on an outside edge but it is not so easy to get a good topstitch on the inside.  I ended up using this foot:


This is the B77 embroidery foot.  The blue line points at what I used to do edge stitching.  It made a stitch about 1/16-inch from the edge.  Perfect.  The red points points at another spot and it is 1/4-inch from the edge.  Here is a close up of the stitching:


Here is a picture of the inside topstitching:


The B77 makes a beautiful buttonhole.  This is an example of buttonhole #51which is a standard buttonhole:


I used the Liesl & Co Classic Shirt pattern.  This pattern is very well drafted.  The instructions are well written.  I can see many of these shirts in the future.

Happy Stitching!

(Affiliate link included.  I receive a small commission should you purchase.)

Tuesday, July 13, 2021

First Month With The New Machine....

 Why are new sewing machines scary?  In my case, it has everything to do with the new technology.  You can refer to this post when I received the machine.  While I am waiting on the muslin to arrive, I am just playing around with the machine.  

The first thing you need to do is turn on the machine.  That is when you say "Oh, why did I do this?".  Yep even though I had read the manuals and thought I was prepared, when I actually turning the machine on made me it realize I did not know how to raise the pressure foot.  Fiddling around I figured out two ways to raise the pressure foot.  One being the presser foot up/down button on the front of the machine and the other being the knee lift of free hand system, which is amazing.  I discovered that if you lightly press the knee lift that the presser foot will hoover and if you push it all the way to the right the presser foot rises and the tensions are released. 

The second thing that I did was thread related.  Winding the bobbin was an adventure and required getting my computer out to read the manual.  After two attempts, I finally got a bobbin to wind correctly.  Right now, I thinking that a bobbin winder sounds pretty good.  My featherweight is easier to wind a bobbin.  Threading the machine was really not an issue. Inserting the bobbin did not appear to be an issue but I had tension issues from the moment I put in the new bobbin.  The bobbin thread was being pulled to the top.  I stopped at this point and visited the Bernette Facebook page to see if anyone else had had this issue and what the fix was.  You know it is a simple fix, right?  Take the bobbin out and insert it correctly.  Once I did that, the tension issues disappeared.  

Now, I am playing with the different menus.  I think I need to create little cards that will be cheat sheets showing the various menus and stitches. Maybe I will be able to incorporate that into the stitch bible.  That would be much better I think.  Here is a few pages of the stitch bible:


This will be the first page of the stitch bible.  It is the very basic stitches.  If you zoom in you can see the various stitches along with the adjustments.  It is also very easy to see which stitches require a heavier stabilizer than what I'm using.


This is the second page of the stitch bible.  It is dedicated to darning stitches, various types of buttonholes, eyelets, and the stitch for sewing on the button.  These stitches I did not really play with.  They are just straight programmed from the machine.  Some of the buttonholes look better than others.  I am not sure what the really decorative buttonholes would be used for but they sure are pretty.


This is the start of what I think are the stitches for quilting.  This page is more or less the various straight stitches, joining stitches, and applique stitches.  I will probably play around more with the applique stitches as that is something I do from time to time.


This page is also part of the quilting menu.  The stitches are getting more decorative.  It is rather surprising at how much some of these stitches change when you move away from the default settings. I can see doing decorative stitching on tops and such using some of these.

Well that is all I have accomplished toward my stitch bible in the past month.  I know it seems slow but my awake hours at home are very limited.  Occasionally, I will get a day to myself.  I am getting more comfortable with the machine and the oddities that go with it.  The machine has not earned a name yet and it might not.  More pages will show up as time allows.

I have completed a pillow case with the machine. Okay the serger did the seams and the machine did the hem and you know I had to play with the decorative stitches.  You can find the post here.  Pillow cases are simple to make.  Especially when you have been in a funk like I have.  Easy projects get you going again.  I am ready to go.  I have done several muslins but not really completed anything since February. 

I am ready to sew.

Happy Stitching!


Friday, July 9, 2021

Finally A Completed Project...

 It seems like forever since I actually finished a project.  That bag is February really put me off sewing for a while.  There is nothing like a simple project to get things rolling again and this project could not be simpler.  It is a pillow case for a body pillow.  Here is the fabric which I never admitted to getting:


I know this is crazy fabric but I just loved the colors.  The walls in my bedroom are in the shades of the softer bluish green.  The quilt on my bed is navy.  I figured this would be a good look.  I do not do anything fancy for the pillow case.  Basically, I figure out how much fabric that I need and add a little extra for shrinkage and being off grain.  I purchased 2 1/4 yards of 42" wide cotton and I have less than 1/2" left.  This is one of the few times that my cutting is done with a rotary cutter.  I straighten the fabric with the first cut and then start measuring until I get to the desired length and then another rotary cut.  Don't forget to add seams and hems to the length.  In my case, the pillow is 54" long.  Basic construction was completed on the serger.  Then, I turned to a decorative stitch on the Bernette B77.  Here is a simple of the stitch:


I thought this stitch looked a bit like waves so I used it to hem the pillow case. Not that you can really tell.


Yeah, this funky stitch took about 20 minutes to complete.  It turned out okay for what I needed but it's a shame you can not see it.  Here is the completed case on the pillow:


My husband likes it and that is all that matters.  

My first completed project with the Bernette B77.  Maybe this will give me courage to really get to using it more.  I have buttonholes on projects that need to be finished.

Hope you are inspired to do some simple sewing for yourself.

Happy Stitching!


Tuesday, June 15, 2021

Decision Made...New Machine Is Here

 After a great deal of dithering, I finally made a decision on a machine.  I purchased a Bernette B77.  Here is a picture:


This machine will primarily stay at my parents house since I spend so much time there.  Currently, my Singer Featherweight is staying there and yes, I have been using it to sew.  

I will periodically share things I learn about the B77.  My first thing will be to work through the mastery workbook.  I will also be creating a stitch bible.  I just need to order fabric and interfacing.  The mastery workbook and the stitch bible may go hand and hand.  I have read through both the workbook and the manual.  

There is going to be learning curve.  Technology has a way of throwing new stuff at you and it have been 14 years since I have even thought about another machine.  Different brands of machines display that technology in different ways.  With this machine, I am hoping for a great buttonhole.  I have not had a machine with a good buttonhole on it since I had my Necchi Logica.  

One of my little buddies decided to hang out with me while I unboxed the machine:


Here are the additional goodies:


The goodies from the goodie bag - bobbins, presser feet, needles, and tools.


The cover and table that came with the machine.  The cover is actually fairly substantial.  It is standing up by itself.


I also ordered the additional presser feet for the machine.  I will order some additional bobbins and maybe the straight stitch plate. I think that is everything that can be purchased for the machine.

Happy Stitching!