Saturday, June 19, 2010

I love getting new books!

Today, I received a copy of "Sewn Spaces" by Joel Dewberry. I have glanced through the book and checked out all the projects. I was surprised to see patterns in the book. It wasn't mentioned in the description.

Just like so many books over the last few years it starts out with the techniques section but what makes it a little bit different is, is it not just sewing. Oh, there is a very basic info on stitches from the sewing machine but also hand embroidery stitches, glass etching, how to cover a button, etc. You get the idea. Of course, all the techniques discussed are used in the projects.

This will be a "shop" copy for the office/store. I plan on making a few of the projects to decorate with - farmer's tote, bird sachet (used as a pincushion), memo board, hanger cozy, fabric roses, etc. I'm hoping that my son can help out with the projects a little bit. I'll try to remember to post pictures as I work on these projects. However, I have a lot of projects and not a lot of time to work on them. Guess, I'll see how it goes. I do have a sewing machine at the office now.

Happy Sewing!
Thursday, June 17, 2010

School is out....

Where has the week gone? I tell you it has just disappeared. I don't like that the days disappear so quickly. I wish that time would slow down just bit. Remember when you were a kid, how the days seemed so long?

Monday, I called about the business who's catalog showed the ruler that I've been looking for. It wasn't in stock. Yes, I was really bummed. This means that the broker ruler will remain in my sewing room to be used on the days that I want bias trim a particular width. I ended up ordering a June Tailor ruler. I hope that I like it.

Tuesday, I was gifted with a sewing machine in a cabinet. I accepted it because it was free. A quick look at it told me that it wasn't as young as they tried to tell me it was. They said that it was 8 to 10 years old but this is a fairly heavy metal machine. I had never heard of the brand - National - before and of course, there wasn't a manual available. This is a super stretch 100 series. I have taken the machine to the office/store.

Wednesday, I played with the machine gifted on Tuesday. It is in good working condition and runs like a champ. I was surprised as the neighbor who I received the machine from had never mentioned that she sewed. I also have located someone who has a copy of the manual and is going to email it to me. Yeah! better than no manual at all. There are two thread spindles on this machine and I would like to know how the 2nd one is used. Also, I need to find out what kind of needles it takes. The machine threads from side-to-side instead of front-to-back.

Thursday, first day of summer for the kids. YEAH! My son is going to be working with me at the office/store. He did pretty good today. He worked to 2 hours without any complaints. I was actually amazed that I was able to keep him busy that long but I'm giving him things that need to be double-checked in inventory before I place another order. I have also been working on creating pattern books and he's helping making copies of the front/back covers.

If anyone knows anything about the Super Stretch 100 series from National, I would love to hear from you.

Happy Stitching!

Saturday, June 12, 2010

On the hunt for a new ruler

I'm still looking for a new ruler. I never would have thought that it would be so difficult. However, I did find a ruler set that I that is similar to a set that I purchase more than 2o years that I thought others might find interesting also. I found it at Nancy's Notions and it's the Lutterloh Pattern Making Ruler Set. Absolutely perfect for redrawing curves on patterns or when making your own patterns.

By the way, I have finally located the same ruler that I broke. However, I have to purchase 3 rulers to get it. I will be calling on Monday to see if they are still in stock and if I can purchase from this company. There isn't any pricing showing in the pages I saw. My fingers are crossed that the item is still available and that it isn't too expensive. Really, I haven't found a ruler like it anywhere. Oh, they have the marking and the 45 degree angle but what about being able to cut the bias stripes to widths between 1 1/2" to 3" wide.

Happy Stitching!

Friday, June 11, 2010

I broke my ruler...

I'm so bummed. I broke my 6"x24" ruler yesterday. Just one corner but that is enough to make it hard to use. I guess that is what I get carrying it back and forth from work. Anyone have any suggestions for a good replacement? My old ruler was made by Dritz. I've been looking around and can not find a ruler with the same markings. Ok, now, I'm feeling really old. I've had this ruler for 20+ years and you would think that there would be some improvement since then. Help me out. I'm looking for a 6" x 24" ruler that is clear with 1/8" markings and has 45 degree bias. Anyone?

Tuesday, June 8, 2010

Preparing for the next project.

The next project on my list is a curtain for my deck. I have an outdoor fabric that is dark green with a white strip and I purchased an outdoor thread. Everything has been measured and I've calculated length and width of each panel. I've purchased a felting foot for my machine. What is slowing me down? I've never worked with the outdoor fabrics before. What if I mess it up? I do have a book - "Sewing for Outdoor Spaces" by Carol Zentgraf. I suppose I should sit down and read about anything that may be special about this fabric before I cut it. However, there is no information about making an outdoor curtain. I'm planning on using curtain grommets with roller shower clips. Hopefully, it will work out. I'm unsure of the spacing for the grommets. Any ideas on how often they should be spaced? Any suggestions would be appreciated.

Happy Sewing!

Sunday, June 6, 2010

Another project finished...

I must be on a roll. This is the 3rd project complete in the past month.

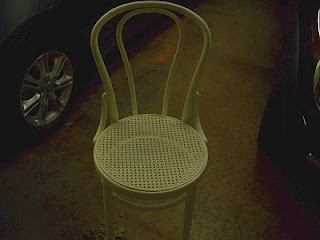
I decided to take an chair from the house to my office/shop but it needed to be changed a little bit. This chair had been sitting on my deck for the last couple years. So the finish on it wasn't in good condition. Here's a pic after it was sanded:


DH stepped in and painted the chair for me. Although the chair looks very white, it's not. It is an ivory color.

I made a pattern by measuring across the seat, dividing by 2 and adding 3/4". Then drew a big circle. This took 1/2 yard of 44" quilting cotton.

Here's the leftovers after cutting out the cushion cover. At this point, I'm hoping that square is big enough to create the ties and bias binding for the piping.

All squared up.

Selecting the spot to cut the 45 degree angle for the bias strips.


Moved the piece from the right to the left so that the straight edges can be sewn together. Notice that both outside edges are now at a 45 degree angle.

Stitched the 1/4" seam.

Pressed seam to the side.

Not shown is how I figured the width of the bias binding which is going to be 1 3/4" wide. How I calculate is by taking the piping and a tape measure. Wrap the tape measure around the piping making sure that you seam allowance (1/2") is visible under the piping. Turn the tape measure over and see where the end of the tape measure end is sitting. That is the width of the bias binding.

Here I took a colored pencil and drew my lines.

Here is where I pinned the seam together. This is where you have to be accurate. Make sure the lines meet on the seam line (1/4").

Here's the seam sewn and you can see that my lines match from one side of the seam to the other.

The cut out bias strips.

Piping sewn to top. Here's I'm getting ready to attach the two ends to make the continuous loop of piping.

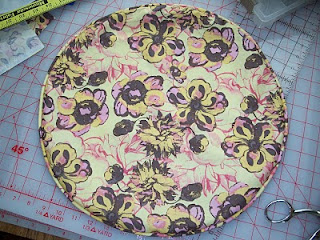
Piping is finished, zipper installed, and everything is sewn together. Not to bad for a quick cushion cover. Can you see what I forgot? It's in the picture below.

Cushion cover has the pillow form in it. Yes, it's a pillow form and not a cushion. I went to JoAnn's to get a round cushion but they only had a pillow form which makes it a little puffier than what I wanted. Cushion needs to be played with a little bit to get it to fill out the cover a little better.

Following are examples of how it looks:


This is far from perfect but I'm happy with it. It is the very first time that I have made a round pillow cover. The very first time that I have put a zipper in the round. The zipper didn't turn out so great but it is definitely a learning experience. I love the fabric and actually think that it would have made a great skirt or even a shirt.

The pillow form was suppose to be the same size as the chair - 16". It's not really true. Maybe if you measured from seam to seam on the pillow but it definitely doesn't sit as 16". When making a cover for a pillow or a cushion, make it the same size as what is being covered as in don't add seam allowances unless you need a little for the height of the cushion/pillow form. That way it will fill out the cover.

Oh, I forgot to tell you that I had just enough bias strips for the piping and the ties. The ties are a tad short but will tie.

Happy Stitching!