Monday, March 27, 2017

Fitting Dresses...Fitting Armhole and Sleeve, Part 11

Continuing with the "Fitting Dresses" booklet from the U.S. Department of Agriculture.

Fitting Armhole and Sleeve

Sleeve Puffs up at top. The sleeve-cap fullness may not be evenly distributed.  Or, the sleeve cap may be too wide or too high, especially if the shoulder or underarm seams have been taken in.

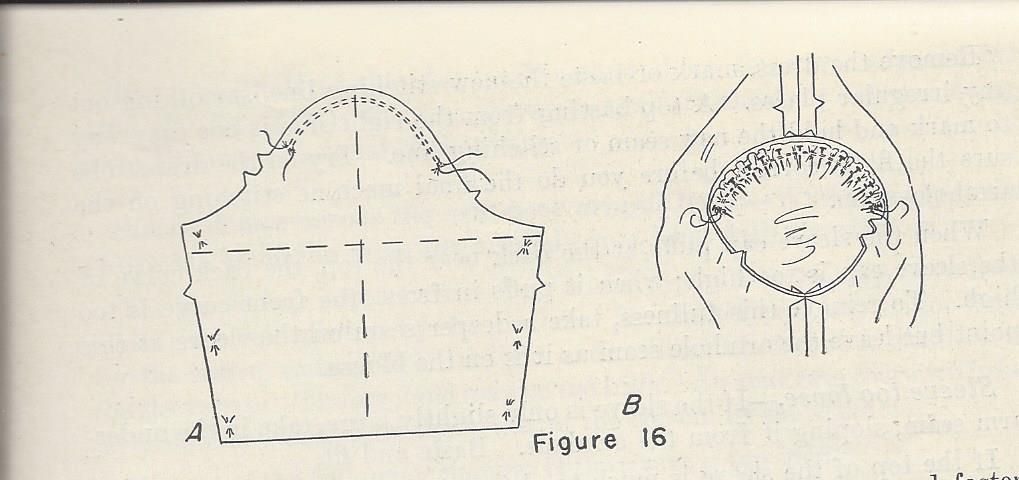
If the puffiness can not be removed by adjusting the fullness, the sleeve cap is probably too wide.  It will need refitting.  To do this easily, have someone help you.  Put on the dress, insert the shoulder pads if used, and fasten the dress properly.  Direct your helper to work from the right side as follows:  Clip the basting threads a few at a time at points of puffiness.  Turn under the sleeve at these points to take out extra material in the sleeve cap.  Put pins at right angles to the seam line.  (See Figure 17).  Always keep the crosswise and lengthwise grain of the goods in the sleeve cap straight.  Adjust the other sleeve if necessary.


Remove the dress, mark or baste the new stitching line, smoothing out any irregular places.  A top basting from the right side is one easy way to mark and hold the new seam line.   Try on the dress to be sure the fit is correct before you do the final machine stitching on the armhole seam.

When the sleeve cap puffs at the back near the top, the back curve of the sleeve cap is too high; when it puffs in the front, the front curve is too high.  To remove the fullness, take a deeper seam on the sleeve at this point but leave the armhole seam as it is on the blouse.

Sleeve too loose.  If the sleeve is only slightly large, take in the underarm seam, sloping it from the armhole.  Baste and fit.

If the top of the sleeve is  much too large, it may need recutting.  Rip the sleeve out, and make it smaller by taking lengthwise folds on either side of the top of the sleeve.  Cut a pattern like the altered sleeve, reshaping the cap.  Smooth out dress sleeve.  Then recut the entire sleeve, using the altered pattern.  If the sleeve is too large all the way down, the out the fullness the full length of the sleeve.

Diagonal wrinkles from the top of sleeve to underarm.  The lower (or edge of the sleeve sticks out  (See Figure 18 A).  The crosswise grain of the goods is pulled up in the top of the sleeve cap.  This happens when a woman has very square shoulders or large muscles on the top of her arm or if the sleeve cap is too short.

If the sleeve cap is only a little short and there is a generous seam allowance, rip out upper half of armhole seam and drop sleeve until the crosswise grain of goods is straight at armhole level (Figure 18, B).

If this cannot be done, rip the armhole seam except for an inch or two at the top.  Put on the dress.  Then, while standing before a mirror (or pretty still, with the help of someone else), lift the under parts of the sleeve up in the armhole until the crosswise grain of the goods lies straight across the upper arm.  Pin in place to hold until the dress is removed.  Ease sleeve into lower half of armhole, pin, and baste in place (later reference).

The lower half of the sleeve will extend above the lower edge of the armhole (Figure 18, C).  Try on the dress again to check fit before cutting away the extra material on the sleeve.

Sleeve draws across the arm near armpit level.  Wrinkles across the sleeve cap extend in from the armhole on a level with the chest.

The sleeve cap is too narrow or a wider armhole seam may have been taken than was allowed by the pattern.  The upper arm may be too large for the sleeve, causing it to be too tight and to draw up, forming wrinkles in the sleeve cap.  The armhole may be too high.  In that case there will also be crosswise wrinkles on the blouse at the bottom of the armhole.

Use one of the following changes if the sleeve is too small:

1.  If the seams are wide enough, let out the sleeve and waist seams on each side of the armhole.

2.  If the sleeve is long enough, raise it  and recut the top, adding extra width at each side of the sleeve cap.  Refit the sleeve in the armhole.  Mark a new bottom line.  It may be necessary to face the lower edge of the sleeve.

3.  Release the underarm seam of the sleeve until it feels comfortable.  Ease in the extra fullness around the top or, on a large arm, ease in a little fullness in the sleeve at the underarm side.

4.  If the underarm sleeve seam is too narrow to be let out, set a gusset in the underarm seam of the waist at the armpit line and also set a similar piece in the sleeve (Figure 19).

5.  If the sleeve armhole is too high, trim out the underarm of both the blouse and the sleeve.  Be very careful not to cut the armhole too low and leave a good seam allowance.


(to be continued)

Monday, March 20, 2017

Fitting Dresses...Fitting Armhole and Sleeve, Part 10

Continuing with the "Fitting Dresses" booklet from the U.S. Department of Agriculture.

Fitting Armhole and Sleeve

Well-shaped armhole.  When a dress is worn, the seam of a good armhole forms a smooth curve up and over the top of the shoulder bone and makes a straight line, back and front, down to the muscles joining the arm to the body.  From there, it curves again under the arm, fitting as closely as is comfortable.  If the armhole is not shaped correctly, the sleeve may pull and bind at the seams, and the neck line may be drawn away from the sides of the neck.  In addition, the front and back of the blouse may draw or wrinkle at the front or back armhole line.

Well-fitting sleeves.  If the sleeves are not properly set into the armhole and carefully fitted, the entire dress is spoiled.  So give special attention to this part of fitting dresses and blouses (figure 15).  Properly fitted, the sleeve appears to be smoothly set into the armhole rather than the armhole into the sleeve.  The armhole does not draw or pull the blouse.


Figure 15 shows a well-fitting sleeve.  The sleeve hangs straight down from the high point of the shoulder when the arm hangs naturally at the side.  Lengthwise yarns run straight down from the top of the shoulder to elbow,  Crosswise yarns of the sleeve cap are parallel to the floor at armpit level.  The 
inside seam is in line with the thumb.

A long sleeve should come well down over the wristbone when the arm hangs at the side.  A good test for both length and roominess in a long sleeve is to bend the arm until the fingertips touch the ears.  The sleeve should not draw or pull when the arms are in this position.

Putting in the sleeve.  The fit of the sleeve often depends upon how it is pinned and basted in the armhole.  First see that the armhole line is good.  See that all seams entering the armhole are finished and pressed.  Make sure that the sleeves are cut as mates and marked.  Run two gathering threads over the top of the sleeve between the notches -- one, the seam's depth from the cut edge, the other about 1/4 inch out from this and in the seam allowance (figure 16, A).

Work from the inside of the dress with the sleeve right side out and the blouse wrong side out.  Pin the right sleeve into the right armhole, matching notches, and the highest point of the sleeve with the shoulder seam.  Also match the lowest seam of the sleeve with the lowest part of the armhole.  With the sleeve toward you, place pins in the seam line at right angles to the edge, first at the top and bottom, and then at the side notches (figure 16, B).


Smooth the lower half of the sleeve cap into the armhole with little or no fullness.  Hold in place with a few pins.  A very plump arm may need more ease than a slim one.  A plain sleeve top will have about 2 inches of extra fullness to be eased into the loop.  Draw up and fasten gathering threads.  Avoid drawing them too tight.  Keep the sleeve fairly smooth over the top to the point  where both the armhole and the sleeve begin to curve down.  From there, ease the extra fullness into the armhole evenly with no pleats or folds on the stitching line.  Pin to hold fulness in place.  If the shoulder seam slants decidely to the back, the top of the sleeve will have to be placed slightly to the front of it.

Pin and baste on the seam line, working from the sleeve side.  Use small bastings, particularly where the fullness is eased.  Pin and baste the other sleeve into the armhole.  Remove the pins and try on the blouse before stitching with the machine.

(to be continued)

Monday, March 13, 2017

Fitting Dresses...Fitting the Bust and Back, Part 9

Continuing with the "Fitting Dresses" booklet from the U.S. Department of Agriculture.

Fitting the Bust and Back (continued)

Blouse sags below bust in front or below shoulder blades in the back.  There are figures with a flat chest, flat or pendulous bust, or round shoulders.  These figures are often shorter in front between shoulder and waistline than than the pattern, which may fit well otherwise.  As a result, the dress sags below the bust.  On the other hand there are the overly erect figures or those with sway-backs.  These figures do not take up the usual pattern length in the back between the shoulder blades and waistline.  The dress therefore sags below the shoulder blades.

If the dress sags below the bust, do not push extra blouse length below the waistline.  Instead, rip the shoulder seams, raise the front shoulder seams until the grain is straight across the bust.  The neck side of the front shoulder seams is taken up to fit.  Taper to normal width near armhole.

When the blouse sags below the shoulder blades, rip the shoulder seams and lift the back of the blouse until the grain of the goods is straight across the upper back.  Repin the shoulder seams, taking up more of the back shoulder seam at the neck end and tapering the seams toward the armholes.  Keep the direction of the shoulder correct.

Mark a correct armhole line in the back.  Avoid fitting the lower back of the blouse too close.  Raise the waistline of the dress by slightly trimming out the center back of the top of the skirt.

Underarm seam of blouse sags below armpit.  Diagonal folds appear below the armhole; the sleeve cap may draw crosswise when the arm is raised.  The armhole or perhaps the blouse is too large, permitting the crosswise grain of the goods to drop at the underarm seams.  Or, the figure may have very slanting shoulders and more padding may be needed at the shoulders.

If padding has been used, try changing the size and place.  When this does not remove the trouble, take deeper underarm seams, beginning at the armhole and tapering them as far down toward the waist as needed.  If necessary, take deeper shoulder seams near the armhole (figure 12).  This fitting brings the crosswise grain of the goods into the right position at the bust line.  After this fitting cut the lower half of the armhole into a good curve; do not leave a pointed armhole.


Back of blouse draws at underarm seam just below armpit.  (figure 13 A)  The pattern may have been too small around at the level of the bust or the figure may have a large muscle or roll of flesh across the back the armpit level.

Rip the underarm seams, and let them out until the width across the back feels easy (figure 13 B).  Leave the front allowance unchanged.  To fit the back smoothly, it may be necessary to change the shoulder seams.  Rip them and lift the back edge near the armhole, tapering it to normal near the neck line.

Diagonal wrinkles fall from shoulder blade to underarm.  The blouse pulls up in center back and pokes out at the bottom.  The underarm seam sags.  The front neck line may be pulled back (figure 14 A). 

This fitting difficulty occurs most frequently on a figure with round shoulders, prominent shoulder blades, or a roll of flesh at the back of the neck.  More length than the pattern allows is usually needed between the shoulder blades and the neck.  In such cases the pattern should be altered before the dress is cut.

However, if this has not been done, the fit of the dress can sometimes be improved by ripping and releasing the back shoulder seams until the grain of the goods is straight across the upper back.  Pin and refit the shoulder seams, letting it out near the neck line and tapering it in a the armhole.  This may make it necessary to rip the underarm seams and refit the lower back.  Take in the back of the underarm seams, trimming out the armhole if the back extends up into it, as shown in figure 14 B.


If becoming to the figure, a shoulder yoke, cut to fit properly, may be the only feasible solution to this problem.


Happy Sewing!

Wednesday, March 8, 2017

Stripes...

I was out browsing this past weekend and found these men's tops:


What do you think of the way these stripes have been done?  I'm not sure that I like the purposeful re-aligning of the stripe.  It seems jarring to the eye.  The use of the narrow stripe as the band was a really good choice.  That stripe is carefully matched.  Another thing I noticed about these tops was the fabric.  It was so thin that you could see through two layers.  I know for a fact that my son would not wear this just due to the thinness of the fabric.

Stripes are on trend for spring.  I'm just not sure I'm up for the totally mismatched look. If you decide to try this, don't forget to add you seam allowances at the center front and center back.

Are we going to see plaids done the exact same way in the future?

Thoughts?

Happy Stitching!


Monday, March 6, 2017

Fitting Dresses...Fitting the Bust and Back, Part 8

Continuing with the "Fitting Dresses" booklet from the U.S. Department of Agriculture.

Fitting the Bust and Back

The comfort of the waist of a dress depends much on the fit over the bust and across the back.  Avoid extremes of fit -- too tight is neither comfortable or attractive; too loose looks untidy.  If the wearer has a large bust but small abdomen and hips, fit the dress a little loosely below the bust so the blouse does not outline the bust too closely.  Be sure there is enough fullness under the bust in front and enough room for the shoulder blades in the back.  The center front and back may be smooth and free from gathers unless the style calls for a different effect.  Taking in or releasing darts at the waistline may improve the fit.

Cloth draws across bust.  If the dress draws across the bust perhaps the grain of the goods has been dropped or raised on either side of the bust.  Or the waist may have been cut too narrow at the bust line.  These troubles usually appear when the figure is overly erect or has a large bust.

If the crosswise grain of the goods is straight but still the waist looks drawn, let out the front (or both back and front) underarm seams until the waist fits easily.  When the seam allowance is too small to let out underarm seams, set in a straight matched or bias piece of cloth at the underarm seam for extra width.  Let out the underarm seams in the sleeves accordingly or if necessary, set in a piece here, too.

If the grain of the goods is not right, rip the underarm seams and try changing the size and position of the underarm darts and the location of the fullness at the waist.  If the dress has no underarm dart, and the waist length permits, it may help to place one or more darts in the front edge of the underarm seam in line with the bust.

Diagonal wrinkles from bust line to underarm waistline.  The lower front 
edge of the blouse swings out and up.  The underarm seam swings to the front (figure 10 A).  Then often occurs when the figure is overly erect or has a prominent bust.  Such figures require more length than the pattern allowed between the shoulder and bust or between bust and waistline, depending upon the height of the bust.

If the waist of the dress does not reach the waistline in the center front, the pattern must be altered and a new front cut.  When there is sufficient length, rip open the underarm and shoulder seams.  Let down the center front of the waist by tapering the seam allowance on the front shoulder to 1/4 inch at the neck edge.  Then lift the lower waist front with one or more darts at the underarm.  (figure 10 B)  In addition, more fullness in gathers or darts may be needed under the bust.  Let out the front side of the underarm seam.  This gives width across the bust and allows additional fullness under the bust.  The seam allowance on the back is left unchanged.


An undesirable fold or fullness at armhole in front near chest line.  A figure with a prominent shoulder bone and full bust often has a hollow place near the armhole.  The dress may puff out there (figure 11 A).  This is more prominent if the armhole seam is too high at the armpit.  (see future reference)

If the armhole seam allowance is wide enough at the front shoulder line, remove the puff with a front shoulder dart.  Pin, baste, and fit again.  If the seam allowance is skimpy, rip shoulder and underarm seams.  Raise the shoulder in the front more at the armhole, tapering the seam to nothing at the neck (figure 11 B).  

The puff can also be removed by the armhole dart in the lower half of the front armhole, extending down as far as possible toward the bust.  This gives a close-fitting armhole.  Or if the puff is small, sometimes it can be "shrunk" out before setting in the sleeve.  Or it can be held in place with a row of small backstitches next to the seam line.


Thoughts?  Have you done any of these types of alterations instinctively while making a dress?

Happy Sewing!