Monday, November 30, 2015

Holiday Table Runner....

I have been working on a table runner.  I hinted at the project here with a picture of the fabrics.  This is a tumbler project and it's the first that I can remember doing a tumbler pattern.  Here's a picture of the pattern:


This is Tumbler Table Runner by Cottage Creek Quilts.  Here's my version of the pieced top:


I used the Fat Cats Triangle Ruler to cut the tumbler per the directions.  It certainly was very easy using the ruler.  Here's what the ruler looks like:


I did make a pattern template (included in the pattern) with card stock but decided that it would be easier to use the ruler.  Cutting the tumbler with the ruler was quick and easy.  This was my first time using a specialty ruler.  I hope that I can find other uses for it.  Here's the finished table runner:


For the quilting, I used a quilting design from my machine that looked like a large stippling design and a 40wt embroidery thread for the quilting.  I stitched several samples but the actual quilting on the table runner looked much tighter than the samples.  Here's a glance at a sample:


Here's a close up of the quilting on the table runner:


I used the technique for the mitered corners from the Double Fold Binding Technique on youtube by Nancy Zieman.  Joining of the binding is from an older quilting book. I finish attaching the binding by hand.

Yes, I'm doing a happy dance that I actually finished it before the holidays.

Happy Stitching!


Wednesday, November 25, 2015

Ready For The Mystery To Begin....

I was beginning to doubt my ability to get every thing ready before the Allietare Mystery Quilt started on Friday.  Somehow, all the fabric has been purchased, washed, and pressed.  Here's the proof:


I even was able to locate the necessary rulers which are on back order in many locations:


Now, I'm just hoping that I can keep up with the weekly events.  I will be out of town during some of this but hopefully I will be able to download the information and play catch-up when I return.

What do you think of my color selections?

Have you ever participated in a mystery quilt before?  More importantly, did you finish the mystery quilt?  I would love to hear about your experiences.

Happy Stitching!

Tuesday, November 24, 2015

Seam or Edge Finishes....

My sewing buddy and I have been been having issues with our sergers.  So, this month we decided to revisit seam finishes.  Let me tell you that I do feel extremely spoiled having had a serger for the last 25 years (wow! does that seem like a long time).  I haven't had the need for the majority of seam finishes that I used in my younger sewing days.  Here's the finishes that we practiced with:

1.  Flat Fell - We kinda followed the basic directions for the Flat Fell Foot in the Husqvarna Accessories Book.  The Husqvarna flat fell foot is 9mm foot and really intended for home dec.  My sewing buddy had a generic 6mm flat fell foot.  The 9mm foot stitched a beautiful seam without any additional manipulating of the machine.  The generic 6mm foot stitched a beautiful seam but there was a fair amount of manipulating the machine due to the fact that the foot didn't line up with the needle.  There are many tutorials available on the internet to create the flat fell seam with and without a foot.

2.  French Seam - This is perhaps my favorite seam finish.  All the raw edges are enclosed and it looks beautiful.  Typically, this is used in heirloom sewing today. Children's clothing can benefit from this particular treatment. For a 5/8" seam, I would typically put wrong sides together stitch 1/4" seam, press seam open, then press flat with the right sides together, stitch a 3/8", and call it done,  But this can be manipulated a little more.  If you wanted a flat fell seam look, make sure that the finally seam stitching will be on the outside and then, you can top stitch this into place.  Very easy.  Please realize that the 5/8" seam is an example.  The seam can be produced with smaller seams.

3.  Bound or Hong Kong Finish - This is where things got a little funny.  We both thought that we had binding feet to play with.  I did finally find the 1/2" Husqvarna binding foot but I really thought that I had one in each available size. Using the foot wasn't very successful but using a clover bias binding maker and manually binding the seam edge was okay.  I really think that the having the binding foot would have created a better edge.  I did finally realize that all of my binding feet were attachments for my antique machines.

4.   Edging Foot J - This foot is all about using overcasting stitches.  On my machine, the right zigzag works very well with this.  This is the stitch that I used to finish the remainder of the fabric edges this past weekend.

When we were done playing with these items, we turned our attention to the narrow hemmers.  Are you successful with these feet?  Amazingly, I couldn't find a hemmer that would work on my machine.  My sewing buddy had one hemmer and had been unable to get it to work.  So, I showed her how I used a hemmer.  I always press the whole edge and then press the first couple of inches a second so I can get it started in the machine.  Then, under the foot it goes and I anchor it with the needle and slide the edge into the machine.  I also hold the the item being hemmed up just so the pressed edge is on the inside edge of the foot and the edge that needs to be turned under is hitting the inside of the hemmer.  It stitched perfectly.  My friend was able to repeat the process.

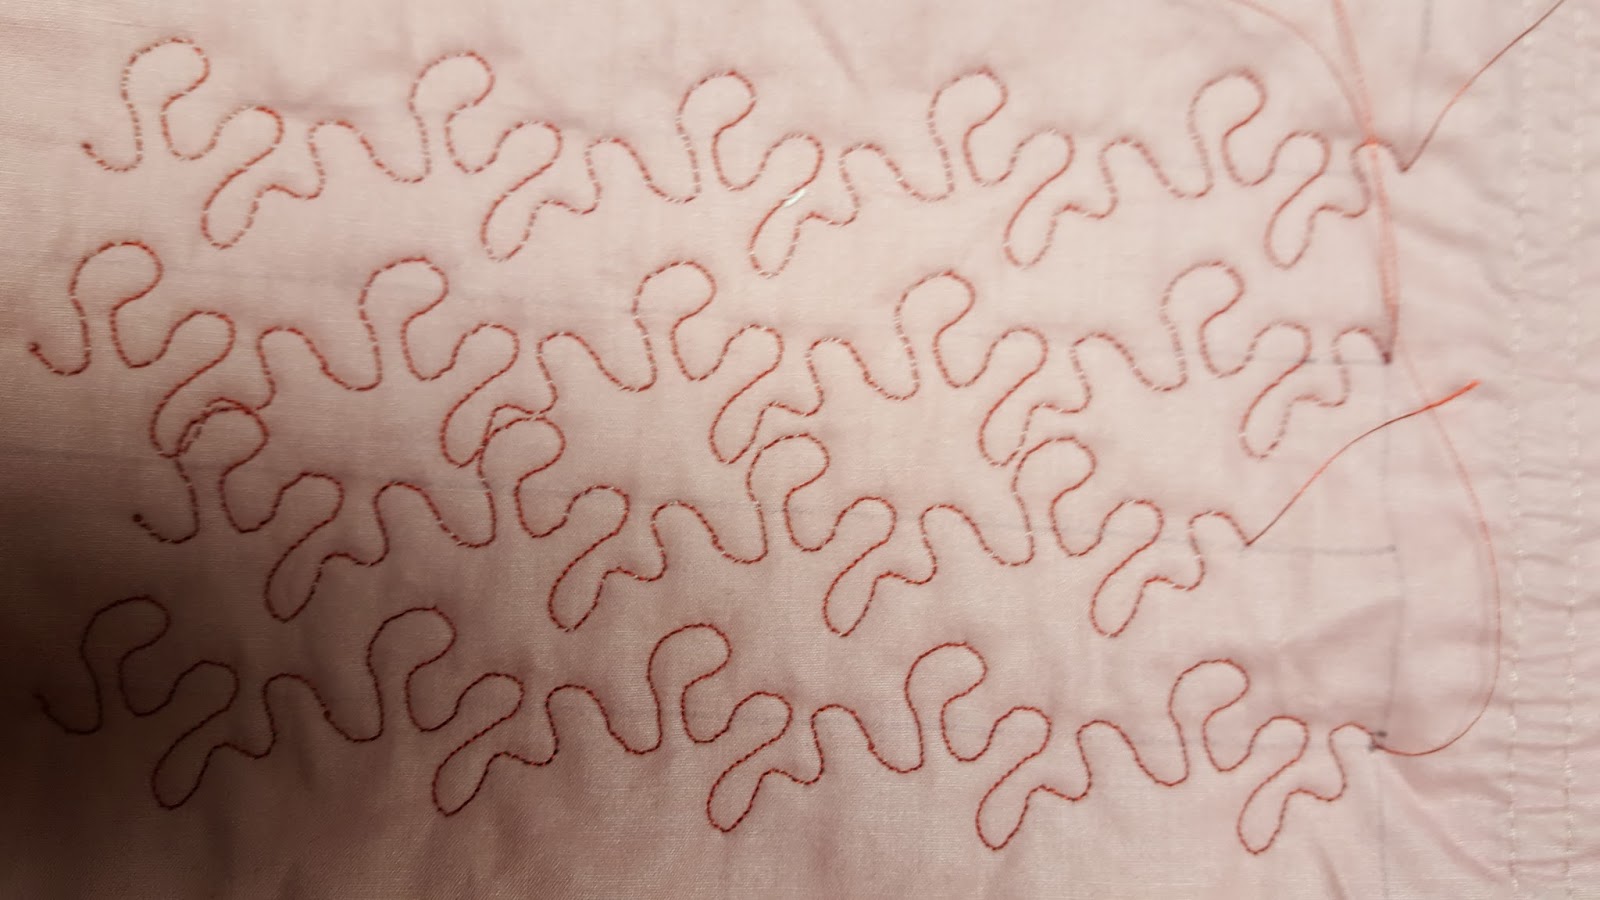
The final item that we played with was the Husqvarna instructions for The Hand-look Quilt Stitch.  Here's my sample:


Typically with this type of stitching you would use a clear or smoke thread so that the bobbin thread would pop but my sewing buddy was using my spool of nylon and the thread holder, so I just used the thread that was on my machine and changed the bobbin to a dark thread.  You do need a programmable machine to use these techniques.  The first row on the left is the #3 stitch on the instructions. We were both amazed by this stitch.  I'm not sure about it looking like hand quilting but it peeked my interest because it reminds me very much of the stitching on a hand picked zipper.  The second row from the left is the #1 stitch in the instructions.  I really liked the way this looks and it is amazing when using the clear nylon thread.  The third row from the left is the #2 stitch on the instructions.  The final row is a pre-programmed stitch on my machine.  I just selected it and stitched.  It looks okay.  Definitely not my favorite.

Overall, we had a very successful stitching day. Practicing techniques and learning new techniques.

Do you have any seam finishes that you like use outside of the serger?  I would love to hear about them.

Happy Stitching!

Monday, November 23, 2015

Serger: Two Thread Narrow Overlock...

Have you tried the 2-thread narrow overlock stitch?  This weekend I had a lot of 1/4 yard cuts of fabric that needed to be washed.  The stitch that I would normal use is a 3 or 4-thread overlock or whatever stitch was currently set up but I decided to branch out and try something new.  So, I looked up the information on the 2-thread narrow overlock.  Here's what it looks like:


This sample has already been washed and the 2-thread narrow overlock did the job of stopping the fraying very well.  I'm so happy that I decided to step outside my comfort zone and try something "new" to me with my serger.  It's really a shame that I don't try more of the stitches on my machine.

Unfortunately, the experience of stitching so much fabric brought my machine to it's knees.  I only got the edges of about half the fabric stitched when I started having issues with what seemed like the motor seizing.  I played with it a little and then decided that maybe I should just take it in for service.   My machine is is 12 or 13 years old.  I'm truly hoping that it's not the motor.  They always tell you it is dirty when you take it in for service.  Yep, this is going to be very dirty.  I did try cleaning it and giving it a little oil but that did little to help with whatever the problem is.  SIGH!   I guess Tuesday I will make the hour or so drive to take it in for service.  Now, where is that GPS?

Oh, my sewing machine happily finished stitching the edges of the remaining fabric. It just took another 2-3 hours to finish it up.

Happy Stitching!

Wednesday, November 11, 2015

Love This Skirt....

I absolutely love this skirt:


This is the Side Wrap Pleat Skirt.  It is nice and long.  It is a perfect boot skirt.  The issue is that there is one skirt left in stock as I write this and it is a little size 6.  I'm looking for a pattern that can be adapted to look similar or even ideas on how to add this pleated wrap to a skirt.

Let me know your ideas or a pattern.  There are just too many pattern companies to keep up with all of them.

Happy Stitching!

Monday, November 9, 2015

Fast Fashion...

This weekend I was reading Clair Kennedy's article "Getting a Perspective on Real Clothing Prices".  It is an interesting read especially if you follow the links.  I wish I could remember the name of the book that I read 2 or 3 years ago directed at Fast Fashion and the cost of it.

What is your take on Fast Fashion?

I would rather have fewer clothes than purchase some of the really cheap clothing that I've been seeing the last 2 to 4 years.  I don't really care for the ultra thin fabrics.  Yes, I fully realize that this is one of the ways that manufacturers use to reduce costs.  It doesn't mean that I need to indulge it.  Although I can see a use for it, but it would as an additional layer under something else.  The other thing that I have seen in the last couple of years is items that barely make it though 3 or 4 washings and I only wash the majority of my clothing on gentle cycle, partial dry in the dryer, and the hang or rack dry.  I purchased a coat a couple of years ago that barely make it through the winter season.  The lining gave out after being worn about 10 or 15 times.  It is discouraging to spend $200-$300 on an item and that happen.  By the way, I actually expect this type of item to last 5 to 10 years not weeks/months.  I still have the coat but have been unable to locate good coat lining to replace the lining.

So, do you look at cost per wearing when you purchase items?  Sometimes, things can last a long time.  The cheap tops that are $10 each sometimes only survive to 3 or 4 washings.  That makes the top cost $2.50 to $3.33 per wearing.  A $30 dollar top might last a full season and result in 25 to 30 wearings with the top costing $1 to $1.2.  If you're lucky, it might last longer.

When you make something?  Do you expect it to last through the season or longer?  Does the time it takes to create something make it worth more to us?

Hope I've given you something to thing about?

Happy Stitching!


Friday, November 6, 2015

The Mystery Deepens....

After my work related stuff yesterday, I tried to pick out fabrics for the mystery quilt.  Here's what I've been so far:


Here are the shades of black.  I picked 11 different blacks but one of them doesn't look so black. Against the other shades of black, it looks dark brown.  It's the third one from the bottom.  What do you think?  Here's what I was thinking about replacing it with:


What do you think?  Should I replace the brownish-black with the above fabric?


This is the grey I've chosen.  The picture is a little dark.  It is the top fabric in the first picture of all the blacks where it is completely wash out.  Too light, too dark.  I can't seem to get a good balance today.


Here are the chosen reds.  Again, I'm not so sure about some of them.  The third one from the bottom seems a little too orange and the third one from the top seems a little too pink.  I was thinking about changing one of them out for this fabric:


This has my color card on it.  The little teddy bears will only add a little interest to the quilt.  There may be some other swaps too.  I'm not sure that I'm liking all my other reds.


Here's a couple of golds.  I had much more than this pulled but decided that they were too light.


Here's a few of creams that I pulled.  I haven't decided yet if I'm going to use them all. Some of them seem a little dark.  I discovered that I did pull as many color cards as I thought that I had for the creams.  This may require another run to the home improvement store.   I need a lot as in almost 6 yards of various creamy colors.  

Looks like I will be visiting my favorite local quilt shop for some creams, golds, and reds.  I must not forget my color cards when I go.  

The only other thing I need to get done for the quilt is to order the rulers.  I could probably get by without the rulers but sometimes a tool can really make something easier.  These rulers seem to be pretty basic as hopefully, they will be used for more than just this quilt. 

Anyone else going to do the mystery quilt at Quiltville?

Happy Stitching!

Wednesday, November 4, 2015

It's A Mystery...

Yes, I have decided to join in a winter mystery quilt over at Quiltville.  This is the first time for something like this.  I hoping that it turns out well and I don't feel over whelmed.  Surely, I can get this done over the next 3 or 4 months.  I went to Lowe's today and picked up paint cards to get an idea of the fabric colors.  The creams are a huge variety of colors.  I will be checking the stash to see if there is anything appropriate in there.  I'm sure that I will find something.

So, have you ever done a mystery quilt?  Were you happy with the results? I guess a better question is "Did you finish it?".

I started a new project today outside of the mystery quilt. I shared the fabric selection a few weeks ago. I'm hoping to get it cut out tonight.

Happy Stitching!

Tuesday, November 3, 2015

Winter Sewing--6pac style....

The fall 6pac never really happened.  I did start it but got side tracked with other business.  Luckily for me the items that I started fall right into the Winter 6pac.  The winter 6pac is:

1. 2 layering pieces - one neural, one color,
2. 2 tops - one neutral, one color, and
3. 2 bottoms - both neutrals.

Sounds easy, doesn't it?  I have the two bottoms started.  So, I might as well get them finished.

We'll see how the sewing goes.  There is just over 7 weeks till Christmas.  That's means any gifts that I want to ship will need to be completed in about 4 weeks.  EEK!  Time sure seems short.  How is your sewing going?

Happy Stitching!

Monday, November 2, 2015

Table Runner Finished....

Back in April and May, I was working on sewing curves for a table runner using 1/4" Curve Master Presser Foot.  Unfortunately, very little sewing occurred over the summer.  I did get the backing ready which would have been okay had I been hand quilting the table runner but I ended using this project on my sewing buddy's new quilting frame.  This meant that I had to add fabric around the outside edge.  It worked out okay.  My table runner will not be double-sided as was originally intended.  So, here's the finished project:


I think it turned out pretty good.  This is the second time that I have done free motion quilting (FMQ).  I can't say that I really getting better at FMQ but I can say that this could be very addictive.  I didn't enjoy the FMQ so much on the Behemoth but that could be because I didn't have a big surface to work with which makes it hard to move the quilted item around.  My first attempt at FMQ was when we did the Trapunto project in January.  You can read about that here and the finished project is here.  My friend's quilting frame made this really pretty easy.  I think with practice it could be a lot of fun.  We were using a frame that she had built with a Singer model 15 for the stitching.

I also tried another new to me technique.  I machine stitched the binding.  This involved using this foot:


This is a left edge topstitching foot.  I collect many feet but don't always know what to do with them after getting them.  This was a perfect application.  Here's the table runner on my table:


My living room is a little on the dark side but you can kinda see the table that the table runner is on.  Looks like I have a runner for next spring/summer.  Now, I need to work on additional runners for other seasons.

Happy Stitching!